JVC胜利HD-Z61RF7液晶平板电视使用手册
 "JVC胜利HD-Z61RF7液晶平板电视使用手册-0")
 "JVC胜利HD-Z61RF7液晶平板电视使用手册-1")
 "JVC胜利HD-Z61RF7液晶平板电视使用手册-2")
 "JVC胜利HD-Z61RF7液晶平板电视使用手册-3")
 "JVC胜利HD-Z61RF7液晶平板电视使用手册-4")
 "JVC胜利HD-Z61RF7液晶平板电视使用手册-5")
 "JVC胜利HD-Z61RF7液晶平板电视使用手册-6")
 "JVC胜利HD-Z61RF7液晶平板电视使用手册-7")
 "JVC胜利HD-Z61RF7液晶平板电视使用手册-8")
 "JVC胜利HD-Z61RF7液晶平板电视使用手册-9")
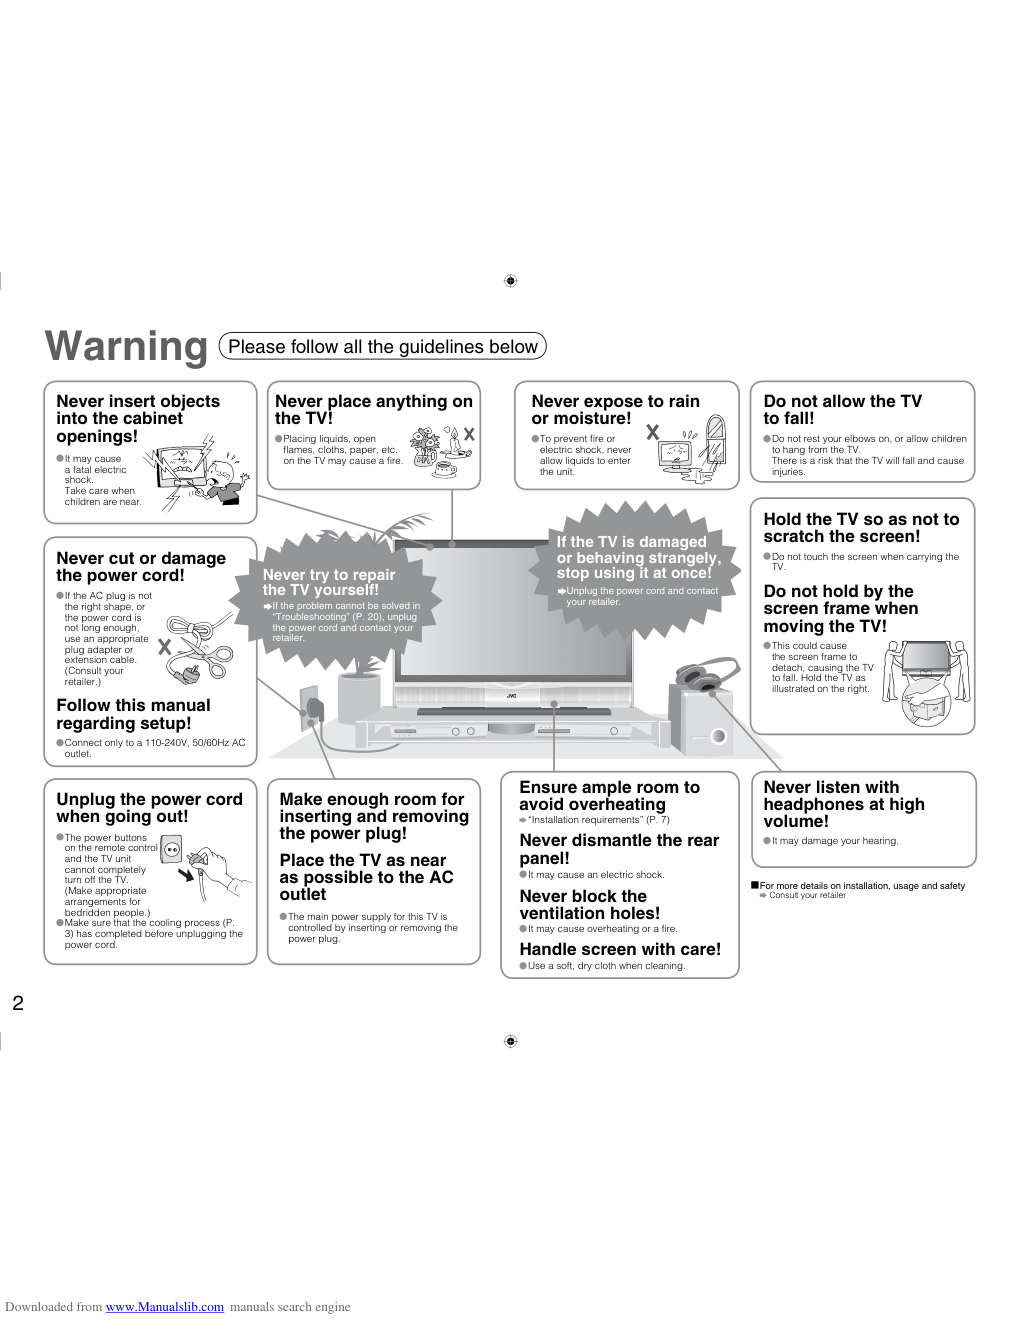
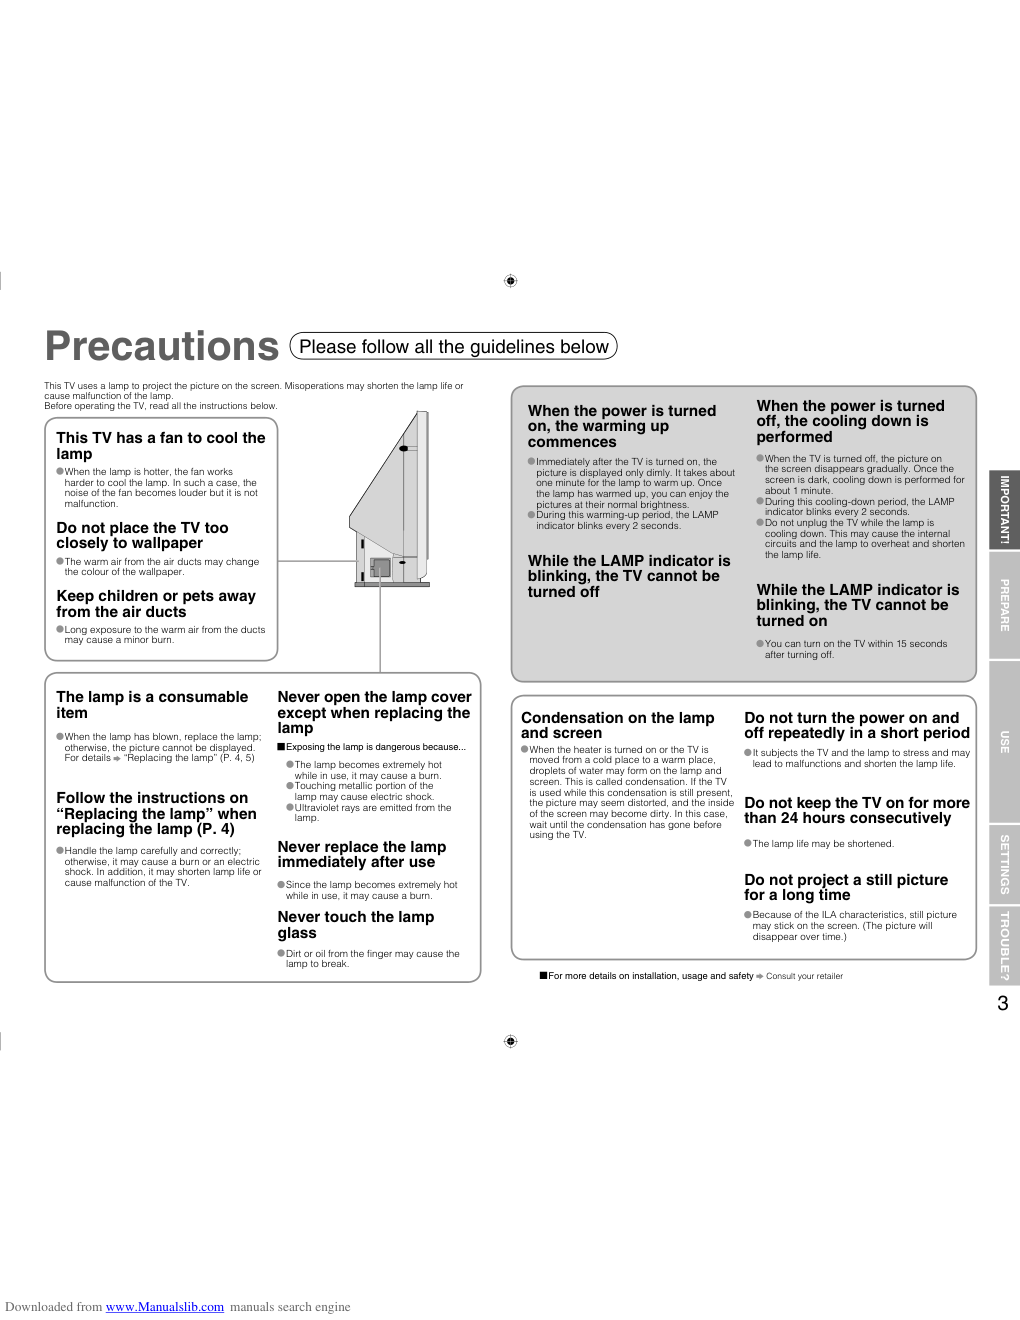
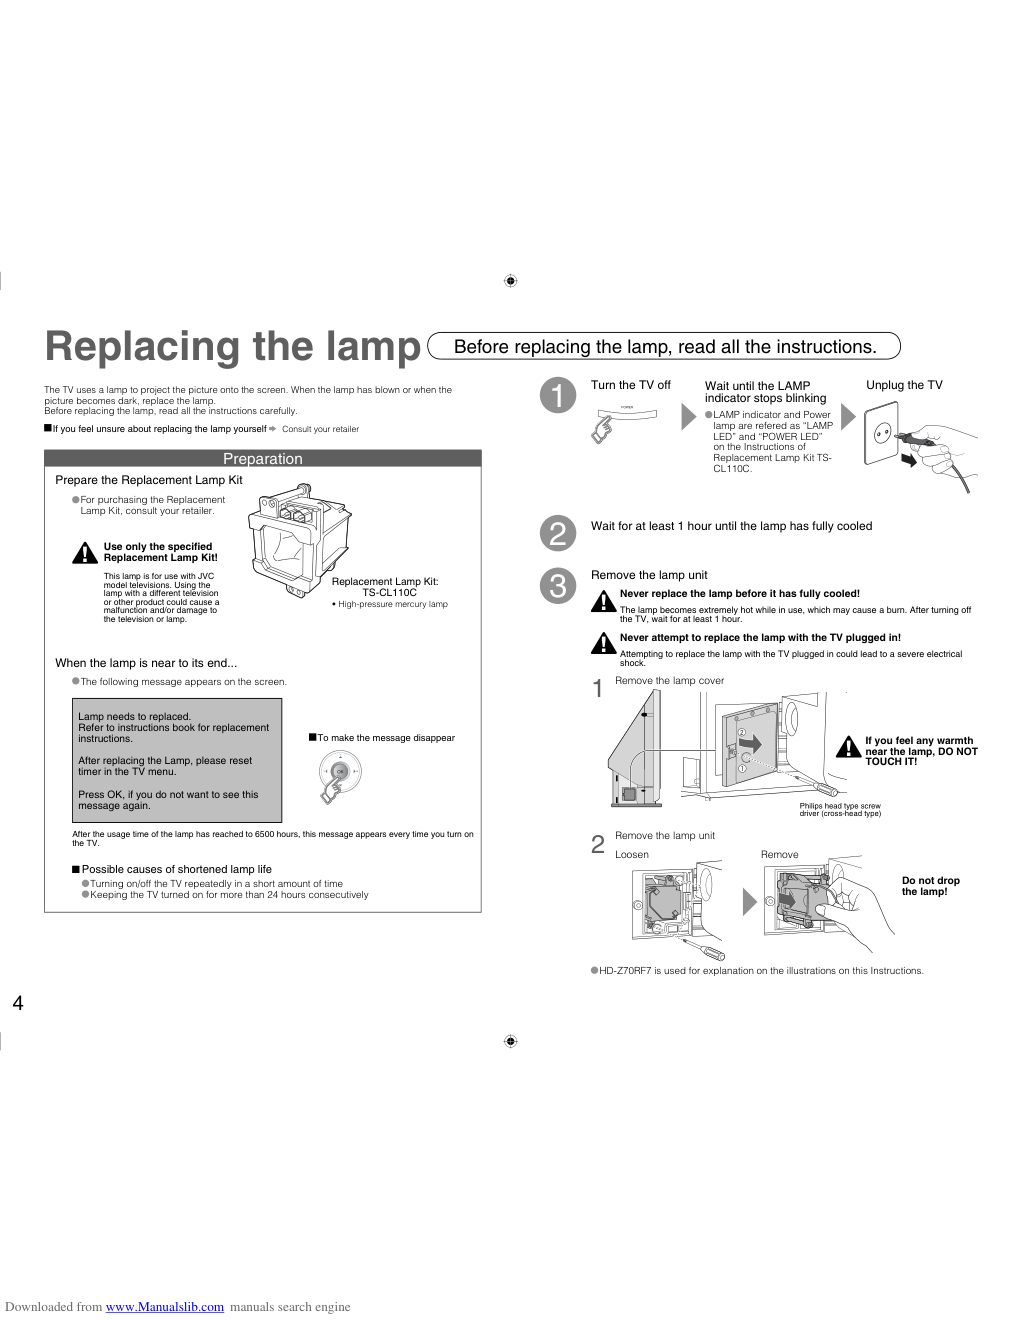
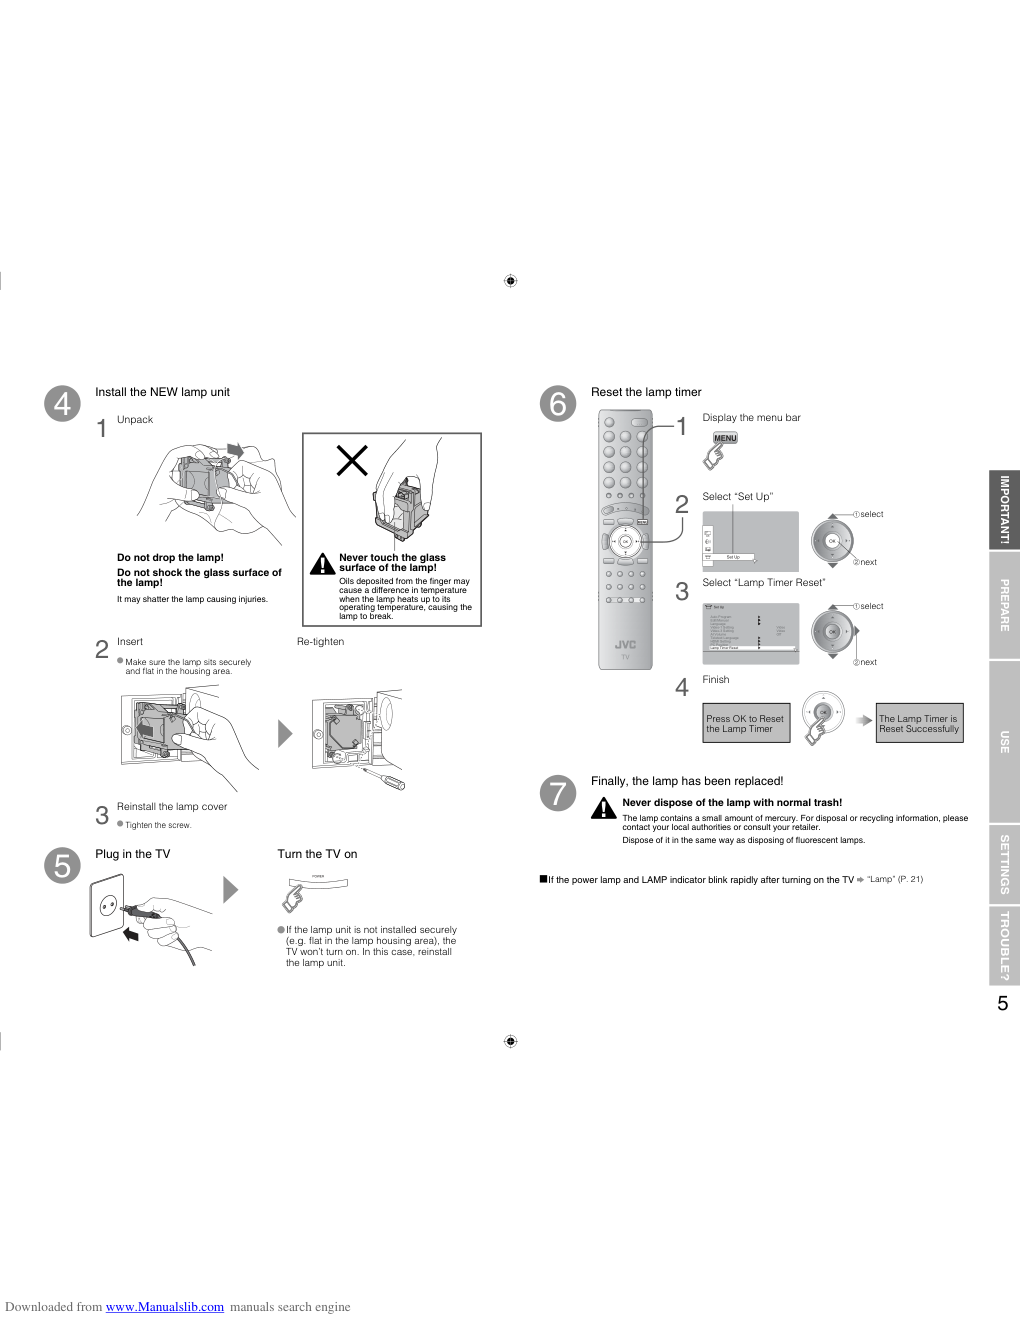
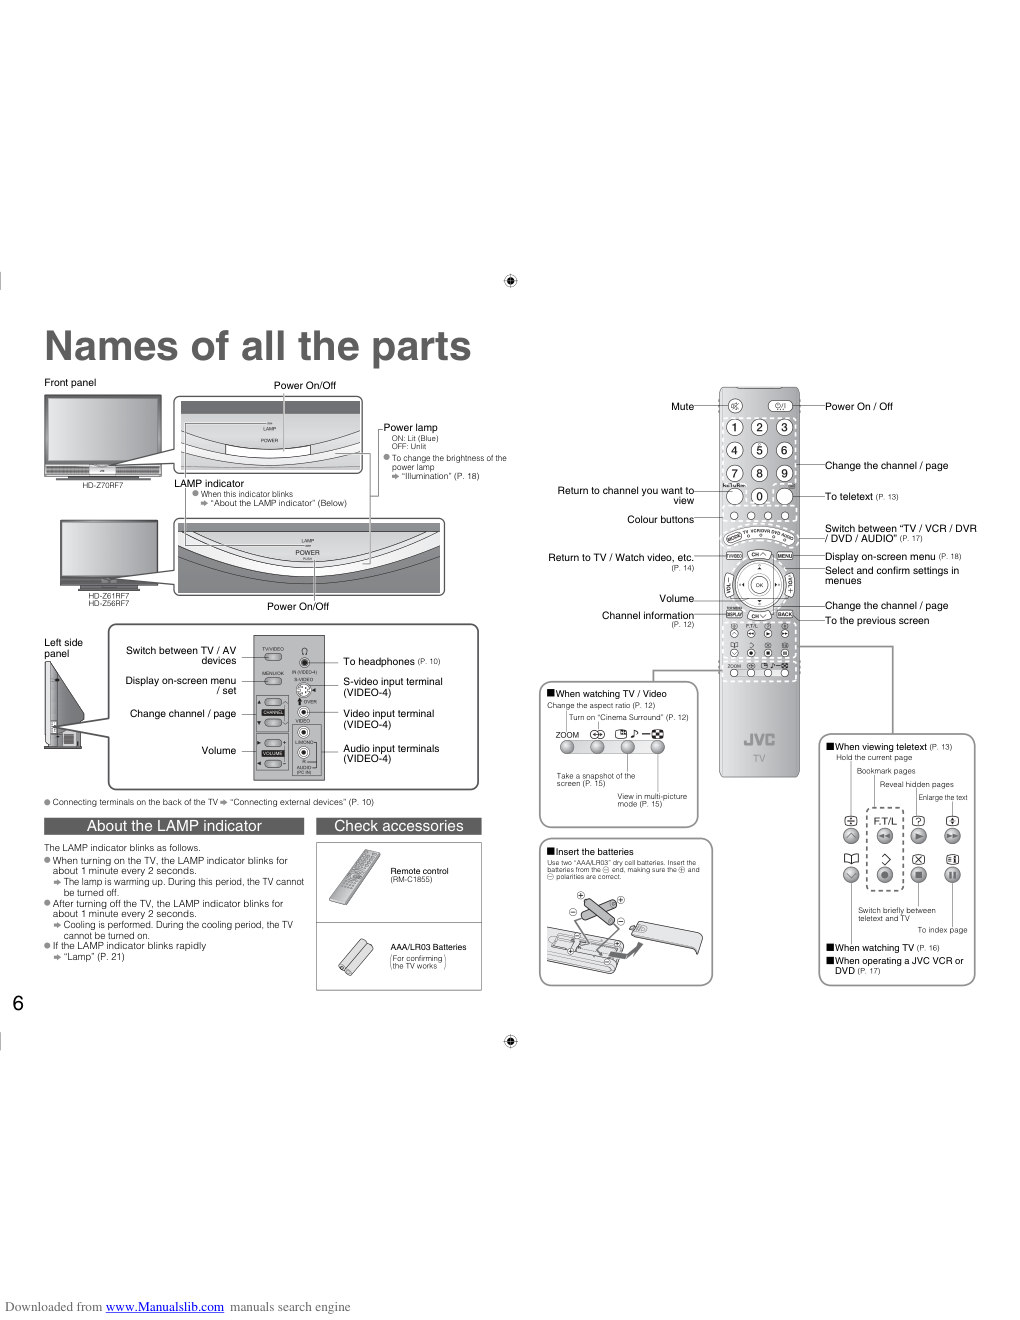
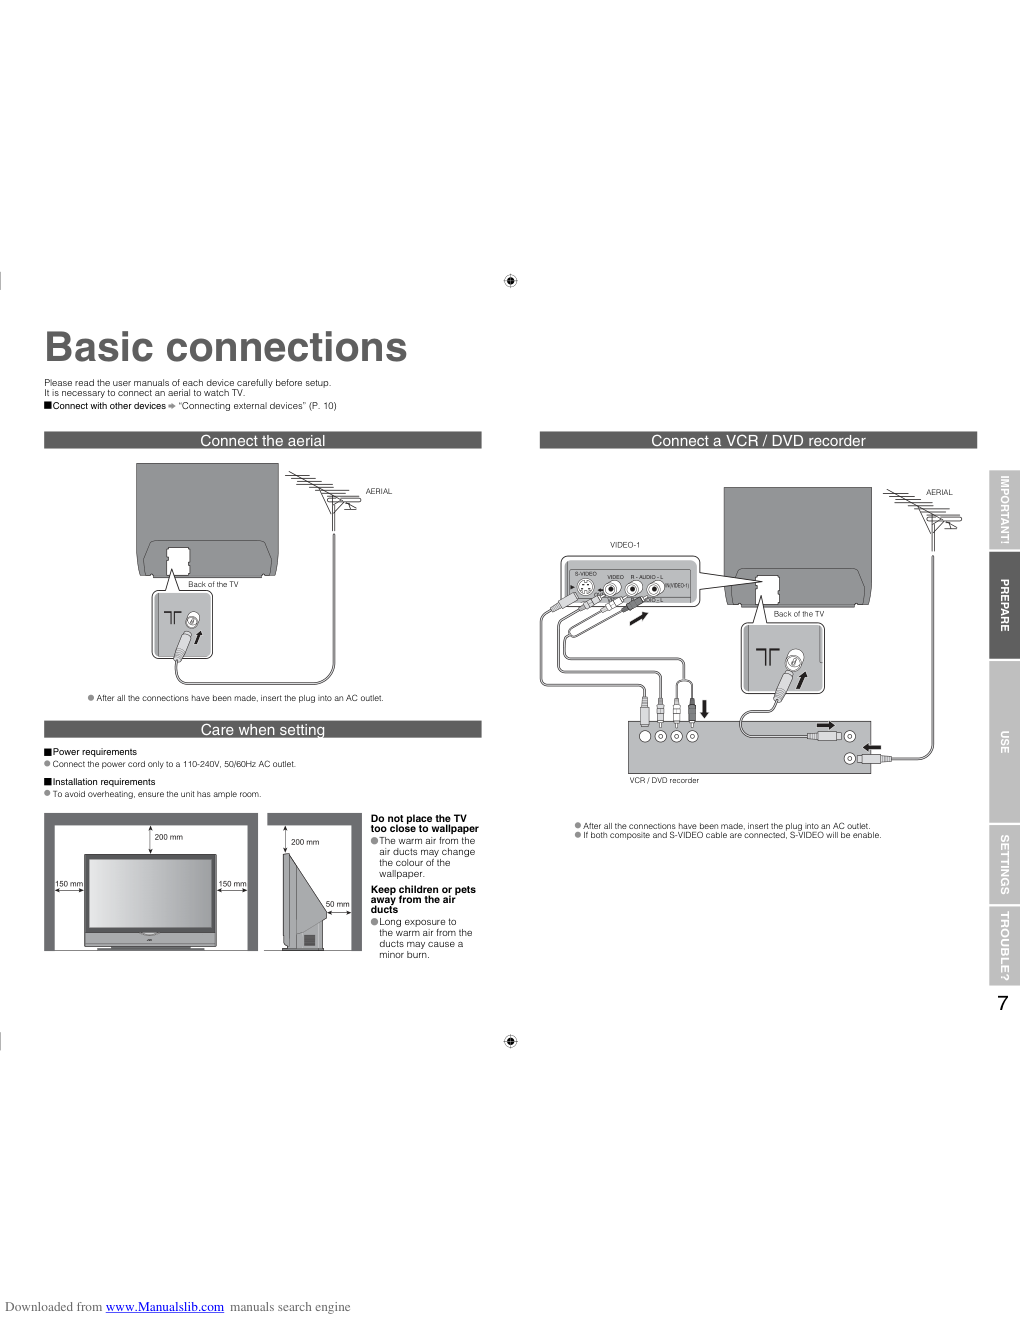
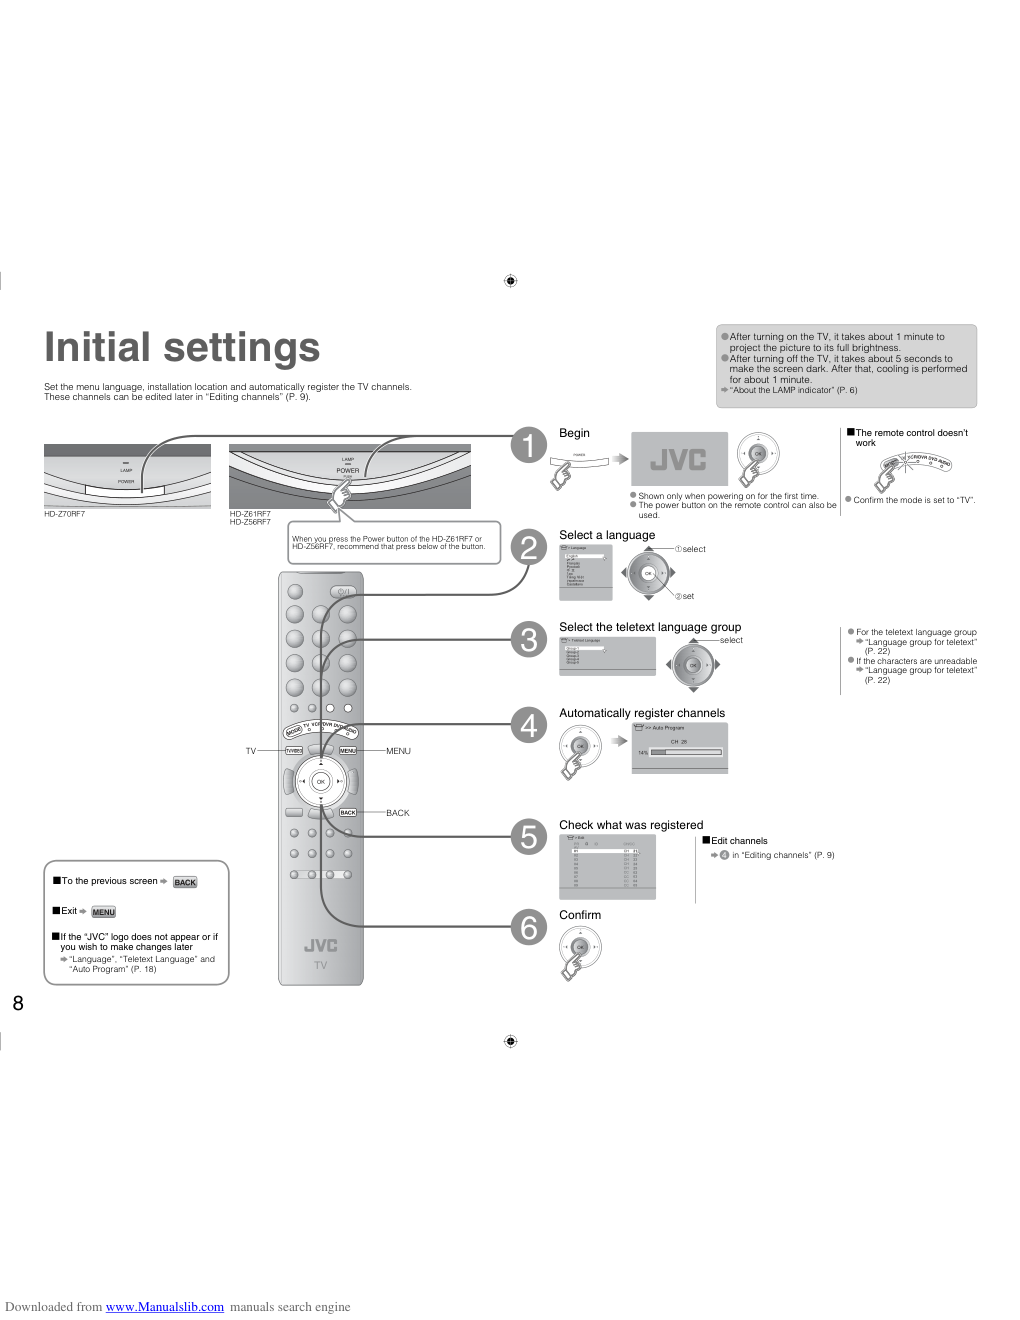
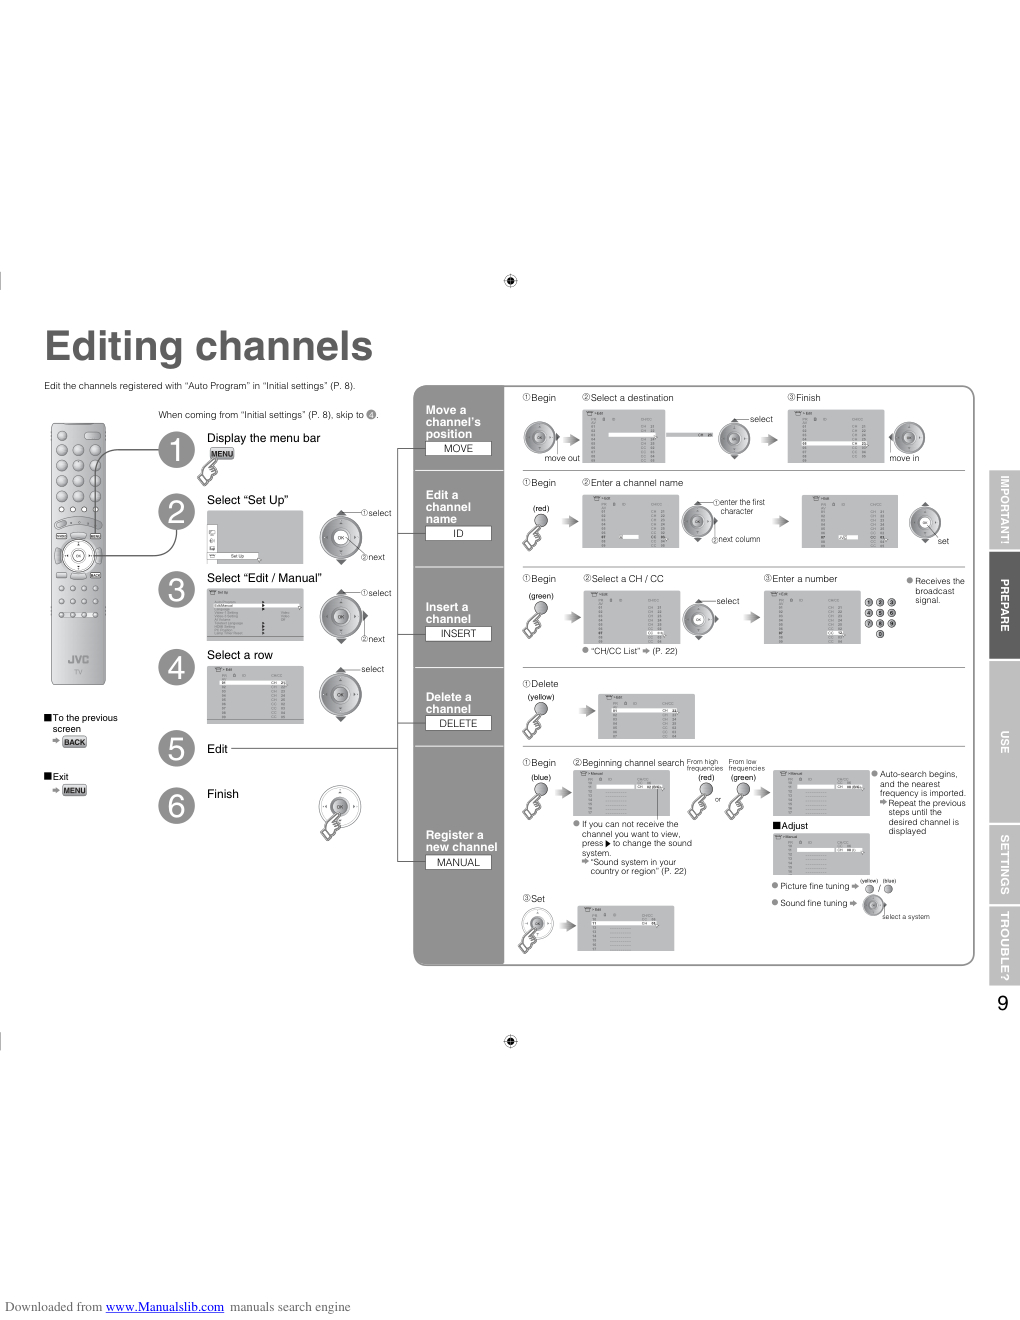
HD-ILA TV HD-Z70RF7 HD-Z61RF7 HD-Z56RF7 INSTRUCTIONS LCT2132-001A HD-Z70RF7 Downloaded from www.Manualslib.com manuals search engine 1 IMPORTANT! PREPARE USE SETTINGS TROUBLE? Expanding the world of beautiful images Enjoy rich multi-media with JVC VHF/UHF Digital camera Video camera Game console Audio components VCR DVD player DVD recorder Personal Computer Contents First things fi rst! · Registering channels Warning Precautions Replacing the lamp 2 3 4 Getting started Names of all the parts Basic connections Initial settings Editing channels 6 7 8 9 · TV / Teletext / Video / etc. Let’s try it out Enjoying your new TV! 11 Watching TV Viewing teletext Watching videos / DVDs · Register your favourite channels · View and search in multi-picture mode · Sleep timer / Channel Guard Try the advanced features Useful functions 15 · Reduce noise / Watch a more natural picture · Set the aspect ratio, etc. Just the way you like it Customising your TV Advanced picture adjustment 18 19 When you have trouble Troubleshooting Technical information CH/CC List Specifi cations 20 22 22 23 12 13 14 Connecting external devices 10 Operate JVC recorders and other devices 17 Downloaded from www.Manualslib.com manuals search engine 2 Never cut or damage the power cord! Follow this manual regarding setup! Unplug the power cord when going out! Never place anything on the TV! Never dismantle the rear panel! Never try to repair the TV yourself! If the TV is damaged or behaving strangely, stop using it at once! Unplug the power cord and contact your retailer. Please follow all the guidelines below Warning For more details on installation, usage and safety Consult your retailer Connect only to a 110-240V, 50/60Hz AC outlet. The power buttons on the remote control and the TV unit cannot completely turn off the TV. (Make appropriate arrangements for bedridden people.) Make sure that the cooling process (P. 3) has completed before unplugging the power cord. Placing liquids, open fl ames, cloths, paper, etc. on the TV may cause a fi re. It may cause an electric shock. Never block the ventilation holes! It may cause overheating or a fi re. If the problem cannot be solved in “Troubleshooting” (P. 20), unplug the power cord and contact your retailer. Handle screen with care! Use a soft, dry cloth when cleaning. Never expose to rain or moisture! To prevent fi re or electric shock, never allow liquids to enter the unit. If the AC plug is not the right shape, or the power cord is not long enough, use an appropriate plug adapter or extension cable. (Consult your retailer.) Hold the TV so as not to scratch the screen! Do not touch the screen when carrying the TV. Do not hold by the screen frame when moving the TV! This could cause the screen frame to detach, causing the TV to fall. Hold the TV as illustrated on the right. Do not allow the TV to fall! Do not rest your elbows on, or allow children to hang from the TV. There is a risk that the TV will fall and cause injuries. Never listen with headphones at high volume! It may damage your hearing. Never insert objects into the cabinet openings! It may cause a fatal electric shock. Take care when children are near. Make enough room for inserting and removing the power plug! Place the TV as near as possible to the AC outlet The main power supply for this TV is controlled by inserting or removing the power plug. Ensure ample room to avoid overheating “Installation requirements” (P. 7) Downloaded from www.Manualslib.com manuals search engine 3 IMPORTANT! PREPARE USE SETTINGS TROUBLE? Please follow all the guidelines below Precautions For more details on installation, usage and safety Consult your retailer Do not turn the power on and off repeatedly in a short period It subjects the TV and the lamp to stress and may lead to malfunctions and shorten the lamp life. The lamp is a consumable item When the lamp has blown, replace the lamp; otherwise, the picture cannot be displayed. For details “Replacing the lamp” (P. 4, 5) Never replace the lamp immediately after use Since the lamp becomes extremely hot while in use, it may cause a burn. Never touch the lamp glass Dirt or oil from the fi nger may cause the lamp to break. Do not keep the TV on for more than 24 hours consecutively The lamp life may be shortened. When the power is turned on, the warming up commences Immediately after the TV is turned on, the picture is displayed only dimly. It takes about one minute for the lamp to warm up. Once the lamp has warmed up, you can enjoy the pictures at their normal brightness. During this warming-up period, the LAMP indicator blinks every 2 seconds. While the LAMP indicator is blinking, the TV cannot be turned off Do not project a still picture for a long time Because of the ILA characteristics, still picture may stick on the screen. (The picture will disappear over time.) When the power is turned off, the cooling down is performed When the TV is turned off, the picture on the screen disappears gradually. Once the screen is dark, cooling down is performed for about 1 minute. During this cooling-down period, the LAMP indicator blinks every 2 seconds. Do not unplug the TV while the lamp is cooling down. This may cause the internal circuits and the lamp to overheat and shorten the lamp life. While the LAMP indicator is blinking, the TV cannot be turned on You can turn on the TV within 15 seconds after turning off. Condensation on the lamp and screen When the heater is turned on or the TV is moved from a cold place to a warm place, droplets of water may form on the lamp and screen. This is called condensation. If the TV is used while this condensation is still present, the picture may seem distorted, and the inside of the screen may become dirty. In this case, wait until the condensation has gone before using the TV. This TV uses a lamp to project the picture on the screen. Misoperations may shorten the lamp life or cause malfunction of the lamp. Before operating the TV, read all the instructions below. This TV has a fan to cool the lamp When the lamp is hotter, the fan works harder to cool the lamp. In such a case, the noise of the fan becomes louder but it is not malfunction. Never open the lamp cover except when replacing the lamp Exposing the lamp is dangerous because... The lamp becomes extremely hot while in use, it may cause a burn. Touching metallic portion of the lamp may cause electric shock. Ultraviolet rays are emitted from the lamp. Follow the instructions on “Replacing the lamp” when replacing the lamp (P. 4) Handle the lamp carefully and correctly; otherwise, it may cause a burn or an electric shock. In addition, it may shorten lamp life or cause malfunction of the TV. Keep children or pets away from the air ducts Long exposure to the warm air from the ducts may cause a minor burn. Do not place the TV too closely to wallpaper The warm air from the air ducts may change the colour of the wallpaper. Downloaded from www.Manualslib.com manuals search engine 4 Preparation Before replacing the lamp, read all the instructions. Replacing the lamp Replacement Lamp Kit: TS-CL110C • High-pressure mercury lamp Possible causes of shortened lamp life Turning on/off the TV repeatedly in a short amount of time Keeping the TV turned on for more than 24 hours consecutively Use only the specifi ed Replacement Lamp Kit! This lamp is for use with JVC model televisions. Using the lamp with a different television or other product could cause a malfunction and/or damage to the television or lamp. If you feel unsure about replacing the lamp yourself Consult your retailer Lamp needs to replaced. Refer to instructions book for replacement instructions. After replacing the Lamp, please reset timer in the TV menu. Press OK, if you do not want to see this message again. To make the message disappear Turn the TV off Wait until the LAMP indicator stops blinking LAMP indicator and Power lamp are refered as “LAMP LED” and “POWER LED” on the Instructions of Replacement Lamp Kit TS- CL110C. 1 Unplug the TV 2 Wait for at least 1 hour until the lamp has fully cooled For purchasing the Replacement Lamp Kit, consult your retailer. 3 The TV uses a lamp to project the picture onto the screen. When the lamp has blown or when the picture becomes dark, replace the lamp. Before replacing the lamp, read all the instructions carefully. Prepare the Replacement Lamp Kit When the lamp is near to its end... The following message appears on the screen. After the usage time of the lamp has reached to 6500 hours, this message appears every time you turn on the TV. Remove the lamp cover Remove the lamp unit 2 Remove the lamp unit Philips head type screw driver (cross-head type) 1 Do not drop the lamp! If you feel any warmth near the lamp, DO NOT TOUCH IT! Never attempt to replace the lamp with the TV plugged in! Attempting to replace the lamp with the TV plugged in could lead to a severe electrical shock. Never replace the lamp before it has fully cooled! The lamp becomes extremely hot while in use, which may cause a burn. After turning off the TV, wait for at least 1 hour. Loosen Remove ! ! ! ! HD-Z70RF7 is used for explanation on the illustrations on this Instructions. Downloaded from www.Manualslib.com manuals search engine 5 Set Up Auto Program Video-3 Setting AI Volume HDMI Setting PC Position Video Off Video Teletext Language Edit/Manual Video-1 Setting Language Lamp Timer Reset Set Up IMPORTANT! PREPARE USE SETTINGS TROUBLE? Select “Set Up” Display the menu bar Select “Lamp Timer Reset” Finish select next select next 5 6 Install the NEW lamp unit 7 Reinstall the lamp cover The Lamp Timer is Reset Successfully Press OK to Reset the Lamp Timer Tighten the screw. 4 1 2 3 4 Finally, the lamp has been replaced! 1 3 Turn the TV on Plug in the TV Reset the lamp timer If the lamp unit is not installed securely (e.g. fl at in the lamp housing area), the TV won’t turn on. In this case, reinstall the lamp unit. Make sure the lamp sits securely and fl at in the housing area. Never dispose of the lamp with normal trash! The lamp contains a small amount of mercury. For disposal or recycling information, please contact your local authorities or consult your retailer. Dispose of it in the same way as disposing of fl uorescent lamps. If the power lamp and LAMP indicator blink rapidly after turning on the TV “Lamp” (P. 21) Insert Re-tighten Unpack It may shatter the lamp causing injuries. Do not drop the lamp! Do not shock the glass surface of the lamp! Oils deposited from the fi nger may cause a difference in temperature when the lamp heats up to its operating temperature, causing the lamp to break. Never touch the glass surface of the lamp! ! 2 ! Downloaded from www.Manualslib.com manuals search engine 6 Check accessories About the LAMP indicator Change channel / page Volume Names of all the parts Remote control (RM-C1855) AAA/LR03 Batteries For confi rming the TV works When watching TV (P. 16) When operating a JVC VCR or DVD (P. 17) Change the aspect ratio (P. 12) Turn on “Cinema Surround” (P. 12) Take a snapshot of the screen (P. 15) View in multi-picture mode (P. 15) Hold the current page Bookmark pages Reveal hidden pages Enlarge the text Switch briefl y between teletext and TV To index page Return to TV / Watch video, etc. (P. 14) Power On / Off Change the channel / page Switch between “TV / VCR / DVR / DVD / AUDIO” (P. 17) To the previous screen To teletext (P. 13) Volume Change the channel / page When watching TV / Video Mute When viewing teletext (P. 13) Insert the batteries Use two “AAA/LR03” dry cell batteries. Insert the batteries from the end, making sure the and polarities are correct. Channel information (P. 12) Display on-screen menu (P. 18) Power On/Off Power lamp ON: Lit (Blue) OFF: Unlit To headphones (P. 10) Display on-screen menu / set Switch between TV / AV devices To change the brightness of the power lamp “Illumination” (P. 18) LAMP indicator The LAMP indicator blinks as follows. When turning on the TV, the LAMP indicator blinks for about 1 minute every 2 seconds. The lamp is warming up. During this period, the TV cannot be turned off. After turning off the TV, the LAMP indicator blinks for about 1 minute every 2 seconds. Cooling is performed. During the cooling period, the TV cannot be turned on. If the LAMP indicator blinks rapidly “Lamp” (P. 21) Audio input terminals (VIDEO-4) S-video input terminal (VIDEO-4) Video input terminal (VIDEO-4) Front panel Left side panel When this indicator blinks “About the LAMP indicator” (Below) Connecting terminals on the back of the TV “Connecting external devices” (P. 10) HD-Z70RF7 HD-Z61RF7 HD-Z56RF7 Power On/Off Colour buttons Return to channel you want to view Select and confi rm settings in menues Downloaded from www.Manualslib.com manuals search engine 7 Care when setting Connect the aerial IMPORTANT! PREPARE USE SETTINGS TROUBLE? Basic connections Please read the user manuals of each device carefully before setup. It is necessary to connect an aerial to watch TV. Connect with other devices “Connecting external devices” (P. 10) VCR / DVD recorder After all the connections have been made, insert the plug into an AC outlet. If both composite and S-VIDEO cable are connected, S-VIDEO will be enable. After all the connections have been made, insert the plug into an AC outlet. AERIAL Power requirements Connect the power cord only to a 110-240V, 50/60Hz AC outlet. Installation requirements To avoid overheating, ensure the unit has ample room. Connect a VCR / DVD recorder Do not place the TV too close to wallpaper The warm air from the air ducts may change the colour of the wallpaper. Keep children or pets away from the air ducts Long exposure to the warm air from the ducts may cause a minor burn. AERIAL VIDEO-1 Back of the TV Back of the TV Downloaded from www.Manualslib.com manuals search engine 8 CH >> 14% Auto Program 28 > Language > Group-1 Group-2 Group-3 Group-4 Group-5 Teletext Language 01 AV PR 02 03 04 05 06 07 08 09 CH/CC CH 21 CH 22 CH 23 CH 24 CH 25 CC 02 CC CC 04 CC 05 03 > Edit ID Initial settings Set the menu language, installation location and automatically register the TV channels. These channels can be edited later in “Editing channels” (P. 9). To the previous screen If the “JVC” logo does not appear or if you wish to make changes later “Language”, “Teletext Language” and “Auto Program” (P. 18) Exit MENU BACK TV Begin Select a language Select the teletext language group Automatically register channels Check what was registered select Shown only when powering on for the fi rst time. The power button on the remote control can also be used. Edit channels Confi rm 3 6 select set in “Editing channels” (P. 9) After turning on the TV, it takes about 1 minute to project the picture to its full brightness. After turning off the TV, it takes about 5 seconds to make the screen dark. After that, cooling is performed for about 1 minute. “About the LAMP indicator” (P. 6) HD-Z61RF7 HD-Z56RF7 HD-Z70RF7 1 The remote control doesn’t work Confi rm the mode is set to “TV”. For the teletext language group “Language group for teletext” (P. 22) If the characters are unreadable “Language group for teletext” (P. 22) 5 4 2 When you press the Power button of the HD-Z61RF7 or HD-Z56RF7, recommend that press below of the button. Downloaded from www.Manualslib.com manuals search engine 9 Set Up 01 AV PR 02 03 04 05 06 07 08 09 CH/CC CH 21 CH 22 CH 23 CH 24 CH 25 CC 02 CC CC 04 CC 05 03 > Edit ID 01 AV PR 02 03 04 05 06 07 08 09 CH/CC CH 21 CH 22 CH 23 CH 24 CH 25 CC 02 CC 03 CC 04 CC 05 >Edit ID > Edit 01 AV PR 02 03 04 05 06 07 08 09 CH/CC ID CH 21 CH 22 CH 23 CH 24 CH 25 CC 03 CC 04 CC 05 01 AV PR 02 03 04 05 06 07 08 09 CH/CC CH 21 CH 22 CH 23 CH 24 CH 25 CC 02 CC 03 CC 04 CC 05 A > Edit ID 01 AV PR 02 03 04 05 06 07 08 09 CH/CC ID CH 21 CH 22 CH 23 CH 24 CH 25 CC 02 CC 03 CC 04 CC 05 JVC >Edit 01 AV PR 02 03 04 05 06 07 08 09 CH/CC CH 21 CH 22 CH 23 CH 24 CH 25 CC 02 CC CC 03 CC 04 >Edit ID >Edit 01 AV PR 02 03 04 05 06 07 08 09 CH/CC ID CH 21 CH 22 CH 23 CH 24 CH 25 CC 02 CC CC 03 CC 04 12 > 01 AV PR 02 03 04 05 06 07 CH/CC CH 22 CH 23 CH 24 CH 25 CC 02 CC 03 CC 04 Edit ID > 11 10 PR 12 13 14 15 16 17 CH/CC CH 02 (B/G) CC 06 Manual ID > Manual 11 10 PR 12 13 14 15 16 17 CH/CC ID CH 08 (B/G) CC 06 > 11 10 PR 12 13 14 15 16 17 CH/CC CH 08 CC 06 Edit ID > Manual 11 10 PR 12 13 14 15 16 17 CH/CC ID CH 08 (I) CC 06 Set Up Auto Program Video-3 Setting AI Volume HDMI Setting PC Position Video Off Video Teletext Language Video-1 Setting Language Lamp Timer Reset Edit/Manual IMPORTANT! PREPARE USE SETTINGS TROUBLE? Display the menu bar Select “Set Up” Select “Edit / Manual” Finish When coming from “Initial settings” (P. 8), skip to 4 . Select a row Edit Move a channel’s position MOVE Editing channels Edit the channels registered with “Auto Program” in “Initial settings” (P. 8). To the previous screen Exit 1 2 3 4 5 6 Register a new channel MANUAL Delete a channel DELETE Insert a channel INSERT Edit a channel name ID next select next select move out move in select enter the fi rst character From high frequencies or / select a system Receives the broadcast signal. If you can not receive the channel you want to view, press to change the sound system. “Sound system in your country or region” (P. 22) Auto-search begins, and the nearest frequency is imported. Repeat the previous steps until the desired channel is displayed From low frequencies “CH/CC List” (P. 22) Begin Select a destination Finish Begin Enter a channel name Begin Select a CH / CC Enter a number Delete Beginning channel search Begin Set select Adjust Picture fi ne tuning Sound fi ne tuning select (red) next column set (green) (yellow) (blue) (red) (green) (blue) (yellow) Downloaded from www.Manualslib.com manuals search engine 10 Plug in headphones Game consoles Video camera Connect a PC IN (VIDEO-4) AERIAL Connecting external devices You can connect many devices to the rear panel of the TV. Please read the user manuals of each device before setup. (Connecting cables are not supplied with this TV.) Amplifi er (L) (R) OUT Set-top box / Digital broadcast tuner VCR / DVD / other devices Check for PC compatibility “Technical information” (P. 22) HDMI-2 : signal direction Connect DVI devices to “HDMI-1” (P. 22) Left side panel Rear panel VIDEO-4 VCR / DVD recorder DVD player (HDMI compatible) JVC’s VCR / DVD player (AV COMPULINK compatible) AV COMPULINK PC IN VIDEO-2 VIDEO-1 VIDEO-3 VCR / DVD recorder VCR / DVD recorder VIDEO-1 Output Input · Component signal / S-VIDEO / Composite signal · Sound L / R Use Component signal “Switch between video and component signal” (P. 14) Use S-VIDEO “Using S-VIDEO” (P. 14) Watching videos VIDEO-2 Output Input · S-VIDEO / Composite signal · Sound L / R Use S-VIDEO “Using S-VIDEO” (P. 14) Watching videos VIDEO-3 Output Input · Component signal / Composite signal · Sound L / R Use Component signal “Switch between video and component signal” (P. 14) Watching videos VIDEO-4 Output Input · S-VIDEO / Composite signal · Sound L / R Use S-VIDEO “Using S-VIDEO” (P. 14) Watching videos HDMI-1 HDMI-2 Output Input · HDMI signal · Sound L / R (HDMI-1 only) “HDMI Setting” (P. 18) HDMI-2 input does not support analogue sound. Connecting HDMI devices OUT Video and sound signal of a TV channel you are viewing s from this terminal Output Input · S-VIDEO / Composite signal · Sound L / R “Using OUT terminal” (P. 14) AV COMPULINK This feature makes playing video tapes or DVDs totally automatic. Simply insert a pre-recorded media into your JVC brand VCR or DVD player and the device will automatically turn on and begin playback. At the same time, using the AV CompuLink, the VCR or DVD player sends a signal to the television telling it to turn on and switch to the proper video input. Refer to your DVD or VCR’s instruction book for detailed connection information. DVD player (HDMI compatible) HDMI-1 Analogue Audio input (HDMI-1) “HDMI Setting” (P. 18) Downloaded from www.Manualslib.com manuals search engine 11 Picture IMPORTANT! PREPARE USE SETTINGS TROUBLE? TV mode TV and Text mode Text mode Watching TV 12 PAGE Viewing teletext 13 PAGE Enjoying your new TV! View channel information Change the aspect ratio Enjoy “Cinema Surround” Register your favourite channels Enlarge the text To the index page Hold the current page Switch briefl y between teletext and TV Bookmark your favourite pages Reveal hidden pages Watching videos / DVDs 14 PAGE 18 PAGE Personal preferences Watch high quality video (S-VIDEO) Switch between video and component signal PC position adjustments Adjust the picture Adjust the sound (channel settings, etc.) Basic settings (sleep-timer / channel guard, etc.) Advanced settings Downloaded from www.Manualslib.com manuals search engine 12 AV 16 : 9 Zoom High Cinema Surround AV 02 03 04 05 06 07 08 09 PR List 01 Auto Panoramic 14:9 Zoom 16:9 Zoom 16:9 Zoom Subtitle Full Zoom Regular CHANNEL VOLUME IN (VIDEO-4) CHANNEL + - MENU/OK OVER S-VIDEO VIDEO L/MONO R AUDIO TV/VIDEO High Return Plus Programmed! Return Plus Canceled! Select a channel Power on 2 The blue power lamp on the TV lights 3 DISPLAY Channel information Watching TV Mute Note To completely turn off the TV, unplug the AC plug after the LAMP indicator stops blinking. Press again to turn the screen off and put the TV into standby mode. Move up or down a channel Switch between stereo / mono / bilingual broadcasting “Stereo / · ” ( P. 18) Volume ZOOM Change the aspect ratio CINEMA SURROUND Enjoy ambient sound PR List Channel information (No indication) High : For stereo sound Low : For stereo sound (when the sound distorts in “High” mode) Mono : For mono sound (emulates a stereo-like sound) Off : Turns off “Cinema Surround” select Select a page Channels registered in “Initial settings” will appear here. Select and view a channel When set to “Auto”, the aspect ratio will turn to the ratio obtained from the information the TV received. Without receiving aspect information, it will be set to “4:3 Auto Aspect” (P. 19) Not available for 1080i (1125i) / 720p (750p) signals. In PC mode, “Regular” and “Full” can be selected. Move the picture with or while this bar is displayed select set select view Basic operations using the side buttons Power on Change the channel Volume 1 2 After turning on the TV, it takes about 1 minute to project the picture to its normal brightness. After turning off the TV, it takes about 5 seconds to make the screen dark. After that, cooling down is performed for about 1 minute. “About the LAMP indicator” (P. 6) E.g. 1 : 15 : up down Set to “TV” 1 MAXXBASS Emphasize bass sound RETURN PLUS Always return to the channel you want to view select set “MENU” “ ” “Sound” “MaxxBass” level Off Low High Registered as return channel While the channel is displayed Hold down for 3 seconds Cancel While the channel is displayed Hold down for 3 seconds Recall the return channel Current channel Last channel 23 34 RETURN Return to the last channel you were viewing Downloaded from www.Manualslib.com manuals search engine 13 IMPORTANT! PREPARE USE SETTINGS TROUBLE? Enter a teletext page up down When watching TV TV TEXT Display your favourites list 1 (RED) (GREEN) (YELLOW) (BLUE) Select a coloured button to save your page to Enter the number of the page to save Save 2 3 4 TEXT This TV can display TV broadcasts and teletext on the same channel in two windows. to sub-page 1 Viewing teletext Move up or down a page Bookmark your favourite page LIST MODE Recall your favourite page Press the coloured button as in step 2 2 View sub-pages ..... Hold the current page Display hidden information (answers to quizzes, etc) Returns to page “100” or a previously designated page Double the size of the displayed text Leave the current page open, while you switch to watch TV Hold the current page HOLD Switch briefl y from teletext to TV CANCEL Release Press again Useful when running a page search. Reveal hidden pages REVEAL To the index page INDEX Enlarge the text SIZE (red) (green) (yellow) (blue) Downloaded from www.Manualslib.com manuals search engine 14 Switch between video and component signal PC position adjustment Using S-VIDEO Using OUT terminal Set Up Auto Program Video-3 Setting AI Volume HDMI Setting Video Off Video Teletext Language Edit/Manual Video-1 Setting Language Lamp Timer Reset PC Position 1 2 3 4 5 6 Video-1 Video-2 Video-3 7 Video-4 HDMI1 HDMI2 PC AV Select 0 01 Set Up Set Up Auto Program Video-3 Setting AI Volume HDMI Setting Video Off Video Teletext Language Edit/Manual Video-1 Setting Language Lamp Timer Reset PC Position PC Position > Set Up Video Select the video source 1 Watching videos / DVDs 2 Display the menu bar Select “Set Up” 1 2 watch select Operate the connected device and play a video Operate JVC recorders and other devices (P. 17) CHANNEL VOLUME IN (VIDEO-4) CHANNEL + - MENU/OK OVER S-VIDEO VIDEO L/MONO R AUDIO TV/VIDEO Select the video source using the side buttons Select the video source 1 2 MENU/OK TV/VIDEO 3 1 2 3 select next select next adjust set Display the menu bar Shown only when “PC” is selected. Select “Set Up” Select “PC Position” Reset position (blue) select next Select “Video-1 Setting” or “Video-3 Setting” 3 Change setting 4 select select set : For composite or S-video signal : For component video signal Component Video If both composite and S-VIDEO cables are connected, S-VIDEO will be enable. Component and PC signals do not come out from this terminal. When you are viewing video signal, no signal will come out through the S-VIDEO terminal. HDMI-1 and HDMI-2 inputs does not come out from this terminal. Downloaded from www.Manualslib.com manuals search engine 15 Features Sleep Timer Channel Guard Appearance Blue Back Favourite Setting Type A On Child Lock On Auto Shutoff On Illumination Bright Power Lamp On Features > Off Sleep Timer Sleep Timer Channel Guard Appearance Blue Back Favourite Setting Type A On Child Lock On Auto Shutoff On Illumination Bright Power Lamp On Features > Set ID No. >>Channel Guard 01 AV PR 02 03 04 05 06 CH/CC ID CH 21 CH 22 CH 23 CH 24 CH 25 CC 02 >> 01 AV PR 02 03 04 05 06 CH/CC ID CH 21 CH 22 CH 23 CH 24 CH 25 CC 02 Channel Guard IMPORTANT! PREPARE USE SETTINGS TROUBLE? Selecting “ ” returns to normal viewing mode (For wide aspect ratio signals) Only the selected frame has a moving picture. Main Sub Main Sub Main Select the number of screens Watch in dual-picture mode Move up or down a page Useful functions E.g. You can watch TV and video at the same time. Select a channel in 12-screen mode All registered channels are displayed as still images. Switch between the sound sources Change the channel (Main) (Sub) Watch in multi-picture mode MULTI-PICTURE set select watch select a channel Not available in PC mode. Not available for HDMI-1 or HDMI-2 input. Current programme Still picture Take snapshots of the screen FREEZE Not available when the Sub-picture (below) is displayed, or when in PC mode. You cannot save or export the snapshot. Cancel Press “ ” again, or change the channel Set a time for the TV to turn itself off SLEEP TIMER Stop children from watching specifi c channels CHANNEL GUARD 1 2 3 select “Features” next select “Sleep Timer” next set select a time in minutes 4 Cancel Set the time to “0” in step 4 Remaining time You can confi rm the remaining time in step 4, after repeating this process. After steps 1 and 2 above 3 4 (blue) select “Channel Guard” enter an “ID No.” (a secret number of your choice) set to the next column 5 select a channel to lock 6 Lock more channels Repeat steps 5 and 6 7 Release a channel Press “ (blue)” again in step 6 View a locked channel Use the numerical buttons to enter the channel number. When appears, press “ ” and enter your “ID No.”. (If you forget your “ID No.” check it in step 4.) Downloaded from www.Manualslib.com manuals search engine 16 SET 1 - 4? FAVOURITE 1 - 4? > 1 PR 01 2 PR 03 4 PR 07 3 PR 05 Favourite Setting > 1 PR 01 2 PR 03 4 PR 07 3 Favourite Setting PROGRAMMED! On 12 12 On On Useful functions (continued) FAVOURITE CHANNEL Register a channel to a button Press the number you registered select Customizations (P. 18) to the picture of a favourite channel get saved as well. Recall the favourite channel Check your favourite channels Press “ ” and confi rm that the channels you have registered have marks beside them Delete a favourite channel “MENU” “ ” “Features” “Favourite Setting” Press the number to register it on While the channel is displayed Hold down for 3 seconds Disappears in a few seconds 1 1 2 1 2 1 2 (blue) delete Displays a blue screen and mute the sound when the signal is weak BLUE BACK Set the power to turn off if no signal is received and no operation is performed AUTO SHUTOFF Prevent sudden increase or decrease of sound when changing channels AI VOLUME “MENU” “ ” “Features” “Blue Back” “MENU” “ ” “Features” “Auto Shutoff” “MENU” “ ” “Set Up” “AI Volume” set select : Function is turned off : Displays a blue screen Off On When the signal is weak or absent Displays a blue screen and mute the sound set select : Function is turned off : Set the power to turn off Off On When no signal is received and no operation is performed for about 15 minuites The power turns off set select : Function is turned off : Set to prevent sudden increase or decrease of sound Off On Downloaded from www.Manualslib.com manuals search engine 17 IMPORTANT! PREPARE USE SETTINGS TROUBLE? Select a device Turn on the device Operate the device Operate JVC recorders and other devices The included remote control can be used to operate JVC recorders and other devices. Code A or 1 (Default) 1 2 3 Operate the VCR, DVD recorder or HDD recorder VCR/DVR TV (P. 12) DVD players VCRs DVD recorders HDD recorders Home theater system The indicator lights for 3 seconds each time the remote control is operated. TV AUDIO VCR/DVR DVD Other buttons can be used to operate the TV at any time. Try changing the remote control code if you cannot operate a recorder. Press and hold Code C or 3 Press and hold Confi rm the code for your recorder by checking the manual it came with. Some models of JVC devices cannot be operated with this remote control. JVC DVD recorders and HDD recorders are set to code “C” or “3” by default. If the battery is removed, the remote control code reverts back to code A or 1. Note Operate the DVD player DVD Operate the home theatre system AUDIO Operate DVD / HDD recorder menues Display menu Playback / Record etc. Back to previous menu OK Display top menu Select Rewind / Playback / Fast-forward Record / Stop / Pause Select a chapter Display the subtitle (DVD / HDD recorder mode) Operate DVD menues Display menu Back to previous menu OK Display top menu Select Display the subtitle Playback etc. Rewind / Playback / Fast-forward Stop / Pause Select a chapter Operate AUDIO menues Display menu Back to previous menu OK Display top menu Select Display the subtitle Mute Volume Select a surround mode Playback etc. Rewind / Playback / Fast-forward Stop / Pause Select a chapter Downloaded from www.Manualslib.com manuals search engine 18 Menu Item Adjustments / Confi gurations Picture Picture Mode Picture mode (Bright / Standard / Soft) Iris Adjust the amount of light projected on the screen (Darker Brighter) Contrast Contrast (Lower Higher) Bright Brightness (Darker Brighter) Sharp Sharpness (Softer Sharper) Colour Colour (Lighter Deeper) Tint Tint for NTSC (Reddish Greenish) White Balance Colour temperature (Warm / Mid / Cool) Features Finer picture adjustments (P. 19) Sound Stereo / · Mode / Language ( : Mono / : Stereo / : Sub1 / : Sub2 / MONO) Bass Low tones (Weaker Stronger) Treble High tones (Weaker Stronger) Balance Speaker balance (Left Stronger Right Stronger) Cinema Surround Ambience level (High / Low / Mono / Off) MaxxBass *1 Emphasize the bass sound (Off / Low / High) Voice Enhancer Sound enhancement technology (On / Off) Features Sleep Timer Timer for turning off the TV (P. 15) Channel Guard Stops children from watching specifi c channels (P. 15) Appearance Format for displaying the channel number (TYPE A / TYPE B) Blue Back Displays a blue screen and mutes the sound when the signal is weak or absent (P. 16) Child Lock Disables the front control buttons of the TV (On / Off) Auto Shutoff Set the power to turn off if no signal is received and no operation is performed for about 15 minuites. (P. 16) Favourite Setting Clear favourite channel settings (P. 16) Illumination Change the brightness of the Power lamp (P. 6) while the TV is on (Bright / Soft) Set Up Auto Program Automatically registers channels (P. 8, ) Edit / Manual Change registered channels or add new ones (P. 9) Language Select a language for on-screen menus (P. 8, ) Video-1 Setting For use with VCRs and other devices (P. 14) Video-3 Setting For use with VCRs and other devices (P. 14) AI Volume Prevent sudden increase or decrease of sound when changing channels (P. 16) Teletext Language Select a language for Teletext programmes (P. 22) HDMI Setting HDMI-1 : Size (1 / 2 / Auto) HDMI-2 : Size (1 / 2 / Auto) Audio (Digital / Analogue / Auto) PC Position PC position adjustment (P. 14) Lamp Timer Reset Resets the lamp timer (P. 5) Standard Picture Picture Mode Standard Display the menu bar Select a menu Select an item Adjust / Confi gure Move The item will change. Selected menu’s title Items Picture Sound Features Set Up Customizing your TV To the previous screen Exit 1 The menu disappears after one minute of inactivity. When adjusting with the sliding-bar 2 3 4 When selecting from presets select next select adjust / select set adjust set select set Some items have a sub-menu. · Change the aspect ratio “ZOOM” (P. 12) · Turn on “Cinema Surround” “CINEMA SURROUND” (P. 12) Other settings *1 MaxxBass is a registered trademark of Waves Audio Ltd. in the USA, Japan and other countries. Downloaded from www.Manualslib.com manuals search engine 19 Super DigiPure Auto Picture Auto >> Sub Main Auto PAL Colour System >> Regular 14:9 Zoom Panoramic 4:3 Auto Aspect Auto On On On On IMPORTANT! PREPARE USE SETTINGS TROUBLE? Select “Picture” By default, the TV automatically adjusts itself for the best picture. Display the menu bar Select “Features” Select an item Change settings MPEG Noise Reduction Super DigiPure Pull Down Colour Management Picture Management Colour System 4:3 Auto Aspect E.g. “Super DigiPure” E.g. “Super DigiPure” Finish Advanced picture adjustment To the previous screen Exit 1 The menu disappears after one minute of inactivity. 2 3 4 5 6 select next select next select next select To reduce MPEG video noise For smooth looking picture Off : Function is turned off Min Max Auto : Automatically adjusts For smoothing cinema fi lm Off : Function is turned off On Auto : Automatically adjusts : When the picture loses sharpness : Function is always on For natural- looking pictures Off : Function is turned off On : Maintains a natural colour balance Fix bright / dark pictures Off : Function is turned off On : Makes it easier to view bright / dark pictures When there is no colour Main : Main picture Sub : Sub-picture in MULTI-PICTURE mode (P. 15) Select the screen to change settings for PAL Select the colour system SECAM NTSC 3.58 NTSC 4.43 Auto Set a default aspect ratio Panoramic Select a default aspect ratio for Auto in “Zoom” (P. 12) Regular 14:9 Zoom 16 : 9 4 : 3 14 : 9 1 2 Advanced Smart Picture Fix brightness of white areas Off On : Make it easier to view white areas : Function is turned off Not available when “Picture Mode” is set to “Bright” (P. 18) : When much noise appears Off On : When noise appears : Function is turned off For colour system in your country or region. “Colour system in your country or region” (P. 22) Downloaded from www.Manualslib.com manuals search engine 20 Severe noise or snow Troubleshooting Patterns, stripes or noise I can’t turn it on! The remote control doesn’t work! Is the TV connected correctly to the aerial? Change the direction of the aerial. Is the aerial or its cable damaged? Consult your retailer Ghosting (Doubling of images) Are you receiving interference from signals refl ected off mountains or buildings? Adjust the direction of your aerial, or change to a good-quality directional aerial Is the aerial receiving interference from high-voltage power lines or wireless transmitters? Consult your retailer Are connected devices too close to the TV? Insert the minimum distance between the aerial and the cause of interference until no interference Is the power cord connected to the AC outlet correctly? Are the batteries fl at? Are you more than 7 metres away from the TV? Is the “MODE (TV, VCR/DVR, DVD, AUDIO)” set to “TV”? When viewing teletext, the TV menu bar does not appear. Depending on the stability of the signal, there may be a time lag when changing channels. Problem Actions page Unplug the TV, and wait about 1 hour until the lamp completely cooled. Then plug the TV in again. (Turning on the TV soon may shorten the lamp life.) Remote control stops working - Press “ ” to return to your settings. Aspect ratio changes unintentionally 12 Unnatural colour >>> Adjust “Colour” and “Bright.” Check your “Colour System.” If “Auto” is selected, select the specific colour system manually. Noise >>> Set to the following functions. Picture Mode : Standard Super DigiPure : Max Dull picture >>> Set to the following functions. Picture Mode : Bright Super DigiPure : Min Poor picture quality 18 19 - 18 19- 18 19 If the top of the image is distorted, check the video signal quality itself. If movement appears unnatural when receiving a signal from a DVD player, etc. with 625p (progressive-scanning), change the output setting of the external device to 625i (interlace- scanning). Strange picture when using an external device - - Basics Screen Picture Although the HD-ILA element is manufactured with high- precision technology, please understand that some pixels may be lost or permanently displayed. Black or white dots appear on the screen - Switch “Child Lock” to “Off.” Front control buttons do not work 18 Adjust the “PC Position.” PC screen alignment is off 14 Switch “Blue Back” to “Off.” Blue screen appears on the screen 16 Adjust the “Iris” brighter. The screen is dim 18 Downloaded from www.Manualslib.com manuals search engine 21 IMPORTANT! PREPARE USE SETTINGS TROUBLE? Problem Actions page OUT terminal Some inputs are not output from the OUT terminal. No picture, no sound 14 It is not a malfunction. Some functions (dark background) in the menu do not work depending on the situation. Some functions do not work - Functions Wait a little for the signal to stabilize when switching the signal format for an “HDMI” device. Green and distorted screen - Check if the device is compliant with HDMI. Switch “Audio” in “HDMI Setting” to “Digital” or “Auto” for HDMI devices, or “Analogue” or “Auto” for DVI devices. (Not available for HDMI-2) No sound - 18 Switch “Size” in “HDMI Setting” to “1” or “2.” Wrong screen size 18 HDMI “VIDEO-1 (Component signal)”, “VIDEO-3 (Component signal)”, “HDMI-1”, “HDMI-2” inputs and PC mode cannot be selected in the sub-picture. Some inputs cannot be selected in the sub- picture - Poor sound Adjust the “Bass” and “Treble.” If receiving a poor signal in “Stereo / · ”, switch to “Mono.” Adjust the channel reception using “Manual.” 18 18 9 Sound The LAMP indicator blinks rapidly Keep the TV off for a while and then turn the power on again. If the TV goes into warning mode, unplug the TV after the cooling has completed and consult your retailer. (It may be a malfunction of the internal electrical circuits.) The power lamp and LAMP indicator blink alternately Keep the TV off for a while and then turn the power on again. If the TV goes into warning mode, unplug the TV after the cooling has completed and consult your retailer. (The internal temperature rises abnormally or the fan may be blocked.) The power lamp and LAMP indicator blink rapidly simultaneously If this condition occurs soon after replacing the lamp, reinstall the new lamp unit. (The lamp unit may not be inserted into the lamp housing correctly.) Repeat the lamp installation steps, taking care to observe all warnings. - Make sure the lamp sits fl at inside the housing area. - Make sure the lamp cover is reinstalled. If this condition occurs except for replacing the lamp, keep the TV off for a while and then turn the power on again. If the TV goes into warning mode, unplug the TV after the cooling has completed and consult your retailer. (It may be a lamp malfunction.) Lamp Problem Actions page 6 - - - Use the cable with HDMI logo. No picture, no sound - “AI Volume” makes the effect of “Voice Enhancer” weak. Switch “AI Volume” to “Off.” “Voice Enhancer” does not work 18 Downloaded from www.Manualslib.com manuals search engine 22 Language group for teletext Monoaural sound PC Signals that can be displayed Connect DVI devices Colour system in your country or region Area Country or Region System Asia, Middle East Bahrain, Kuwait, Oman, Qatar, United Arab Emirates, Yemen, etc. Indonesia, Malaysia, Singapore, Thailand, India, etc. PAL China, Vietnam, etc. Hong Kong, etc. Islamic Republic of Iran, Lebanon, Saudi Arabia, etc. SECAM Philippines, Taiwan, Myanmar, etc. NTSC Europe Russia, etc. SECAM Czech Republic, Poland, etc. PAL Germany, Holland, Belgium, etc. UK, etc. Oceania Australia, New Zealand, etc. PAL Africa Republic of South Africa, etc. PAL Nigeria, etc. Egypt, Morocco, etc. SECAM Area Country or Region System Asia, Middle East Bahrain, Kuwait, Oman, Qatar, United Arab Emirates, Yemen, etc. Indonesia, Malaysia, Singapore, Thailand, India, etc. B/G China, Vietnam, etc. D/K Hong Kong, etc. I Islamic Republic of Iran, Lebanon, Saudi Arabia, etc. B/G Philippines, Taiwan, Myanmar, etc. M Europe Russia, etc. D/K Czech Republic, Poland, etc. Germany, Holland, Belgium, etc. B/G UK, etc. I Oceania Australia, New Zealand, etc. B/G Africa Republic of South Africa, etc. I Nigeria, etc. B/G Egypt, Morocco, etc. Sound system in your country or region If the signal doesn’t appear, check that the vertical frequency on the PC is set to 60 Hz. Resolution 640 x 480 (VGA) 1024 x 768 (XGA) Vertical frequency (Hz) 60.0 60.0 Horizontal frequency (kHz) 31.5 48.4 Technical information Use this function when stereo sound or bilingual sound is hard to hear. Set “Stereo / · ” to “Mono.” (P. 18) Connect a “DVI“ device to “HDMI-1” using “DVI-HDMI” conversion cable. Connect analogue sound output of the DVI device to L and R terminals in IN HDMI-1. Set “Audio” in “HDMI Setting” to “Analogue” or “Auto” (P. 18) HDMI-2 input does not support analogue sound (IN HDMI-1). HDMI-2 input does not support DVI devices. To use the INSERT function (P. 9), fi nd the “CH/CC” number corresponding to the TV’s Channel number from this table. US: The US channel numbers are the channel numbers used in the United States, Philippines, etc. CCIR: The CCIR channel numbers are the channel numbers used in the Middle East, Southeast Asia, etc. OIRT: The OIRT channel numbers are the channel numbers used in Eastern Europe, Russia, Vietnam, etc. AUSTRALIA: The AUSTRALIA channel numbers are the channel numbers used in Australia, etc. CH/CC List Group Languages Group-1 Turkish, Hungarian, English, German, French, Italian, Spanish, Portuguese, Greek, Swedish, Finnish Group-2 Polish, Serbian, Croatian, Slovenian, Czech, Slovak, Rumanian, Hungarian, German, French, Italian, Swedish, Finnish Group-3 Russian, Bulgarian, Lettish, Lithuanian, Estonian, Ukrainian, Serbian, Croatian, Slovenian, Czech, Slovak, English, German Group-4 Arabic, Czech, Slovak, Hungarian, English, German, French, Italian, Spanish, Portuguese, Swedish, Finnish Group-5 Farsi, Czech, Slovak, Hungarian, English, German, French, Italian, Spanish, Portuguese, Swedish, Finnish If the characters are unreadable. Select different teletext language group. CH Channel US CCIR OIRT AUSTRALIA CH 02 US-02 E2 R1 AU-0 CH 03 US-03 E3 AU-1 CH 04 US-04 E4 R2 AU-2 CH 05 US-05 E5 R6 AU-6 CH 06 US-06 E6 R7 AU-7 CH 07 US-07 E7 R8 AU-8 CH 08 US-08 E8 R9 AU-9 CH 09 US-09 E9 CH 10 US-10 E10 R10 AU-10 CH 11 US-11 E11 R11 AU-11 CH 12 US-12 E12 R12 CH 13 US-13 CH 14 US-14, W+29 CH 15 US-15, W+30 CH 16 US-16, W+31 CH 17 US-17, W+32 CH 18 US-18, W+33 CH 19 US-19, W+34 CH 20 US-20, W+35 CH 21 US-21, W+36 E21 CH 22 US-22, W+37 E22 CH 23 US-23, W+38 E23 CH 24 US-24, W+39 E24 CH 25 US-25, W+40 E25 CH 26 US-26, W+41 E26 CH 27 US-27, W+42 E27 CH 28 US-28, W+43 E28 CH 29 US-29, W+44 E29 CH 30 US-30, W+45 E30 CH 31 US-31, W+46 E31 CH 32 US-32, W+47 E32 CH 33 US-33, W+48 E33 CH 34 US-34, W+49 E34 CH 35 US-35, W+50 E35 CH 36 US-36, W+51 E36 CH 37 US-37, W+52 E37 CH 38 US-38, W+53 E38 CH 39 US-39, W+54 E39 CH 40 US-40, W+55 E40 CH 41 US-41, W+56 E41 CH 42 US-42, W+57 E42 CH 43 US-43, W+58 E43 CH 44 US-44, W+59 E44 CH 45 US-45, W+60 E45 CH 46 US-46, W+61 E46 CH 47 US-47, W+62 E47 CH 48 US-48, W+63 E48 CH 49 US-49, W+64 E49 CH 50 US-50, W+65 E50 CH 51 US-51, W+66 E51 CH 52 US-52, W+67 E52 CH 53 US-53, W+68 E53 CH 54 US-54, W+69 E54 CH 55 US-55, W+70 E55 CH 56 US-56, W+71 E56 CH 57 US-57, W+72 E57 CH 58 US-58, W+73 E58 CH 59 US-59, W+74 E59 CH 60 US-60, W+75 E60 CH 61 US-61, W+76 E61 CH 62 US-62, W+77 E62 CH 63 US-63, W+78 E63 CH 64 US-64, W+79 E64 CH 65 US-65, W+80 E65 CH 66 US-66, W+81 E66 CH 67 US-67, W+82 E67 CH 68 US-68, W+83 E68 CH 69 US-69, W+84 E69 CC Channel US CCIR OIRT AUSTRALIA CC 01 S-1 AU-5 CC 02 S-2 CC 03 S-3 CC 04 S-4 CC 05 S-5 CC 06 S-6 AU-5A CC 07 S-7 CC 08 S-8 CC 09 S-9 CC 10 S-10 CC 11 S-11 CC 12 S-12 CC 13 S-13 CC 14 A S-14 CC 15 B S-15 CC 16 C S-16 CC 17 D S-17 CC 18 E S-18 CC 19 F S-19 CC 20 G S-20 CC 21 H S-21 CC 22 I S-22 CC 23 J S-23 CC 24 K S-24 CC 25 L S-25 CC 26 M S-26 CC 27 N S-27 CC 28 O S-28 CC 29 P S-29 CC 30 Q S-30 CC 31 R S-31 CC 32 S S-32 CC 33 T S-33 CC 34 U S-34 CC 35 V S-35 CC 36 W S-36 CC 37 W+1 S-37 CC 38 W+2 S-38 CC 39 W+3 S-39 CC 40 W+4 S-40 CC 41 W+5 S-41 CC 42 W+6 CC 43 W+7 CC 44 W+8 CC 45 W+9 CC 46 W+10 CC 47 W+11 CC 48 W+12 CC 49 W+13 CC 50 W+14 CC 51 W+15 CC 52 W+16 CC 53 W+17 CC 54 W+18 CC 55 W+19 CC 56 W+20 CC 57 W+21 CC 58 W+22 CC 59 W+23 CC 60 W+24 CC 61 W+25 CC 62 W+26 CC 63 W+27 CC 64 W+28 CC 75 X CC 76 Y R3 CC 77 Z R4 AU-3 CC 78 Z+1 R5 CC 79 Z+2 AU-4 CC 95 A-5 CC 96 A-4 CC 97 A-3 CC 98 A-2 CC 99 A-1 Downloaded from www.Manualslib.com manuals search engine 23 Model HD-Z70RF7 HD-Z61RF7 HD-Z56RF7 Broadcasting systems B / G / I / D / K / K1 / M (See “Technical information”, P. 22) Colour systems PAL, SECAM, NTSC 3.58/4.43MHz Channels and frequencies VHF low channel (VL) = 46.25 to 140.25 MHz VHF high channel (VH) = 147.25 to 423.25 MHz UHF channel (U) = 431.25 to 863.25 MHz · Receives cable channels in mid band (X to Z+2, S1 to S10), super band (S11 to S20) and hyper band (S21 to S41). Sound-multiplex systems NICAM (I / B / G / D / K), A2 (B / G / D / K) Teletext systems FLOF (Fastext), WST (standard system) Power requirements AC 110 V - 240 V, 50/60 Hz Audio output (Rated power output) 10 W + 10 W Speakers 10 cm round x 2 (8.5 x 12.5cm) oval x 2 Power consumption [standby] 195 W [0.9 W] Screen size (visible area size measured diagonally) 178 cm 155 cm 142 cm Dimensions (W x H x D: mm) 1626 x 1167 x 519 1403 x 1015.5 x 483.6 1292 x 943.5 x 449.8 Weights 72 kg 44 kg 40 kg Accessories (See “Check accessories”, P. 6) Terminal name Terminal type Signal type (IN) Signal type (OUT) Input terminals VIDEO-1 RCA connectors x 6 S-VIDEO connector x 1 Composite video, S-video, Analogue component (576i (625i) / 480i (525i), Progressive : 576p (625p) / 480p (525p), HD : 1080i (1125i), 720p (750p)) Audio L / R VIDEO-2 RCA connectors x 3, S-VIDEO connector x 1 Composite video, S-video, Audio L / R VIDEO-3 RCA connectors x 6 Composite video, Analogue component (576i (625i) / 480i (525i), Progressive : 576p (625p) / 480p (525p), HD : 1080i (1125i), 720p (750p)) Audio L / R VIDEO-4 RCA connectors x 3, S-VIDEO connector x 1 Composite video, S-video, Audio L / R HDMI-1 HDMI connector x 2 HDMI (576i (625i) / 480i (525i) / 576p (625p) / 480p (525p), 1080i (1125i), 720p (750p)) HDMI-2 IN HDMI-1 RCA connectors x 2 Audio L / R PC IN D-SUB (15 pins) x 1 Analogue PC signal (P. 22) Output terminals OUT RCA connectors x 3, S-VIDEO connector x 1 Composite video, S-video, Audio L / R Headphone Stereo mini-jack x 1 (3.5 mm in diameter) Headphone output Main unit Terminals / Connectors Demonstration To start the demonstration: Press the MENU button to display the menu bar. Then press the yellow button. Select DEMO 1 (Super Digipure), DEMO 2 (Maxx Bass) or DEMO 3 (Iris Meter) from the DEMO MODE menu. Press the / buttons, then press the OK button. To quit the demonstration: Press the yellow button, BACK button, CHANNEL / buttons or any of the number buttons. IMPORTANT! PREPARE USE SETTINGS TROUBLE? We may change the design and specifi cations without notice. Specifi cations Downloaded from www.Manualslib.com manuals search engine 2006 Victor Company of Japan, Limited 0706TKH-MW-VP C Downloaded from www.Manualslib.com manuals search engine
版权声明
1. 本站所有素材,仅限学习交流,仅展示部分内容,如需查看完整内容,请下载原文件。
2. 会员在本站下载的所有素材,只拥有使用权,著作权归原作者所有。
3. 所有素材,未经合法授权,请勿用于商业用途,会员不得以任何形式发布、传播、复制、转售该素材,否则一律封号处理。
4. 如果素材损害你的权益请联系客服QQ:77594475 处理。