海尔HLH19BB液晶彩电用户手册
 "海尔HLH19BB液晶彩电用户手册-0")
 "海尔HLH19BB液晶彩电用户手册-1")
 "海尔HLH19BB液晶彩电用户手册-2")
 "海尔HLH19BB液晶彩电用户手册-3")
 "海尔HLH19BB液晶彩电用户手册-4")
 "海尔HLH19BB液晶彩电用户手册-5")
 "海尔HLH19BB液晶彩电用户手册-6")
 "海尔HLH19BB液晶彩电用户手册-7")
 "海尔HLH19BB液晶彩电用户手册-8")
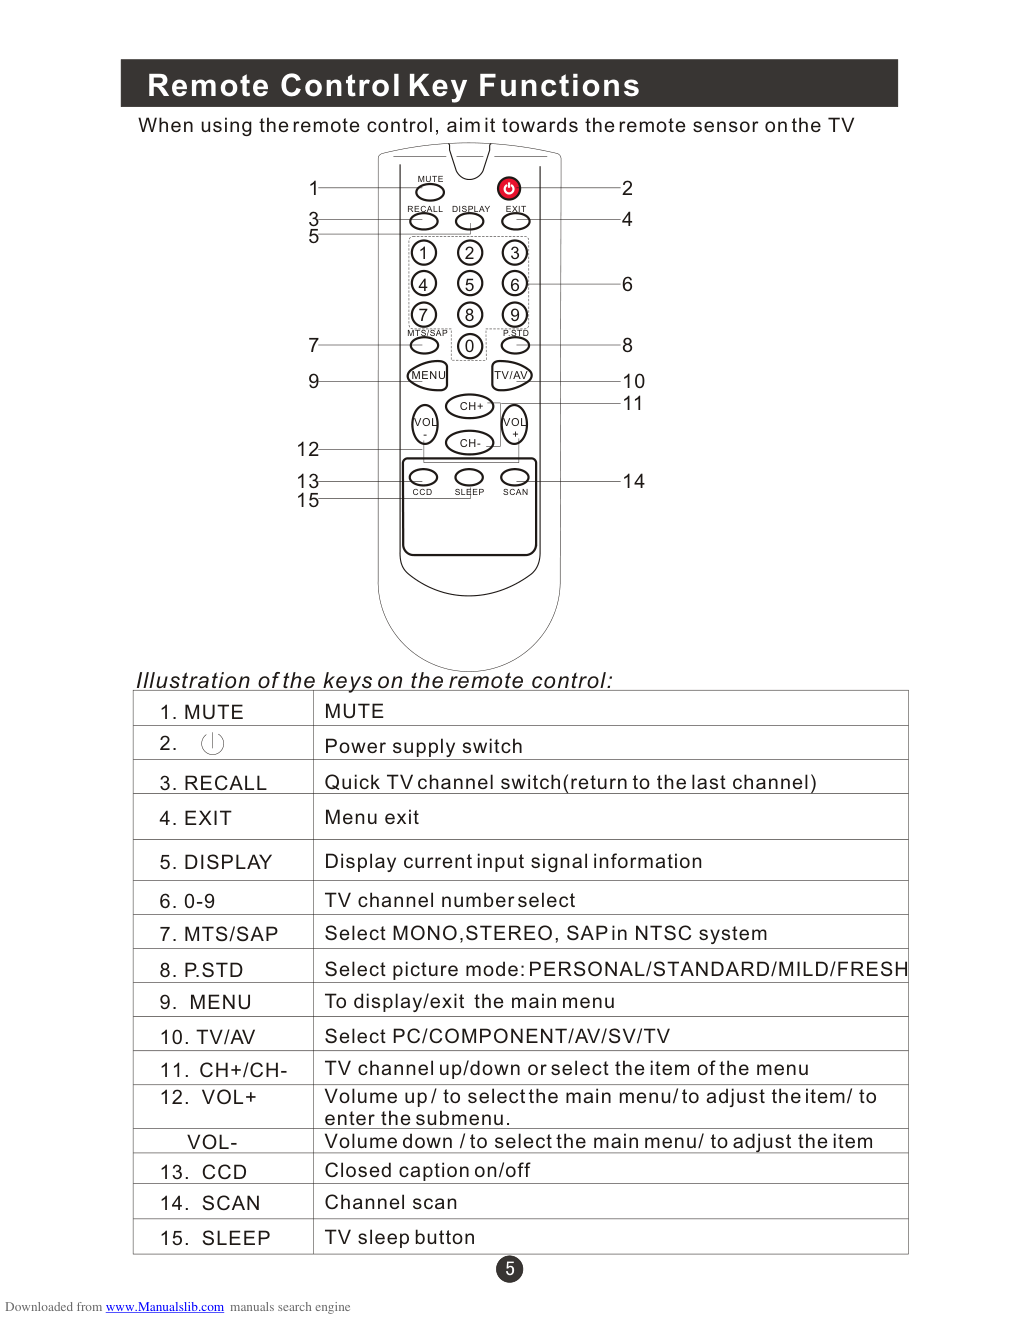
 "海尔HLH19BB液晶彩电用户手册-9")
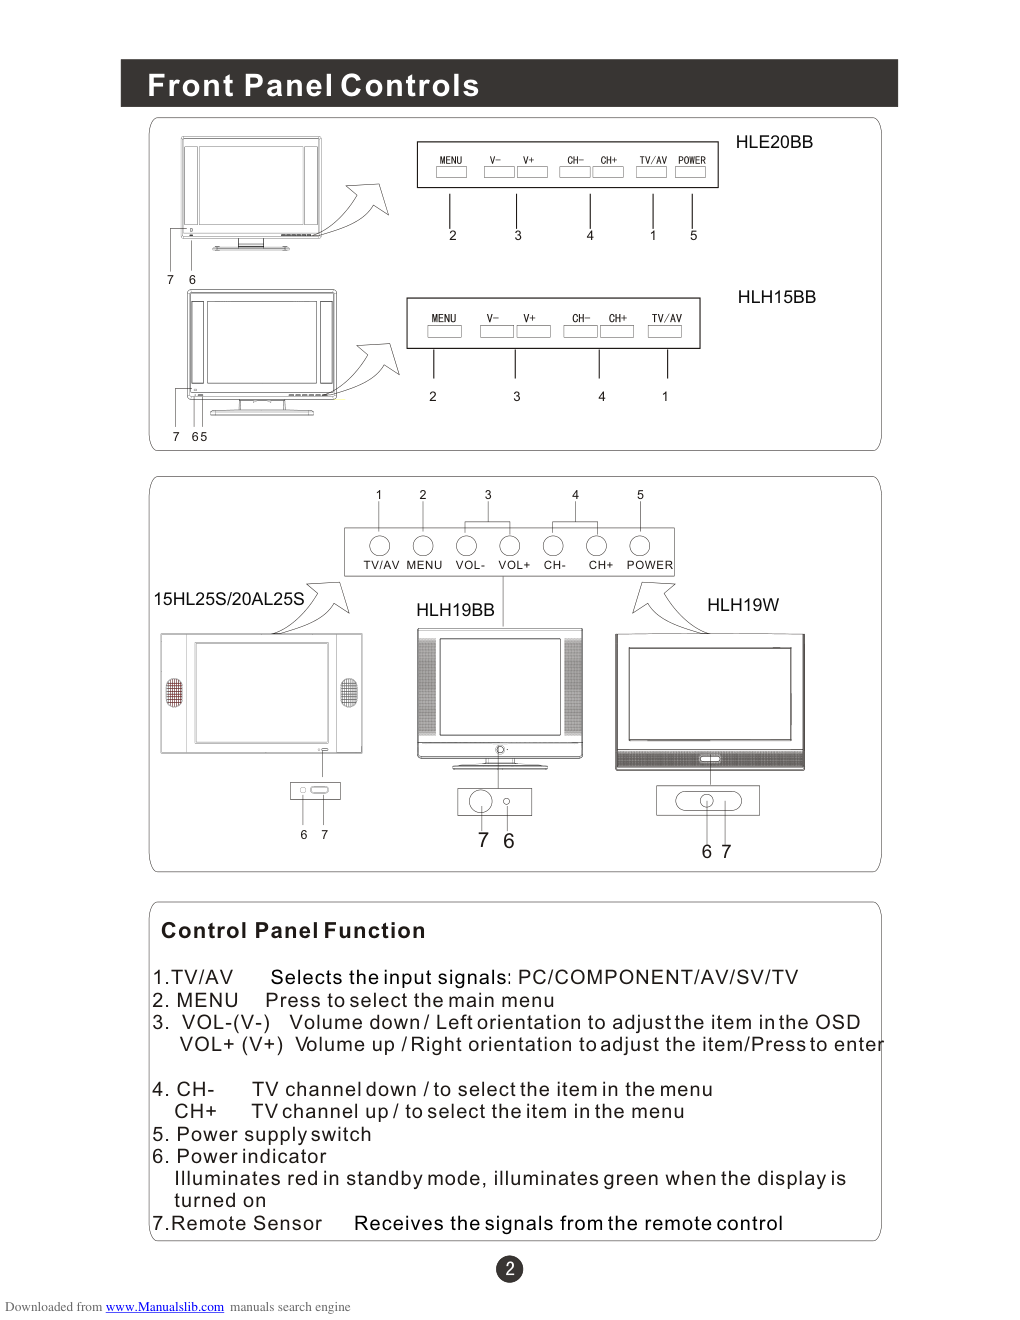
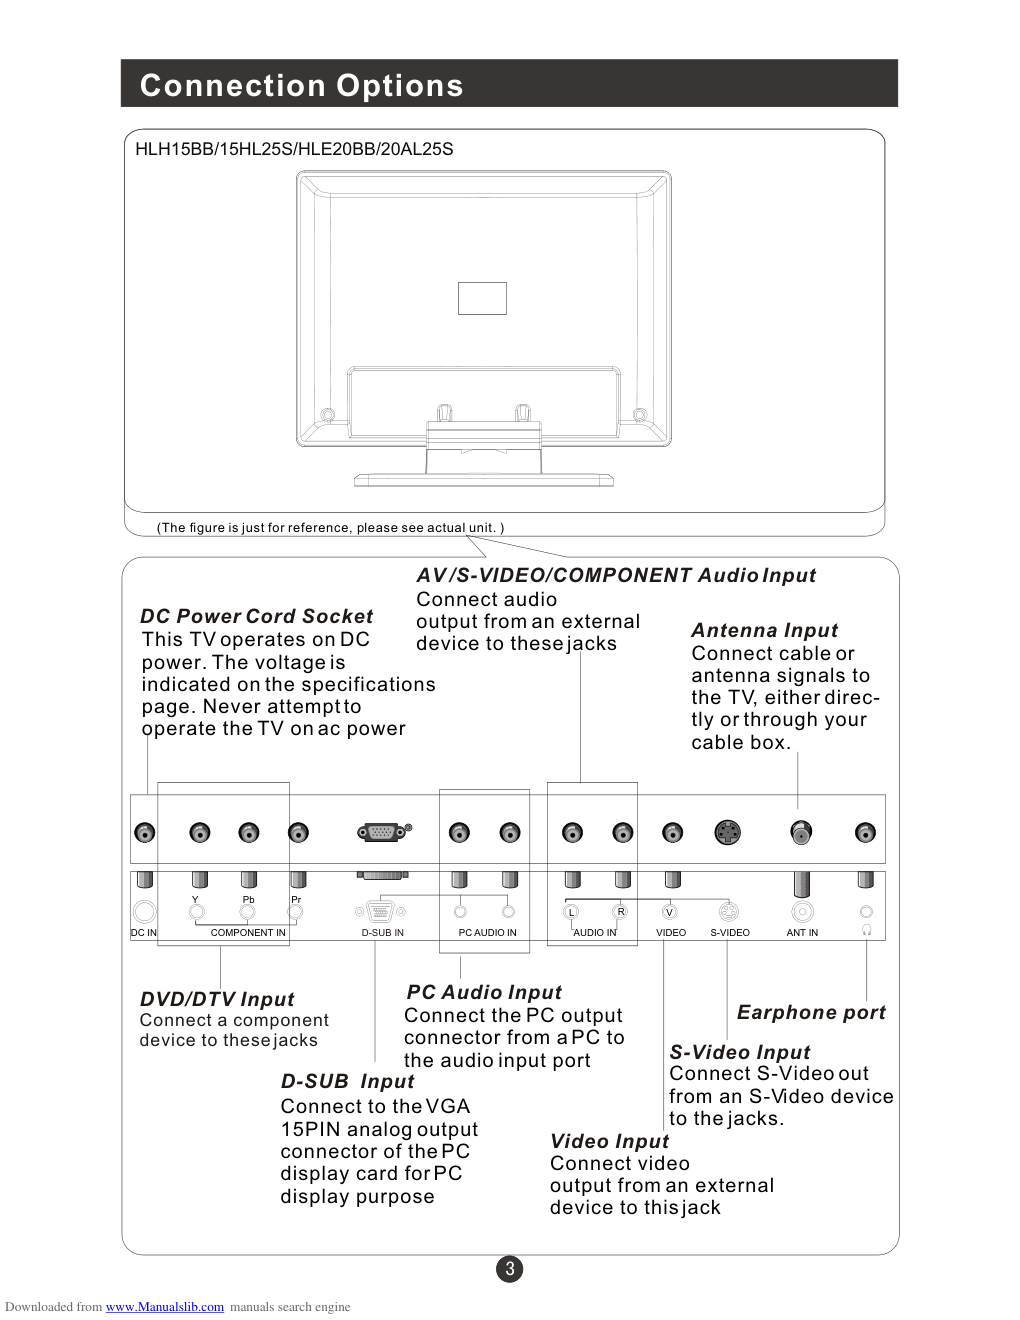
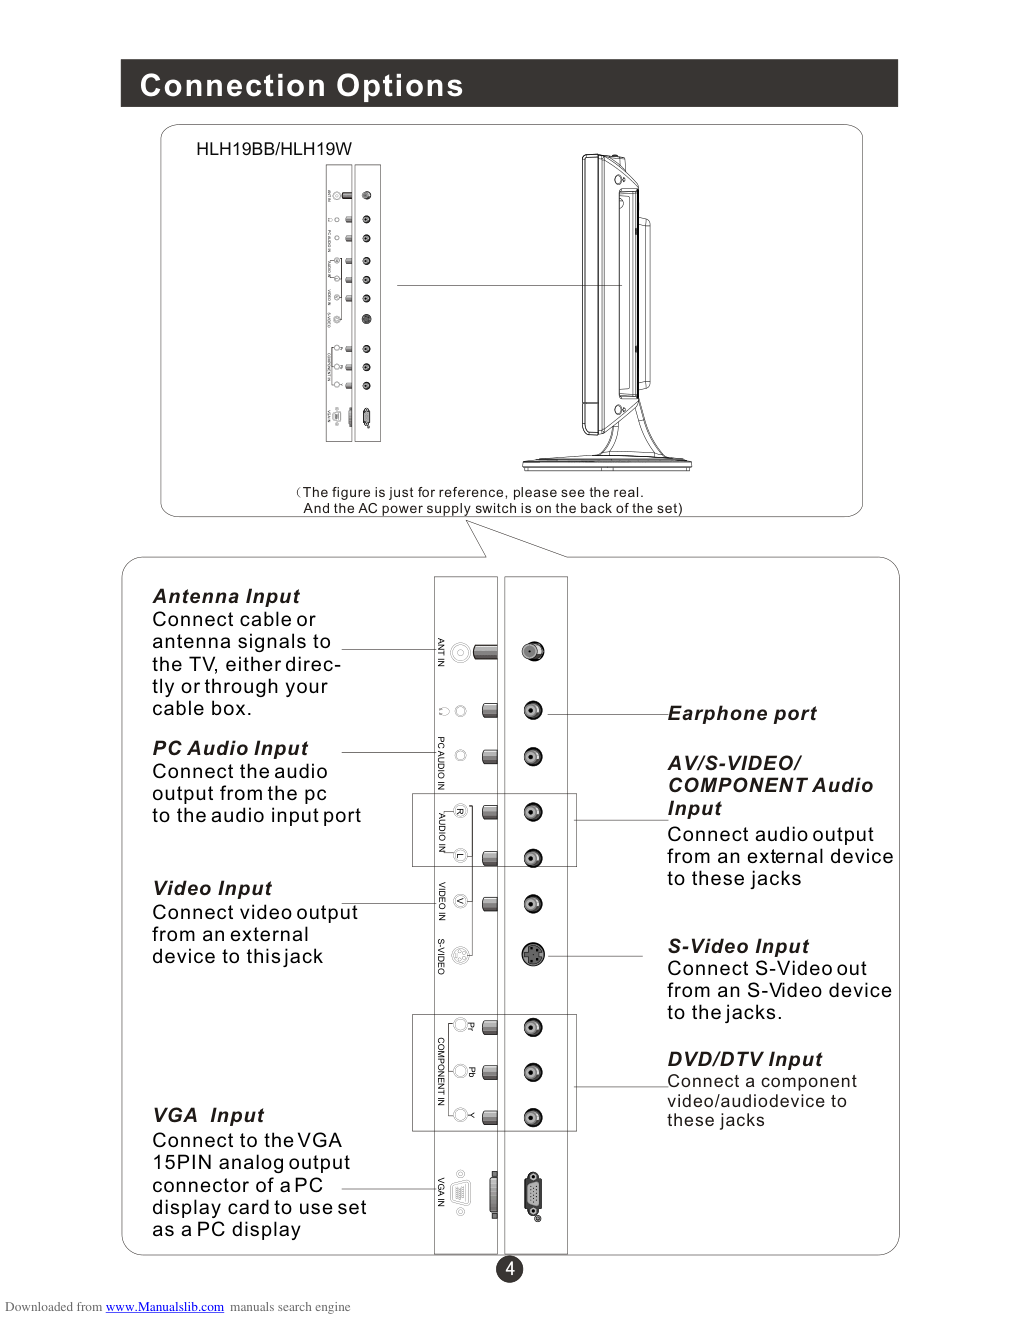
Please read this manual carefully before using this TV set and keep it for future reference. HLH15BB/15HL25S/HLE20BB/20AL25S/HLH19BB/HLH19W LCD TV USER MANUAL Downloaded from www.Manualslib.com manuals search engine THIS SYMBOL INDICATES THAT HIGH VOLTAGE IS PRESENT INSIDE. IT IS DANGEROUS TO MAKE ANY KIND OF CONTACT WITH ANY INSIDE PART OF THIS PRODUCT. WARNING : To reduce the risk of electric shock do not remove cover or back. No user-serviceable parts inside refer service to qualified service personnel. This equipment has been tested and found to comply with the limits for a Class B digital device, pursuant to Part 15 of the FCC Rule. These limits are designed to provide reasonable protection against harmful interference in a residential installation. This equipment generates, use and can radiate radio frequency energy and, if not installed and used in accordance with the instructions, may cause harmful interference to radio communications. However ,there is no guarantee that interference with not occur in a particular installation. If this equipment does cause harmful interference to radio or television reception, which can be determined by turning the equipment off and on, the user is encourage to try to correct the interference by one or more of the following measures: *Reorient or relocate the receiving antenna. *Increase the separation between the equipment and receiver. *Connect the equipment into an outlet on a circuit different from that to which the receiver is connected. *Consult the dealer or an experienced radio/TV technician for help. This device compiles with Part 15 of the FCC Rules. Operation is subject to the following two conditions: (1) This device may be not cause harmful interference, and (2) this device must accept any interference received, including interference that may cause undesired operation. FCC CAUTION: To assure continued compliance and possible undesirable interference, the provided ferrite cores must be used when connecting this plasma display to video equipment; and maintain at least 40cm spacing to other peripheral device. CANADIAN NOTICE: This Class B digital apparatus compiles with Canadian ICES-003. RISK ELECTRIC SHOOK DO NOT OPEN WARNING Safety of operators has been taken into consideration at the design and manufacture phase, but inappropriate operation may cause electric shock or fire. To prevent the product from being damaged, the following rules should be observed for the installation, use and maintenance of the product. Read the following safety instruction before starting the operation. The User Manual uses the following symbols to ensure a safe operation and prevent any damage to operators or properties: THIS SYMBOL INDICATES THAT THERE ARE IMPORTANT OPERATING AND MAINTENANCE INSTRUCTIONS IN THE LITERATURE ACCOMPANYING THE APPLIANCE. FCC STATEMENT Warning Downloaded from www.Manualslib.com manuals search engine IMPORTANT SAFETY INSTRUCTIONS Read all of the instructions before using this appliance. When using this appliance, always exercise basic safety precautions, including the following: 1)Save these Instructions ---the safety and operating instructions should be retained for future reference. 2)All warning on the appliance and in the operating instructions should be followed. 3)Cleaning --- Unplug from the wall outlet before cleaning. Do not use liquid cleaners or aerosol cleaners. Use only dry cloth for cleaning. 4)Attachments ---do not use attachments not recommended by the manufacturer as they may cause hazards. 5)Water and moisture -- do not place this product near water, for example, near a bathtub, wash bowl, kitchen sink, laundry tub, in a wet basement, or near a swimming pool. 6)Accessories ---do not place this unit on an unstable cart, stand, tripod, bracket, or table. Use only with a cart, stand, tripod, bracket, or table recommend by the manufacture, or sold with the unit. 7)Ventilation ---Slots and openings in the cabinets and the back or bottom are provided for ventilation. These openings must not be blocked. In a built in installation such a bookcase or rack do not install product unless proper ventilation is provided. 8)Power Source ---this LCD TV should be operated only from the type of power source indicated on the rating label. If you are not sure of the type of power supply to your home, consult your appliance dealer or local power company. 9)Do not defeat the safety purpose of the polarized or grounding-type plug. A polarized plug has two blades with one wider than the other. A grounding type plug has two blades and a third grounding prong. The wide blade or the third prong are provided for your safety. If the provided plug does not fit into your outlet, consult an electrician for replacement of the obsolete outlet. To prevent electric shock, ensure the grounding pin on the AC cord power plug is securely connected. 10)Power cord protection ---Power supply cords should be routed so that they are not likely to be walked on or pinched by items placed upon or against them. Pay particular attention to cords or plugs, convenience receptacle, and the point where they exit from the appliance. 11)Lighting precaution ---for added protection for this product during a lighting storm or when it is left unattended for long period of time, unplug it from the wall outlet and disconnect the antenna or cable system. This will prevent damage to the product due to lighting and power line surges. 12)Never push objects of any kind into this product through openings as they may touch dangerous voltage point or short out parts that could result in a fire or electric shock. Avoid spilling liquid of any kind on the product. 13)Servicing ---do not attempt to service the product by yourself, as opening or removing covers may expose you to dangerous voltage or other hazards. Refer all servicing to authorized service personnel. 14)Unplug this unit from the wall outlet and refer servicing to qualified service personnel under the following conditions: a. When the power supply cord or plug is damaged or frayed. Safety Instructions Downloaded from www.Manualslib.com manuals search engine b.If liquid has been spilled, or objects have been fallen into the unit. c.If the unit has been exposed to rain or water. d.If the unit does not operate normally by following the operating instructions. Adjust only those controls that are covered by the operating instructions, as improper adjustment of other controls may result in damage and will often require extensive work by a qualified technician to restore the unit to its normal operation. e.If the unit has been dropped or damaged in any way. f.When the unit exhibits a distinct change in performance; this indicates a need for service. 15)Heat --- The product should be situated away heat source such as radiators, heat registers, stoves, or other products (Including amplifiers) that product heat. 16)Overloading ---Do not overload wall outlets and extension cord as this can result in a risk of fire or electric shock. SAVE THESE INSTRUCTIONS Thank you for using our Haier product. This easy-to-use manual will guide you in getting the best use of your product. Remember to record the model and serial number. They are on label in back of the unit. Model number serial number Date of purchase Staple your receipt to your manual. You will need it to obtain warranty service. Safety Instructions Downloaded from www.Manualslib.com manuals search engine To users: Thank you for our LCD-TV. purchasing CONTENT Front Panel Controls.................................................................................. Connection Options................................................................................... Remote Control Key Functions................................................................... Remote Control .................................................................................. Installing Batteries.................................................................................. Connection Instructions............................................................................. Grounding.............................................................................................. External equipment Connections.............................................................. Antenna Connection............................................................................. PC Setup............................................................................................. VCR Setup........................................................................................... Cable TV Setup.................................................................................... External AV Source Setup...................................................................... Basic Operating Instructions....................................................................... Turn on the LCD-TV................................................................................. Audio Control.......................................................................................... Mute...................................................................................................... Select the TV Channel You Want............................................................... Picture Mode........................................................................................... Program Scan......................................................................................... Sleep...................................................................................................... Menu Operations....................................................................................... Picture Menu Options............................................................................... Picture Menu Options Continued............................................................... Sound Menu Options................................................................................ Sound Menu Options Continued................................................................ Function Menu Options............................................................................. Function Menu Options Continued............................................................. Adjust Menu Options................................................................................ Tuning Menu Options.............................................................................. Tuning Menu Options Continued.............................................................. Parental Menu Options............................................................................. Parental Menu Options Continued............................................................. Troubleshooting Guide............................................................................... Specifications........................................................................................... Warranty .................................................................................................. 2 3-4 5 6 6 7 7 7 7 8 9 10 10 11 11 11 11 12 12 12 12 13 13 14 14 15 16 17 17 18 19 19 20-22 23 24 25 Before connecting the LCD-TV and turning on the power, please read this book carefully. Please keep this book for later use. If the unit is disabled by an electrostatic discharge, please turn the power to the unit and turn it back on to reset. off Downloaded from www.Manualslib.com manuals search engine Front Panel Controls Control Panel Function 1.TV/AV PC/COMPONENT/AV/SV/TV 2. MENU Press to select the main menu 3. VOL-(V-) Volume down / Left orientation to adjust the item in the OSD VOL+ (V+) Volume up / Right orientation to adjust the item/Press to enter 4. CH- TV channel down / to select the item in the menu CH+ TV channel up / to select the item in the menu 5. Power supply switch 6. Power indicator Illuminates red in standby mode, illuminates green when the display is turned on 7.Remote Sensor Selects the input signals: Receives the signals from the remote control 2 3 1 4 5 2 3 1 4 6 7 5 6 7 HLH15BB HLE20BB TV/AV MENU VOL- VOL+ CH- CH+ POWER 1 2 3 4 5 6 7 15HL25S/20AL25S 6 7 HLH19BB 6 7 HLH19W Downloaded from www.Manualslib.com manuals search engine AV /S-VIDEO/COMPONENT Audio Input Connect audio output from an external device to these jacks D-SUB Input Connect to the VGA 15PIN analog output connector of the PC display card for PC display purpose S-Video Input Connect S-Video out from an S-Video device to the jacks. Antenna Input Connect cable or antenna signals to the TV, either direc- tly or through your cable box. Connection Options Earphone port PC Audio Input Connect the PC output connector from a PC to the audio input port (The figure is just for reference, please see actual unit. ) DVD/DTV Input Connect a component device to these jacks ANT IN S-VIDEO D-SUB IN PC AUDIO IN AUDIO IN R L VIDEO V Pb Pr Y COMPONENT IN Video Input Connect video output from an external device to this jack DC IN DC Power Cord Socket This TV operates on DC power. The voltage is indicated on the specifications page. Never attempt to operate the TV on ac power HLH15BB/15HL25S/HLE20BB/20AL25S Downloaded from www.Manualslib.com manuals search engine Connection Options VGA Input Connect to the VGA 15PIN analog output connector of a PC display card to use set as a PC display DVD/DTV Input Connect a component video/audiodevice to these jacks Video Input Connect video output from an external device to this jack AV/S-VIDEO/ COMPONENT Audio Input Connect audio output from an external device to these jacks PC Audio Input Connect the audio output from the pc to the audio input port Earphone port Antenna Input Connect cable or antenna signals to the TV, either direc- tly or through your cable box. S-Video Input Connect S-Video out from an S-Video device to the jacks. ANT IN S-VIDEO VGA IN PC AUDIO IN AUDIO IN R L VIDEO IN V Pb Pr Y COMPONENT IN ANT IN S-VIDEO VGA IN PC AUDIO IN AUDIO IN R L VIDEO IN V Pb Pr Y COMPONENT IN The figure is just for reference, please see the real. And the AC power supply switch is on the back of the set) HLH19BB/HLH19W Downloaded from www.Manualslib.com manuals search engine Remote Control Key Functions When using the remote control, aim it towards the remote sensor on the TV 2. Power supply switch 9. MENU To display/exit the main menu 11. CH+/CH- TV channel up/down or select the item of the menu 12. VOL+ Volume up / to select the main menu/ to adjust the item/ to enter the submenu. VOL- Volume down / to select the main menu/ to adjust the item 6. 0-9 TV channel number select 3. RECALL Quick TV channel switch(return to the last channel) 10. TV/AV Select PC/COMPONENT/AV/SV/TV 7. MTS/SAP Select MONO,STEREO, SAP in NTSC system 1. MUTE MUTE 8. P.STD Select picture mode: PERSONAL/STANDARD/MILD/FRESH 5. DISPLAY Display current input signal information 4. EXIT Menu exit Illustration of the keys on the remote control: MUTE RECALL DISPLAY EXIT 1 2 3 4 5 6 7 8 9 MTS/SAP P.STD MENU TV/AV CH+ CH- VOL - VOL + CCD SLEEP SCAN 0 1 2 3 4 5 6 7 8 9 10 11 12 13 14 15 13. CCD Closed caption on/off 14. SCAN Channel scan 15. SLEEP TV sleep button Downloaded from www.Manualslib.com manuals search engine Remote Control Installing Batteries 1.Slide open the cover of the battery compartment on the back of the remote control. 2.Load two batteries in the compartment. (plus and minus poles to respective mark) 3.Replace the cover of the battery compartment. AAA alkaline Precautions Make sure that there is no obstacle between the remote controller and television set. As strong light may interfere with the signals, change your position to operate the remote control if the television cannot be turned on or off as expected. Keep the remote control away from heat sources or humid areas to ensure effective performance of the remote. Make sure that two AAA alkaline batteries are loaded. The batteries must be of the same type, must be inserted properly, and must not be rechargeable. + - Downloaded from www.Manualslib.com manuals search engine Connection Instructions Ensure that you connect the grounding / earth wire to prevent possible electric shock. If grounding methods are not possible, have a qualified electrician install a separate circuit breaker. Do not try to ground the unit by connecting it to telephone wires, lightening rods, or gas pipes. Grounding External Equipment Connections Antenna Connection - Antenna or Cable Service with a Cable Box Connections - For optimum picture quality, adjust antenna direction if needed. Multi-family Dwellings/Apartments (Connect to wall antenna socket) wall antenna socket VHF antenna UHF antenna outdoor antenna Single-family Dwellings /Houses (Connect to wall jack for outdoor antenna) Bronze Wire Be careful not to bend the bronze wire when connecting the antenna. Bronze Wire Turn clockwise to tighten. RF coaxial wire (75 ohm) To improve picture quality in a poor signal area, purchase and install a signal amplifier. If the antenna needs to be split for two TV s, install a 2-Way Signal Splitter in the connections. If the antenna is not installed properly, contact your dealer for assistance. NOTE: Cables shown are not included with the TV The connection instructions shown here are for model HLH15BB for reference only. May differ with the other models mentioned. Downloaded from www.Manualslib.com manuals search engine Connection Instructions You can use your LCD-TV as a monitor for your personal computer using a VGA cable (not supplied). PC Setup Connection and use steps: 1.Read the user guide supplied with your computer and ensure that it has a VGA connector; 2.Make sure that the power of the LCD -TV and the PC are off; 3.Connect a D type 15-pin VGA interface cable ( not supplied ) to the VGA video interface connector on the PC. Then connect the other end to the VGA video interface connector on the back of the LCD-TV.Tighten the screws on the VGA connectors once they are firmly connected; 4.Turn on the power of the LCD-TV first , and then turn on the power of the PC; 5.Press the TV/AV button to set the video input mode of the LCD-TV to PC-RGB; 6.Check the image on your TV. There may be noise associated with the resolution, vertical pattern, contrast or brightness in PC mode. If noise is present, change the PC mode to another resolution, change the refresh rate to another rate or adjust the brightness and contrast on the menu until the picture is clear. If the refresh rate of the PC graphic card can not be changed,change the PC graphic card or consult the manufacturer of the PC graphic card. D-SUB IN Downloaded from www.Manualslib.com manuals search engine V IN Connection Instructions VCR Setup Connection and use steps: 1.Read the user guide supplied with your AV devices and ensure that it has Composite or S-Video connectors; 2.Make sure that the power of the LCD-TV and the AV device are off; .Turn on the power of the LCD-TV first ; and then turn on the power of the AV device; 4.Press the TV/AV button to set the video input mode of the LCD-TV to S-VIDEO mode or AV mode. Connection Option 1 Set VCR output switch to 3 or 4 and then tune TV to the same channel number. Connection Option 2 1. Connect the audio and video cables from the VCR's output jacks to the TV input jacks, as shown in the figure. When connecting the TV to VCR, match the jack colors (Video = yellow, Audio Left = white,and Audio Right = red). If you connect an S-VIDEO output from VCR to the S-VIDEO input, the picture quality is improved; compared to conne- cting a regular VCR to the Video input. 2. Insert a video tape into the VCR and press PLAY on the VCR. (Refer to the VCR owner s manual.) 3 - To avoid picture noise (interference), leave an adequate distance between the VCR and TV . VCR 1 2 Downloaded from www.Manualslib.com manuals search engine V IN V IN Connection Instructions Cable TV Setup - After subscribing to a cable TV service from a local provider you can watch cable TV programming. The TV cannot display TV programming unless a TV tuner device or cable TV converter box is connected to the TV. - For further information regarding cable TV service, contact your local cable TV service provider(s). Connection Option 1 1. Select 3 or 4 with channel switch on cable box. 2. Tune the TV channel to the same selected output channel on cable box. 3. Select channels at the cable box or with the cable box remote control. Connection Option 2 1. Connect the audio and video cables from the Cable Box's output jacks to the TV input jacks, as shown in the figure.When connecting the TV to a Cable Box, match the jack colors (Video = yellow, Audio Left = white, and Audio Right = red). 2. Select the input source by using the TV/AV button on the remote control. 3. Select your desired channel with the remote control for cable box. External AV Source Setup How to connect Connect the audio and video cables from the external equipment's output jacks to the TV input jacks, as shown in the figure. When connecting the TV to external equip- ment, match the jack colors (Video = yellow, Audio Left = white, and Audio Right = red). How to use 1. Select the input source by using the TV/AV button on the remote control. 2. Operate the corresponding external equi- pment. Refer to external equipment ope- rating guide. Downloaded from www.Manualslib.com manuals search engine Basic Operating Instructions Turn on the LCD-TV When the POWER button is pressed and the LCD-TV is turned on, the indicator light on the front of the LCD-TV changes from red to green. When the LCD-TV is turned off using the power button, the LCD-TV will go into standby mode and the indicator light turns red. Note: The display of the input mode will disappear in 3 seconds. PC COMPONENT AV SV Switch Among Different Inputs: TV / PC / COMPONENT / AV / SV Each time you press the TV/AV button, TV, PC, COMPONENT, AV, SV, will appear on the screen in order. Audio Control 1.Press the VOL+ button to increase the volume. A number will appear on screen indicating the volume level. 2.Press the VOL- button to decrease the volume. A number will appear on screen indicating the volume level. Mute 1.Press the MUTE button to mute the sound temporarily. A mute icon appears on the screen. 2.Press the MUTE button or VOL+/VOL- again to restore the sound. The mute icon disappears. TV MUTE RECALL DISPLAY EXIT 1 2 3 4 5 6 7 8 9 MTS/SAP P.STD MENU TV/AV CH+ CH- VOL - VOL + CCD SLEEP SCAN 0 30 Downloaded from www.Manualslib.com manuals search engine Basic Operating Instructions Select the TV Channel You Want You can use the number keys on the remote control to directly select TV channels. The LCD-TV can store up to channels , and you can press the keys on the remote control or on the panel to make a selection. 181 Program Scan Press SCAN button to scan through all the memorized TV channels. The scan will pause for about 2 seconds on each channel . If you want to stop the function during auto scanning, simply press the SCAN button again . Picture Mode Press P.STD button on the remote control for menu display . For desired mode as follows: PERSONAL STANDARD MILD FRESH Sleep Press SLEEP button to set the time : SLEEP 240-SLEEP 180-SLEEP 120 -SLEEP 90-SLEEP 60-SLEEP 45-SLEEP 30-SLEEP 15-SLEEP OFF This feature allows you to turn off the television after a pre-selected minutes number of Downloaded from www.Manualslib.com manuals search engine Menu Operations Picture Menu Options 1. Press MENU button to display the main menu, and VOL+/VOL-to select the main menu . 2. Press CH+/CH- to scroll through the parameters 3. Press VOL+/VOL- buttons to make changes to the parameters 4. Press the EXIT button to exit the menu * In this manual, the OSD (On Screen Display) may be different from your TV s because it is just an example to Press TV/AV to select the input source, and the menu is different . illustrate the TV operation. for each source Picture quality can be adjusted for any input separately . The picture quality on the screen can be adjusted as follows: 1. Press MENU button and VOL+/VOL- until the following menu appears on the screen. PC/COMPONENT MENU TV/AV/SV MENU PICTURE BRIGHTNESS CONTRAST SHARPNESS COLOR HUE PICTURE BRIGHTNESS CONTRAST SHARPNESS COLOR TEMP COLOR 30 Note: Symbols on top of the menu in this manual may be different from the actual set 30 30 2 COOL 50 50 2 50 50 Only available in NTSC system No available in component 0 No available in PC Downloaded from www.Manualslib.com manuals search engine Menu Operations 2. Press CH+/CH- button to enter the picture menu and to go up and down to select the desired option . 3.Press VOL+/VOL- button to increase and decrease the level to adjust the selected option to your preference . 4. Repeat step 2 and step 3 until desired picture quality has been achieved . Function: BRIGHTNESS :Adjust the brightness of the picture . By increasing the level, it will add more light to dark parts of the picture and by decreasing the level ,it will add more dark to light parts of the picture. CONTRAST : Adjust the contrast of the picture . The higher as the number increase. SHARPNESS : Adjust the amount of the detail enhancement , the image sharpness rises as the number increases (By increasing the level, it will show cleaner and clearer images and by decreasing the level, it will make picture smoother). COLOR : Press VOL+/VOL- to adjust the color HUE : Adjust the tone of the picture . Appear and be adjusted only under NTSC mode COLOR TEMP : Press to select the color temperature from contrast becomes WARM/NEUTRAL/ COOL . Picture Menu Options continued Sound Menu Options Sound can be adjusted for any input as follows: 1. Press MENU and VOL+/VOL- button until the following menu appears on the screen VOLUME BALANCE BASS TREBLE AUDIO MODE AVL SOUND 50 0 30 70 VOICE OFF Downloaded from www.Manualslib.com manuals search engine Menu Operations Sound Menu Options continued You can adjust sound options to the levels you prefer. 2. Press CH+/CH- button to enter the audio menu and to go up and down to select the desired option . 3.Press VOL+/VOL- button to increase and decrease the level to adjust the selected option to your preference . 4. Repeat step 2 and step 3 until desired sound quality has been achieved .. Function : VOLUME : Adjust the volume of your TV BALANCE : Adjust the balance of the audio output from left to right . When indication value of balance increases toward +50 , sound of the left speaker becomes weaker . When indication value of balance decreases toward -50 , sound of the right speaker become weaker . BASS : Adjust the bass of the sound . Can only be adjust under PERSONAL mode . TREBLE : Adjust the treble of the sound . Can only be adjust under PERSONAL mode . AUDIO MODE : Press VOL+/VOL- to select among PERSONAL, VOICE, MUSIC and THEATRE . AVL: Automatic Volume Limit Control reduces the effect of high volumes by the limiting the same volume to all channels . Downloaded from www.Manualslib.com manuals search engine Menu Operations Function Menu Options Menu Language Selection: The menus can be shown on the screen in the selected language. First select your language. 1. Press MENU button and VOL+/VOL- until the following menu appears on the screen. 2. Press CH+/CH- button to enter the function menu and to go up and down to select the desired option . 3.Press VOL+/VOL- button to increase and decrease the level to adjust the selected option to your preference . 4. Functions: 1. INPUT SOURCE : Display current mode . There are PC, COMPONENT , AV , SV ,TV to display . 2. LANGUAGE : Press VOL+/VOL- to select the OSD language. 3. CC MODE :Press VOL+/VOL-buttons to select the Closed Caption options. Closed Captioning helps the hearing impaired with the broadcast program, as well as helping children learn how to read. A built in decoder displays the audio portion of a program as text on the screen when this option is selected. OFF: When OFF is displayed on CC MODE is turned off. CC1: When CC1 on TV means CC MODE is turned on. CC2 to CC4: For other modes of video related broadcast information. TT1: For program guide and other information displayed by broadcasters. (This blocks a large portion of the picture on your screen). TT2 to TT4 :For other modes of information displayed by broadcasters. (This blocks a large portion of the picture on your screen). Repeat step 2 and step 3 until desired settings have been achieved . TV, it means is displayed IMPORTANT: Closed captioning availability entirely depends on broadcasters supplying the signal. Therefore, closed captioning might not always be available and language availability will differ by broadcast. INPUT SOURCE TV LANGUAGE ENGLISH CC MODE OFF BLUE SCREEN ON RESET FUNCTION Downloaded from www.Manualslib.com manuals search engine Menu Operations Function Menu Options Continued Note: Select CC1 for full translation of the primary language such as English in your area. Select CC2 for secondary language translation such as French or any other language that may be broadcast in your area. 4.BLUE SCREEN: Press VOL+/VOL- to select ON or OFF. 5. RESET : Press VOL+ to reset some settings to the factory default . To set On, the screen will be in blue screen after 3 seconds if there is no signal. Adjust Menu Options 1. Press MENU and VOL+/VOL- button until the following menu appears on the screen ADJUST AUTO CONFIG PHASE CLOCK H POSITION V POSITION Note: This menu is only appears in PC mode . 2. Press CH+/CH- button to enter the adjust menu and to go up and down to select the desired option . 3.Press VOL+/VOL- button to increase and decrease the level to adjust the selected option to your preference . 4. Repeat step 2 and step 3 until desired quality has been achieved .. Functions: AUTO CONFIG : Is opted for adjustment of picture location frequency and phase parameters . PHASE : Removes any horizontal distortion and clears or sharpness the displayed characters . CLOCK : Adjust the TFT-LCD to match the PC input source H-POSITION : Picture horizontal position adjust V-POSITION : Picture vertical position adjust . 0 50 50 50 Downloaded from www.Manualslib.com manuals search engine Menu Operations Tuning Menu Options 1. Press MENU and VOL+/VOL- button until the following menu appears on the screen Note: This menu is only appears in TV mode . 2. Press CH+/CH- button to enter the turning menu and to go up and down to select the desired option . 3.Press VOL+/VOL- button to increase and decrease the level to adjust the selected option to your preference . 4.Repeat step 2 and step 3 until desired settings have been achieved . Functions: 1. CHANNEL : Press VOL+/VOL-to go up and down to set the channel position. The display will show the current playing channel. Channel Coverage by Antenna: Antenna Type Channel Range VHF 2-13 UHF 14-69 CATV 1-125 2. 3. AFC : SKIP : If you want skip a channel , press VOL+/VOL- to select ON , and this channel will be skipped next time when you press CH+/CH- . You can press the digit buttons to select the channel . If you want to restore the channel , select OFF. Auto frequency control. Select ON to improve the image quality . CHANNEL 1 SKIP OFF AFC ON FINE TUNE ANTENNA CATV AUTO PROGRAM TUNING Downloaded from www.Manualslib.com manuals search engine Menu Operations Tuning Menu Options Continued 4. FINE TUNE : 5. ANTENNA : Press VOL+/VOL- button to select AIR (VHF and UHF) and CATV reception preference. 6. AUTO PROGRAM : Note: The AUTO PROGRAM function will scan the channels on the selected antenna input. If the TV is connected to cable, please select CATV under If the image and / or sound received is not very good , you can press CH+/CH- to select FINE TUNE in the menu . Then , press VOL+/VOL- button to adjust and improve the image quality. Do not use this feature unless reception is poor. Auto search and save the channel .Press the VOL+ button to start automatic search function operation. All channels now available will be automatically preset in order .After the search has finished, the first program number will display on the screen. This search automatically adds only the active channels in your area to the TV's memory. It deletes any channels on which there is no broadcast or a poor signal. ' ANTENNA ' sub menu. Parental Menu Options 1. Press the MENU and VOL+/VOL- button until the following menu appears on the screen . 2. Press CH+/CH- button to select PASSWORD . 3. Then input the password 0000. It will bring parental menu display on the screen. You will see the ollowing menu on your screen: PASSWORD PARENTAL CHILD LOCK OFF MPAA PG PG RATING TV-14 PG CONTENTS --DV-- CAN. ENGLISH C8+ CAN. FRENCH 8+ CHANGE PASSWORD PARENTAL ---- Downloaded from www.Manualslib.com manuals search engine Menu Operations Parental Menu Options Continued CHILD LOCK:Child Lock off means the lock function is turned off . If the Child Lock is in "off" mode then function will not be active to accept the broadcast signal.Child Lock on means the lock function is turned on. If the lock is in the "on" mode then function is activated to accept the broadcast signal. MPAA: When MPAA rating is selected, you could select OFF/G/PG/PG-13 R/NC17/X . PG RATING:Select the TV Rating option. You could select from OFF/TV-Y/TV-Y7/ TV-G/TV-PG/TV-14/TV-MA. PG CONTENTS: Press to set the grade of the program . When there is this grade of program , this program will not be display . CAN. ENGLISH: Select this option. You could select from OFF/E/C/C8+/G/PG/ 14+/18+ . CAN. FRENCH: Select this option. You could select from OFF/E/G/8+/13+/16+/ 18+ . CHANGE PASSWORD: The "Default Password" preset by the manufacturer is "0000" . If you want to change the preset password to your own password, just choose any four digits that can be easily remembered and set. Once you set password for a particular channel, that channel will be blocked. This function enables you to block certain TV channels in accordance to the requirements established by the FCC. 2. Press CH+/CH- button to enter the PARENTAL menu and to go up and down to select the desired option . 3.Press VOL+/VOL- button to go into PG RATING and MPAA Press VOL+/VOL- button to set the CHILD LOCK ON and PARENTAL LOCK OFF. 4. Repeat step 2 and step 3 until desired quality has been achieved . Downloaded from www.Manualslib.com manuals search engine Menu Operations Parental Menu Options Continued PARENTAL LOCK TECHNOLOGY: The "P.L. Technology" allows you to use U.S. and Canadian Movies and TV PROGRAMS Guide ratings to block certain types of TV programs and movies. information: these types towards these types these types To clearly understand TV program rating codes, read the following U.S. TV Program Ratings TV-Y: For all children - of rated programs are designed for a very young audience, including children from ages 2-6. TV-Y7: Directed older children - this type of rated programs may include comedic violence of mild physical, or may frighten children under the age of 7. TV-G: General audience - of rated programs contains little or no violence, no strong language, and little or no sexual dialogue and situations. TV-PG:Parental Guidance Suggested-this type of rated programs may contain limited violence, some suggestive sexual dialogue and situations, and rare language. TV-14: Parents strongly cautioned-these types of rated programs may contain sexual content, strong language and more intense violence. TV-MA:Mature audience only of rated programs may contain sexual violence, explicit sexual content and profane language. NR: Not Rated-this means that programs are not rated or rating does not apply. FV: This type of rated programs contain Fantasy and cartoon violence. Violence: This type of rated programs contain violence. S: This type of rated programs contain sex. L: This type of rated programs contain offensive language. D: This type of rated programs contain dialogue with sexual content. Downloaded from www.Manualslib.com manuals search engine Menu Operations Parental Menu Options Continued To understand clearly about movie rating codes, read the following list: U.S. Movie Rating Chart G: General Audience-this type of movie rating means all ages admitted to see the movie. PG-13:Parents Strongly Cautioned - this type of movie rating means some material may not be appropriate for children under13. R: Restricted- This type of movie rating means children under 17 of age require to be with parent or guardian. NC-17:This type of movie rating means no one 17 and under admitted. X: This type of movie rating means adults only. NR: This means movie is not rated yet. It is pending government rating approval. To clearly understand Canadian program rating codes, read the following list: E: news, sports, documentaries, talk shows, music videos, and variety of other programs. C: for children under age 8. There is no offensive language, nudity or sexual content. C8+:T of rated programs are generally considered acceptable for children 8 years and over. There is no profanity, nudity or sexual content. G: T of rated programs are generally suitable for all audiences. PG: Parental Guidance Suggested -in of rated programs, some material may not be suitable for children. 14+: In of rated programs, some content may not be suitable for viewers under the age of 14.Parents are strongly cautioned not to have their children view 14+ rated programs by pre-teens and early teens. 18+: Adults Only-these types of rated programs are only for adult viewers only. Canadian English Rating Chart These types of programs are exempt from the rating system. Exempt programming includes: This type of programming is intended hese types hese types these types these types Downloaded from www.Manualslib.com manuals search engine To assist in location possible faults use help guide below. Troubleshooting Guide Note: 1.If the fault can not be repaired using the above guide consult with your local authorized service center. 2.The TV set must only be repaired by a qualified registered service person. Never attempt to remove the back cover as the TV set has dangerous voltages levels inside that may be fatal or cause fire. Troubleshooting No picture, no sound Verify if the television is properly plugged in. Verify if the television is properly supplied with power. Verify that electricity is available. Blank screen Verify if correct signals are input. Press TV/AV button to change signal input to TV input. Restart the television of power supply is interrupted. No sound Press MUTE button and verify if Mute mode is on. Switch to another channel and verify if the same problem happens. Press VOL+ button to see if the problem can be solved. Poor sound Verify if sound system is functional. Refer to chapter on adjusting. No picture in some channel Verify if correct channel is selected. Adjust the antenna. Make adjustments by FINE TUNE No color for some channel program (black and white) Verify if the same problem exists in other channels. Check picture and sound systems. Refer to relative instructions in the Manual for color adjust. Spots with some or all pictures Verify if the antenna is correctly connected. Verify if the antenna is in good condition. Make fine adjustment of channel. Abnormal functioning Disconnect the television from power supply and, 10 seconds later, reconnect to the power supply. If the problem still exists, contact an authorized service depot for technical assistance. Downloaded from www.Manualslib.com manuals search engine Specifications Accessories Picture, sound system Audio output External input port AC-DC adapter Temperature 1.5W+1.5W AV input PC input S-VIDEO input PC audio input Headphone output YPbPr input Antenna input DC input Input: 110V 60Hz, Output: ~ NTSC-M Working:5 C~35 C Storage:-10 C~45 C Power consumption Model HLH15BB/15HL25S 48W Remote control Batteries User manual AC-DC adapter NOTE Design and specifications are subject to change without notice. Dimensions quoted in this manual are approximate. HLE20BB/20AL25S 60W --- 12V Accessories Picture, sound system Audio output External input port Temperature 1.5W+1.5W AV input PC input S-VIDEO input PC audio input Headphone output YPbPr input Antenna input NTSC-M Working:5 C~35 C Storage:-10 C~45 C Power consumption Model HLH19BB/HLH19W Remote control Batteries User manual 60W Power requirements 120V 60Hz ~ Downloaded from www.Manualslib.com manuals search engine Warranty Warranty 90 days labor and one year parts . Warranty Downloaded from www.Manualslib.com manuals search engine V0.3 0090508051A Downloaded from www.Manualslib.com manuals search engine
版权声明
1. 本站所有素材,仅限学习交流,仅展示部分内容,如需查看完整内容,请下载原文件。
2. 会员在本站下载的所有素材,只拥有使用权,著作权归原作者所有。
3. 所有素材,未经合法授权,请勿用于商业用途,会员不得以任何形式发布、传播、复制、转售该素材,否则一律封号处理。
4. 如果素材损害你的权益请联系客服QQ:77594475 处理。