海尔ELD1547液晶彩电使用手册
)
)
)
)
)
)
)
)
)
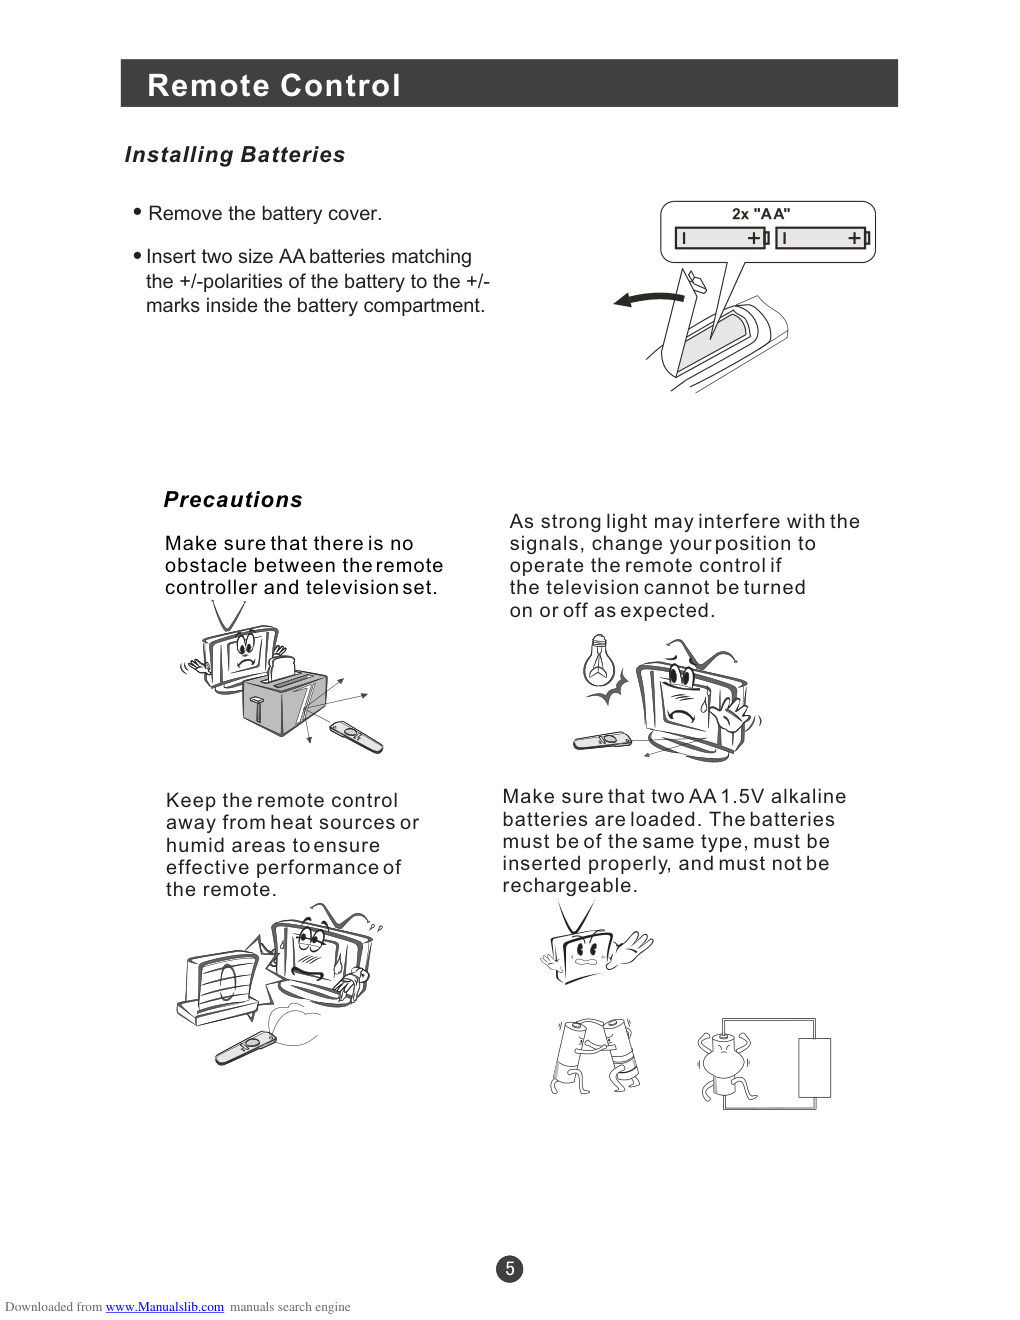)
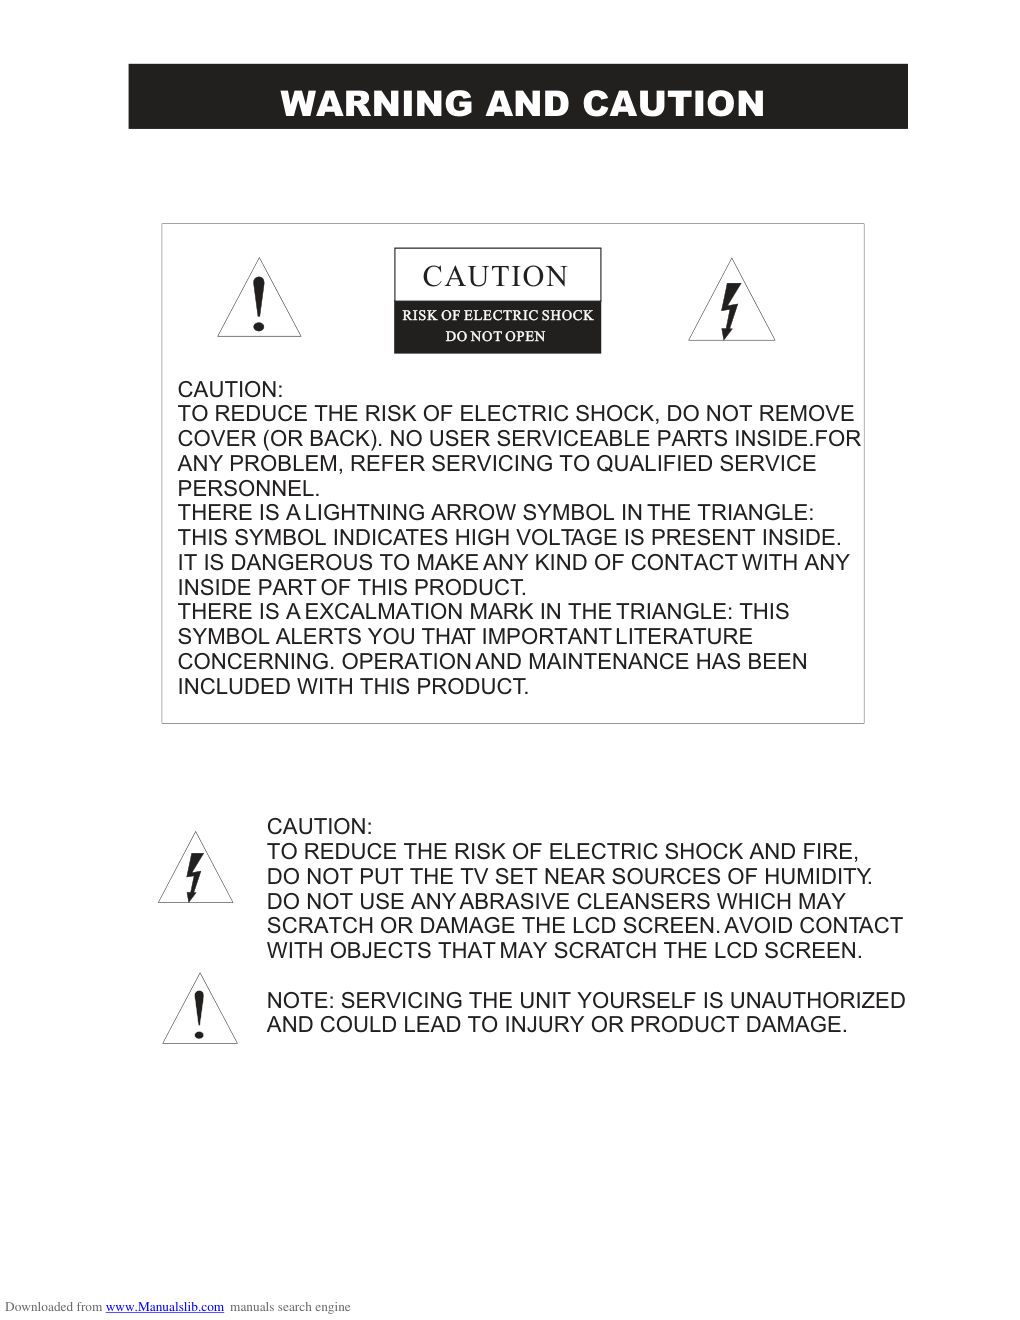
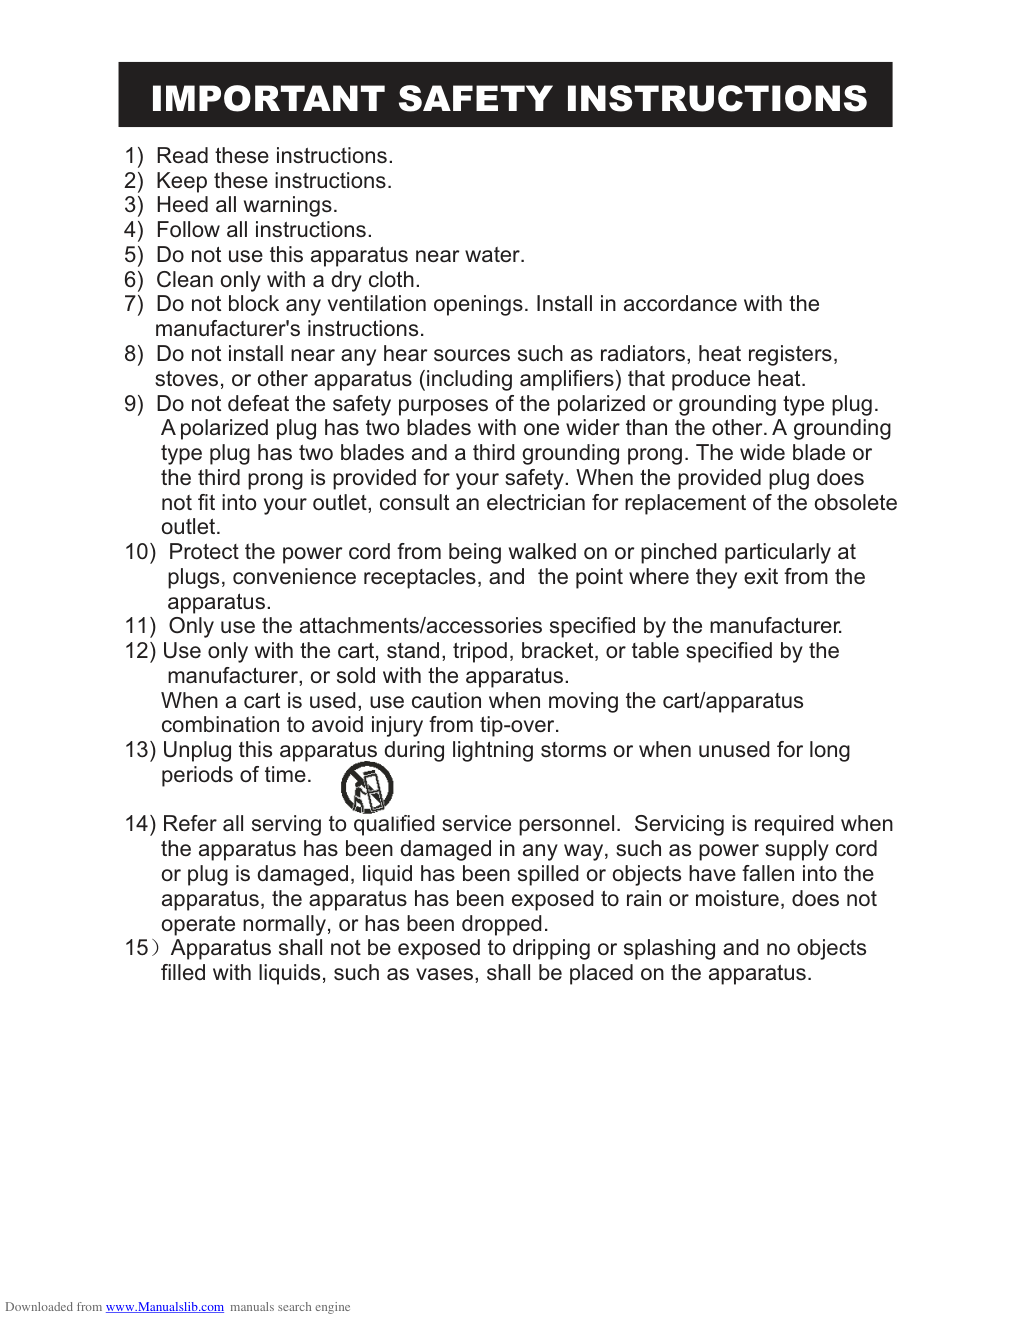
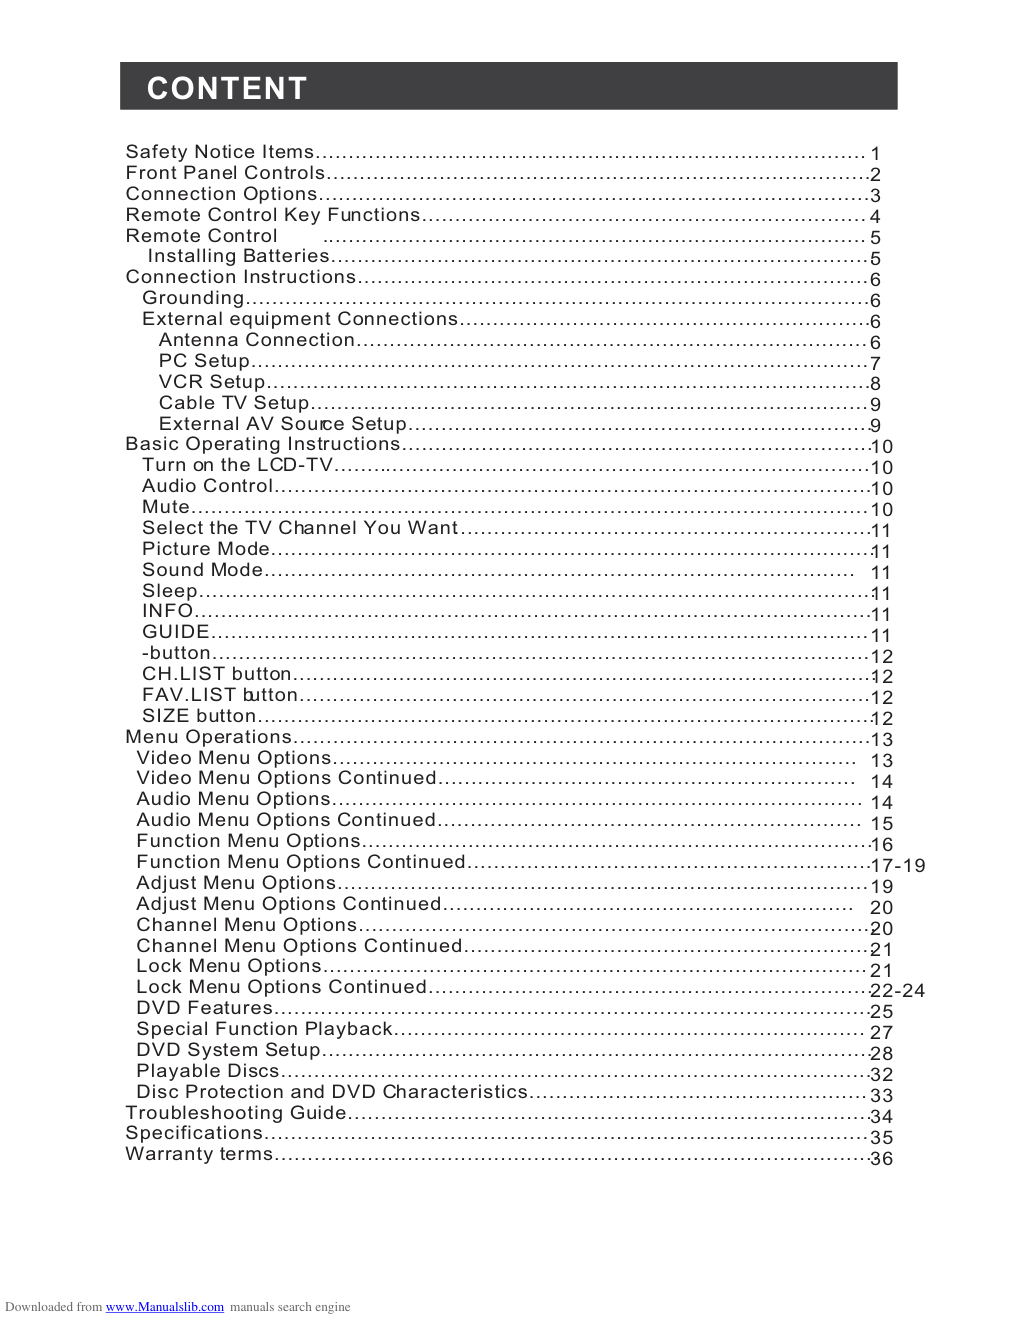
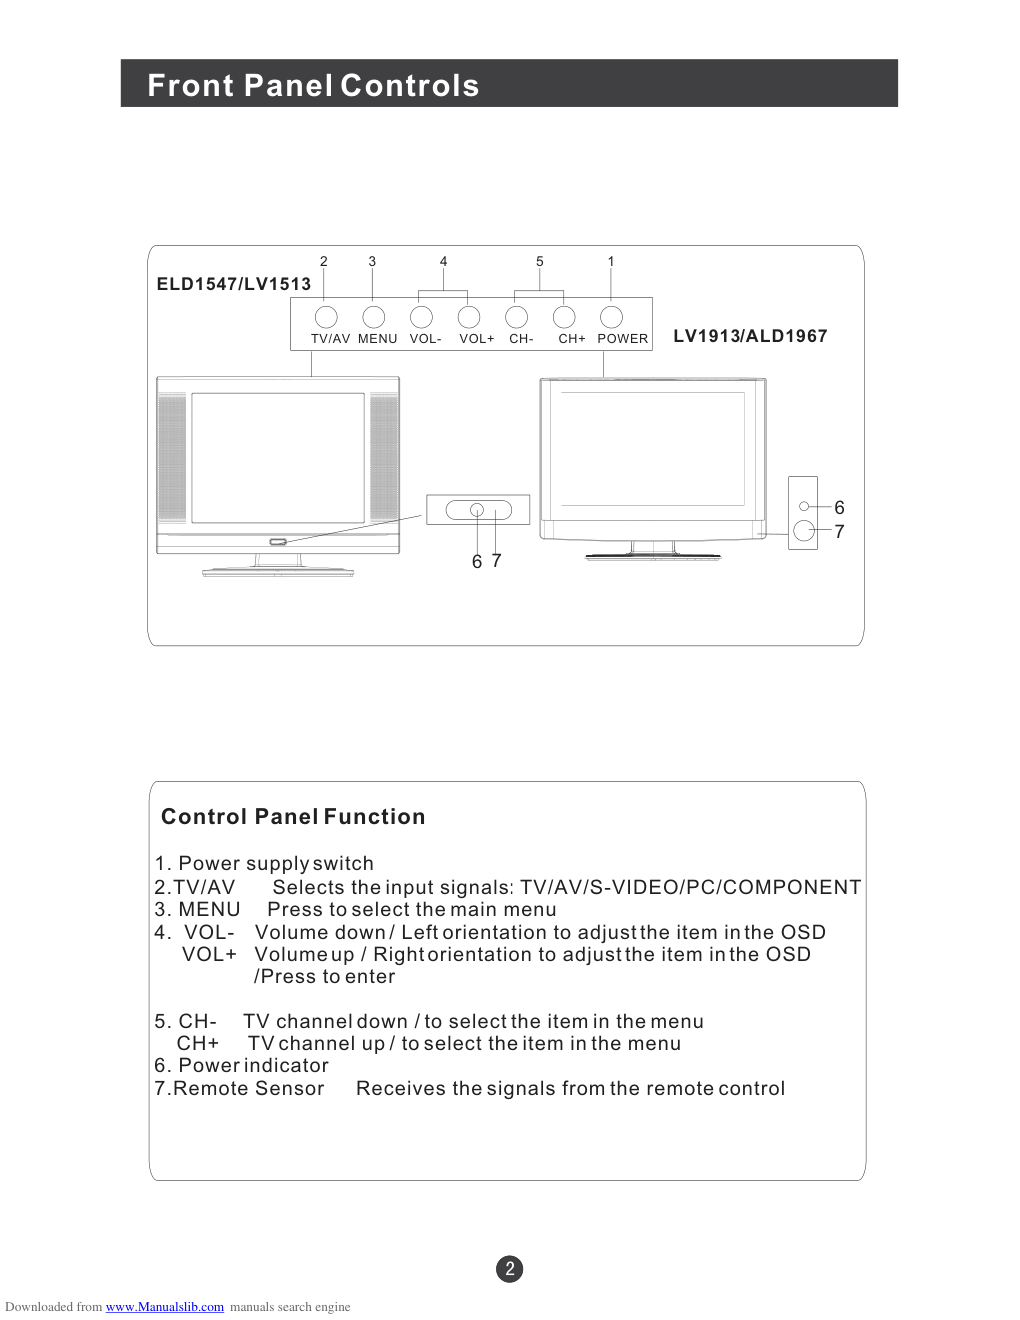
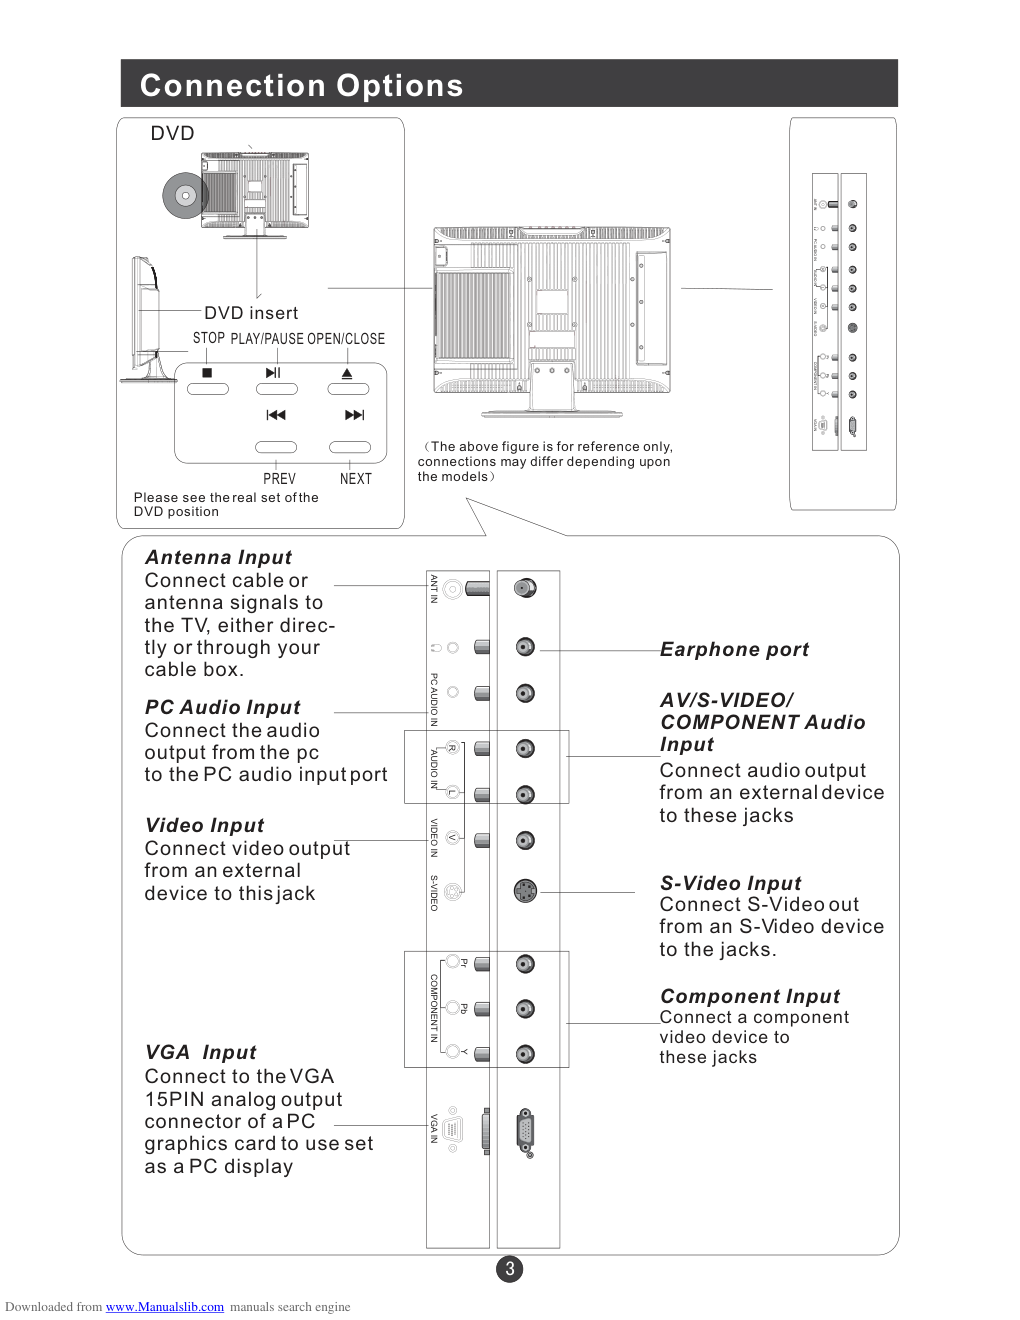
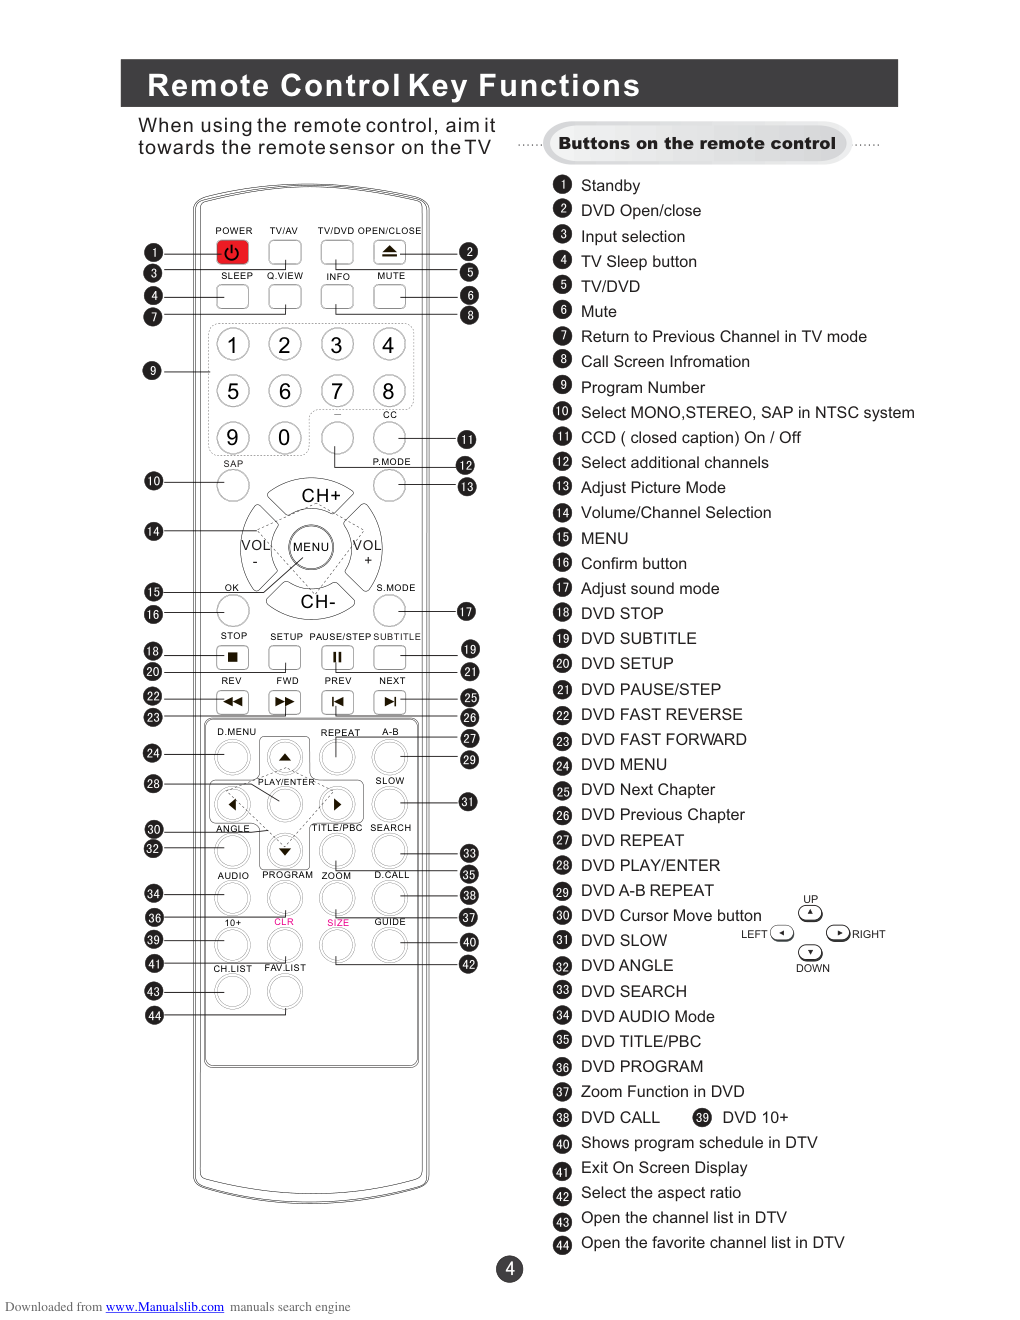
Please read this manual carefully before using this TV set and keep it for future reference. LCD TV/DVD Player Combo USER MANUAL ELD1547 LV1513 LV1913 ALD1967 / / / Downloaded from www.Manualslib.com manuals search engine WARNING AND CAUTION CAUTION: TO REDUCE THE RISK OF ELECTRIC SHOCK, DO NOT REMOVE COVER (OR BACK). NO USER SERVICEABLE PARTS INSIDE.FOR ANY PROBLEM, REFER SERVICING TO QUALIFIED SERVICE PERSONNEL. THERE IS A LIGHTNING ARROW SYMBOL IN THE TRIANGLE: THIS SYMBOL INDICATES HIGH VOLTAGE IS PRESENT INSIDE. IT IS DANGEROUS TO MAKE ANY KIND OF CONTACT WITH ANY INSIDE PART OF THIS PRODUCT. THERE IS A EXCALMATION MARK IN THE TRIANGLE: THIS SYMBOL ALERTS YOU THAT IMPORTANT LITERATURE CONCERNING. OPERATION AND MAINTENANCE HAS BEEN INCLUDED WITH THIS PRODUCT. CAUTION DO NOT OPEN DO NOT OPEN RISK OF ELECTRIC SHOCK RISK OF ELECTRIC SHOCK ! ! CAUTION: TO REDUCE THE RISK OF ELECTRIC SHOCK AND FIRE, DO NOT PUT THE TV SET NEAR SOURCES OF HUMIDITY. DO NOT USE ANY ABRASIVE CLEANSERS WHICH MAY SCRATCH OR DAMAGE THE LCD SCREEN. AVOID CONTACT WITH OBJECTS THAT MAY SCRATCH THE LCD SCREEN. NOTE: SERVICING THE UNIT YOURSELF IS UNAUTHORIZED AND COULD LEAD TO INJURY OR PRODUCT DAMAGE. Downloaded from www.Manualslib.com manuals search engine IMPORTANT SAFETY INSTRUCTIONS 1) Read these instructions. 2) Keep these instructions. 3) Heed all warnings. 4) Follow all instructions. 5) Do not use this apparatus near water. 6) Clean only with a dry cloth. 7) Do not block any ventilation openings. Install in accordance with the manufacturer's instructions. 8) Do not install near any hear sources such as radiators, heat registers, stoves, or other apparatus (including amplifiers) that produce heat. 9) Do not defeat the safety purposes of the polarized or grounding type plug. A polarized plug has two blades with one wider than the other. A grounding type plug has two blades and a third grounding prong. The wide blade or the third prong is provided for your safety. When the provided plug does not fit into your outlet, consult an electrician for replacement of the obsolete outlet. 10) Protect the power cord from being walked on or pinched particularly at plugs, convenience receptacles, and the point where they exit from the apparatus. 11) Only use the attachments/accessories specified by the manufacturer. 12) Use only with the cart, stand, tripod, bracket, or table specified by the manufacturer, or sold with the apparatus. When a cart is used, use caution when moving the cart/apparatus combination to avoid injury from tip-over. 13) Unplug this apparatus during lightning storms or when unused for long periods of time. 14) Refer all serving to qualified service personnel. Servicing is required when the apparatus has been damaged in any way, such as power supply cord or plug is damaged, liquid has been spilled or objects have fallen into the apparatus, the apparatus has been exposed to rain or moisture, does not operate normally, or has been dropped. 15 Apparatus shall not be exposed to dripping or splashing and no objects filled with liquids, such as vases, shall be placed on the apparatus. Downloaded from www.Manualslib.com manuals search engine Safety Instructions PRECAUTIONS FCC WARNING-This equipment may generate or use radio frequency energy.Changes or modifications to this equipment may cause harmful interference unless the modifications are expressly approved in the instruction manual.The user could lose the authority to operate this equipment if an unauthorized change or modification is made. CAUTION:USE OF CONTROLS OR ADJUSTMENTS OR PERFORMANCE OF PROCEDURES OTHER THAN THOSE SPECIFIED HEREIN MAY RESULT IN HAZARDOUS RADIATION EXPOSURE. LASER SAFETY This unit employs a laser.Only a qualified service person should remove the cover or attempt to service this device,due to possible eye injury. CAUTION:VISIBLE AND INVISIBLE LASER RADIATION WHEN OPEN AND INTERLOCK DEFEATED.DO NOT STARE INTO BEAM. LOCATION:INSIDE,NEAR THE DECK MECHANISM. Downloaded from www.Manualslib.com manuals search engine CONTENT Safety Notice Items................................................................................... Front Panel Controls.................................................................................. Connection Options................................................................................... Remote Control Key Functions................................................................... Remote Control .................................................................................. Installing Batteries.................................................................................. Connection Instructions............................................................................. Grounding.............................................................................................. External equipment Connections.............................................................. Antenna Connection............................................................................. PC Setup............................................................................................. VCR Setup........................................................................................... Cable TV Setup.................................................................................... External AV Source Setup...................................................................... Basic Operating Instructions....................................................................... Turn on the LCD-TV................................................................................. Audio Control.......................................................................................... Mute...................................................................................................... Select the TV Channel You Want............................................................... Picture Mode........................................................................................... Sound Mode......................................................................................... Sleep...................................................................................................... INFO...................................................................................................... GUIDE................................................................................................... -button................................................................................................... CH.LIST button........................................................................................ FAV.LIST button...................................................................................... SIZE button............................................................................................. Menu Operations....................................................................................... Video Menu Options............................................................................... Video Menu Options Continued............................................................... Audio Menu Options................................................................................ Audio Menu Options Continued................................................................ Function Menu Options............................................................................. Function Menu Options Continued............................................................. Adjust Menu Options................................................................................ Adjust Menu Options Continued.............................................................. Channel Menu Options.............................................................................. Channel Menu Options Continued.............................................................. Lock Menu Options.................................................................................. Lock Menu Options Continued................................................................... DVD Features.......................................................................................... Special Function Playback....................................................................... DVD System Setup................................................................................... Playable Discs......................................................................................... Disc Protection and DVD Characteristics................................................... Troubleshooting Guide............................................................................... Specifications........................................................................................... Warranty terms........................................................................................... 1 2 3 4 5 5 6 6 6 6 7 8 9 9 10 10 10 10 11 11 11 11 11 11 12 12 12 12 13 13 14 14 15 16 17-19 19 20 20 21 21 22-24 25 27 28 32 33 34 35 36 Downloaded from www.Manualslib.com manuals search engine Safety Notice Items Incorrect usage may cause fire or electric shock. Please keep this manual for later use; Please comply strictly with the warning instructions on the machine and in this book; Before operation, please make sure that the operating voltage of your unit is correct; Do not remove the back cover. If service is needed, please contact an Authorized service technician. To prevent this, please do as required when you are installing, using and cleaning this machine. To insure your safety and extend the life-span of LCD-TV, please read the following items carefully before using: l Please read and understand all the instructions before operation; l l l Please comply with the instructions provided; l Please do not use additional devices that are not recommended by manufacturer: l l Do not place the unit on unstable, dusty and humid places; l Never put the unit in direct sunlight or near heat sources; l Allow enough space for proper ventilation; l Please keep water away from the LCD-TV . If water comes in contact with the LCD-TV, disconnect the power cord from the power source, then wipe the set with a dry soft cloth; l Downloaded from www.Manualslib.com manuals search engine Front Panel Controls Control Panel Function 1. Power supply switch 2.TV/AV TV/AV/S-VIDEO/PC/COMPONENT 3. MENU Press to select the main menu 4. VOL- Volume down / Left orientation to adjust the item in the OSD VOL+ Volume up / Right orientation to adjust the item in the OSD /Press to enter 5. CH- TV channel down / to select the item in the menu CH+ TV channel up / to select the item in the menu 6. Power indicator 7.Remote Sensor Selects the input signals: Receives the signals from the remote control 6 7 TV/AV MENU VOL- VOL+ CH- CH+ POWER 2 3 4 5 1 ELD1547 LV1513 / 6 7 LV1913 ALD1967 / Downloaded from www.Manualslib.com manuals search engine Connection Options The above figure is for reference only, connections may differ depending upon the models DVD STOP PLAY/PAUSE OPEN/CLOSE PREV NEXT DVD insert ANT IN S-VIDEO VGA IN PC AUDIO IN AUDIO IN R L VIDEO IN V Pb Pr Y COMPONENT IN Video Input Connect video output from an external device to this jack PC Audio Input Connect the audio output from the pc to the PC audio input port Connect cable or antenna signals to the TV, either direc- tly or through your cable box. VGA Input Connect to the VGA 15PIN analog output connector of a PC graphics card to use set as a PC display Component Input Connect a component video device to these jacks AV/S-VIDEO/ COMPONENT Audio Input Connect audio output from an external device to these jacks Earphone port Antenna Input S-Video Input Connect S-Video out from an S-Video device to the jacks. ANT IN S-VIDEO VGA IN PC AUDIO IN AUDIO IN R L VIDEO IN V Pb Pr Y COMPONENT IN Please see the real set of the DVD position Downloaded from www.Manualslib.com manuals search engine Remote Control Key Functions When using the remote control, aim it towards the remote sensor on the TV Standby DVD Open/close Input selection TV Sleep button TV/DVD Mute Return to Previous Channel in TV mode Call Screen Infromation Program Number Select MONO,STEREO, SAP in NTSC system CCD ( closed caption) On / Off Select additional channels Adjust Picture Mode Volume/Channel Selection MENU Confirm button Adjust sound mode DVD STOP DVD SUBTITLE DVD SETUP DVD PAUSE/STEP DVD FAST REVERSE DVD FAST FORWARD DVD MENU DVD Next Chapter DVD Previous Chapter DVD REPEAT DVD PLAY/ENTER DVD A-B REPEAT DVD Cursor Move button DVD SLOW DVD ANGLE DVD SEARCH DVD AUDIO Mode DVD TITLE/PBC DVD PROGRAM Zoom Function in DVD DVD CALL DVD 10+ Shows program schedule in DTV Exit On Screen Display Select the aspect ratio Open the channel list in DTV Open the favorite channel list in DTV Buttons on the remote control UP DOWN LEFT RIGHT POWER TV/DVD OPEN/CLOSE SLEEP Q.VIEW INFO MUTE 1 2 3 4 5 6 7 8 9 0 CC P.MODE CH+ CH- VOL - VOL + MENU OK S.MODE STOP SETUP PAUSE/STEP REV FWD . PREV NEXT D.MENU REPEAT A-B PLAY/ENTER SLOW ANGLE TITLE/PBC SEARCH ZOOM D.CALL PROGRAM SUBTITLE SAP TV/AV AUDIO SIZE GUIDE CLR 10+ FAV.LIST CH.LIST Downloaded from www.Manualslib.com manuals search engine Remote Control Installing Batteries Remove the battery cover. Insert two size AA batteries matching the +/-polarities of the battery to the +/- marks inside the battery compartment. ! ! Precautions Make sure that there is no obstacle between the remote controller and television set. As strong light may interfere with the signals, change your position to operate the remote control if the television cannot be turned on or off as expected. Keep the remote control away from heat sources or humid areas to ensure effective performance of the remote. Make sure that two AA 1.5V alkaline batteries are loaded. The batteries must be of the same type, must be inserted properly, and must not be rechargeable. Downloaded from www.Manualslib.com manuals search engine Connection Instructions Ensure that you connect the grounding / earth wire to prevent possible electric shock. If grounding methods are not possible, have a qualified electrician install a separate circuit breaker. Do not try to ground the unit by connecting it to telephone wires, lightening rods, or gas pipes. Grounding External Equipment Connections Antenna Connection - Antenna or Cable Service with a Cable Box Connections - For optimum picture quality, adjust antenna direction if needed. Multi-family Dwellings/Apartments (Connect to wall antenna socket) wall antenna socket VHF antenna UHF antenna outdoor antenna Single-family Dwellings /Houses (Connect to wall jack for outdoor antenna) Bronze Wire Be careful not to bend the bronze wire when connecting the antenna. Bronze Wire Turn clockwise to tighten. RF coaxial wire (75 ohm) To improve picture quality in a poor signal area, purchase and install a signal amplifier. If the antenna needs to be split for two TV s, install a 2-Way Signal Splitter in the connections. If the antenna is not installed properly, contact your dealer for assistance. NOTE: Cables shown are not included with the TV Downloaded from www.Manualslib.com manuals search engine Connection Instructions You can use your LCD-TV as a monitor for your personal computer using a VGA cable (not supplied). PC Setup Connection and use steps: 1.Read the user guide supplied with your computer and ensure that it has a VGA connector; 2.Make sure that the power of the LCD -TV and the PC are off; 3.Connect a D type 15-pin VGA interface cable ( not supplied ) to the VGA video interface connector on the PC. Then connect the other end to the VGA video interface connector on the back of the LCD-TV.Tighten the screws on the VGA connectors once they are firmly connected; 4.Turn on the power of the LCD-TV first , and then turn on the power of the PC; 5.Press the TV/AV button to set the video input mode of the LCD-TV to PC; 6.Check the image on your TV. There may be noise associated with the resolution, vertical pattern, contrast or brightness in PC mode. If noise is present, change the PC mode to another resolution, change the refresh rate to another rate or adjust the brightness and contrast on the menu until the picture is clear. If the refresh rate of the PC graphic card can not be changed,change the PC graphic card or consult the manufacturer of the PC graphic card. Downloaded from www.Manualslib.com manuals search engine Connection Instructions VCR Setup Connection and use steps: 1.Read the user guide supplied with your AV devices and ensure that it has Composite or S-Video connectors; 2.Make sure that the power of the LCD-TV and the AV device are off; .Turn on the LCD-TV first ; and then turn on the power of the AV device; 4.Press the TV/AV button to set the video input mode of the LCD-TV to S-VIDEO mode or AV mode. Connection Option 1 Set VCR output switch to 3 or 4 and then tune TV to the same channel number. Connection Option 2 1. Connect the audio and video cables from the VCR's output jacks to the TV input jacks, as shown in the figure. When connecting the TV to VCR, match the jack colors (Video = yellow, Audio Left = white,and Audio Right = red). If you connect an S-VIDEO output from VCR to the S-VIDEO input, the picture quality is improved; compared to conne- cting a regular VCR to the Video input. 2. Insert a video tape into the VCR and press PLAY on the VCR. (Refer to the VCR owner s manual.) 3 - To avoid picture noise (interference), leave an adequate distance between the VCR and TV . VCR 1 2 Downloaded from www.Manualslib.com manuals search engine Connection Instructions Cable TV Setup - After subscribing to a cable TV service from a local provider you can watch cable TV programming. The TV cannot display TV programming unless a TV tuner device or cable TV converter box is connected to the TV. - For further information regarding cable TV service, contact your local cable TV service provider(s). Connection Option 1 1. Select 3 or 4 with channel switch on cable box. 2. Tune the TV channel to the same selected output channel on cable box. 3. Select channels at the cable box or with the cable box remote control. Connection Option 2 1. Connect the audio and video cables from the Cable Box's output jacks to the TV input jacks, as shown in the figure.When connecting the TV to a Cable Box, match the jack colors (Video = yellow, Audio Left = white, and Audio Right = red). 2. Select the input source by using the TV/AV button on the remote control. 3. Select your desired channel with the remote control for cable box. External AV Source Setup How to connect Connect the audio and video cables from the external equipment's output jacks to the TV input jacks, as shown in the figure. When connecting the TV to external equip- ment, match the jack colors (Video = yellow, Audio Left = white, and Audio Right = red). How to use 1. Select the input source by using the TV/AV button on the remote control. 2. Operate the corresponding external equi- pment. Refer to external equipment ope- rating guide. Downloaded from www.Manualslib.com manuals search engine POWER TV/DVD OPEN/CLOSE SLEEP Q.VIEW INFO MUTE 1 2 3 4 5 6 7 8 9 0 CC P.MODE CH+ CH- VOL - VOL + MENU OK S.MODE STOP SETUP PAUSE/STEP REV FWD . PREV NEXT D.MENU REPEAT A-B PLAY/ENTER SLOW ANGLE TITLE/PBC SEARCH ZOOM D.CALL PROGRAM SUBTITLE SAP TV/AV AUDIO SIZE GUIDE CLR 10+ FAV.LIST CH.LIST Basic Operating Instructions Turn on the LCD-TV When the POWER button is pressed and the LCD-TV is turned on, the indicator light on the front of the LCD-TV changes from red to green(or from dark to light). When the LCD-TV is turned off using the power button, the LCD-TV will go into standby mode and the indicator light turns red(or turns dark). Note: The display of the input mode will disappear in 3 seconds. Each time you press the TV/AV button, TV, AV, S-VIDEO,PC, COMPONENT will appear on the screen in order. Each time you press the TV/DVD button, the current inputs and DVD will appear on the screen in order. Audio Control 1.Press the VOL+ button to increase the volume. A number will appear on screen indicating the volume level. 2.Press the VOL- button to decrease the volume. A number will appear on screen indicating the volume level. Mute 1.Press the MUTE button to mute the sound temporarily. A mute icon appears on the screen. 2.Press the MUTE button or VOL+ again to restore the sound. The mute icon disappears. Downloaded from www.Manualslib.com manuals search engine Basic Operating Instructions Select the TV Channel You Want You can use the number buttons on the remote control to directly select TV channels. And you can press the buttons on the remote control or on the panel to make a selection. Sound Mode Press S.MODE button on the remote control for menu display . For desired mode as follows: CUSTOM STANDARD MUSIC THEATRE Picture Mode Press P.MODE button on the remote control for menu display . For desired mode as follows: CUSTOM STANDARD MILD VIVID Sleep Press SLEEP button to set the time : This feature allows you to turn off the television after a pre-selected minutes SLEEP OFF-SLEEP 5 MIN-SLEEP 10 MIN- SLEEP 15 MIN-SLEEP 30 MIN-SLEEP 45 MIN-SLEEP 60 MIN-SLEEP 90 MIN- SLEEP 120 MIN number of INFO Press INFO button to display the current information. In the digits channel of TV, press INFO button to display basic information, press the second time to display DTV information. GUIDE(only available in digital signal) Press GUIDE button in digital channels to display Guide menu.(This menu is just for you to see the information and can not be changed) Press VOL+/VOL- to switch the page and CH+/CH- to select up and down for you to look over. Downloaded from www.Manualslib.com manuals search engine Basic Operating Instructions - button Press to select additional channels (digital and analog) being broadcast by the same station. For example, to select digital channel “11.1”, press “11”, then press “-” and “1”; to select analog channel 13.0, press 13 first, then press - and 0.(You must press - and 0 when you select analog channel. If you just press the number(eg.13), you will get digital channel) CH.LIST button(only available in digital signal) Press to display the digital program list. Press CH+/CH- to select the item and OK button to select the channel you desired. FAV.LIST button(only available in digital signal) Press to display favorite list. Press CH+/CH- to select the item and VOL+ to select the channels and VOL- to select NONE. SIZE button Press to select the aspect ratio among NORMAL, WIDE and ZOOM. NOTE: WIDE is only available in some models. The aspect ratio can only be adjusted when 16:9 signal input in DTV. Downloaded from www.Manualslib.com manuals search engine Menu Operations Video Menu Options 1. Press MENU button to display the main menu, and VOL+/VOL-to select the main menu . 2. Press CH+/CH- to scroll through the parameters 3. Press VOL+/VOL- buttons to make changes to the parameters 4. Press the CLR button to exit the menu * In this manual, the OSD (On Screen Display) may be differ from your TV These are examples to illustrate the TV's operation. Press TV/AV to select the input source. The menu for each source may be different . Picture quality can be adjusted for any input separately . The picture quality on the screen can be adjusted as follows: 1. Press MENU button and VOL+/VOL- until the following menu appears on the screen. 2. Press CH+/CH- button to enter the VIDEO menu and to go up and down to select the desired option . PC MENU TV/AV/SVIDEO MENU VIDEO BRIGHTNESS CONTRAST SHARPNESS COLOR NOISE REDUCE TINT VIDEO BRIGHTNESS CONTRAST SHARPNESS COLOR TEMP 30 Note: Symbols on top of the menu in this manual may differ from the actual set display 30 30 0 COOL 50 50 0 50 MID Only available in NTSC system COMPONENT MENU VIDEO BRIGHTNESS CONTRAST SHARPNESS COLOR H POSITION V POSITION 30 30 30 0 0 0 0 50 Only available in analog signal Downloaded from www.Manualslib.com manuals search engine Menu Operations 3.Press VOL+/VOL- button to increase and decrease the level to adjust the selected option to your preference . 4. Repeat step 2 and step 3 until desired picture quality has been achieved . Function: BRIGHTNESS :Adjust the brightness of the picture . By increasing the level, it will lighten the dark parts of the picture and by decreasing the level it will darken the lighter parts of the picture. CONTRAST : Adjust the contrast of the picture . The contrast becomes higher as the number increases. SHARPNESS : Adjust the amount of the detail enhancement , the image sharpness rises as the number increases (By increasing the level, it will show cleaner and clearer images and by decreasing the level, it will make the picture smoother). COLOR : Press VOL+/VOL- to adjust the color NOISE REDUCE: Adjust the quality of the picture by selecting OFF,LOW,MID,HIGH. TINT : Adjust the tone of the picture . This will appear and can be adjusted only in NTSC mode COLOR TEMP : Press to select the color temperature from WARM/NEUTRAL/COOL H POSITION : Picture horizontal adjust V POSITION : Picture vertical position adjust . Video Menu Options continued Audio Menu Options Sound can be adjusted for any input as follows: 1. Press MENU and VOL+/VOL- button until the following menu appears on the screen AUDIO MODE VOLUME BASS TREBLE BALANCE AVL AUDIO 50 30 70 50 STANDARD OFF Downloaded from www.Manualslib.com manuals search engine Menu Operations Audio Menu Options continued You can adjust sound options to the levels you prefer. 2. Press CH+/CH- button to enter the audio menu and to go up and down to select the desired option . 3.Press VOL+/VOL- button to increase and decrease the level to adjust the selected option to your preference . 4. Repeat step 2 and step 3 until desired audio quality has been achieved . Function : AUDIO MODE : Press VOL+/VOL- to select among CUSTOM, STANDARD, MUSIC and THEATRE . VOLUME : Adjust the volume of your TV BASS : TREBLE : mode . BALANCE : AVL: Adjust the bass of the sound . Can only be stored under CUSTOM mode . : Adjust the treble of the sound . Can only be stored under CUSTOM Adjust the balance of the audio output from left to right . When indication value of balance increases toward 100 , sound from the left speaker becomes weaker . When indication value of balance decreases toward 0 , sound from the right speaker become weaker . Automatic Volume Limit Control reduces the effect of high volumes by limiting the same volume peaks across all channels . Downloaded from www.Manualslib.com manuals search engine Menu Operations Function Menu Options 1. Press MENU button and VOL+/VOL- until the following menu appears on the screen. 2. Press CH+/CH- button to enter the function menu and to go up and down to select the desired option . 3.Press VOL+/VOL- button to increase and decrease the level to adjust the selected option to your preference . 4. Functions: 1. INPUT SOURCE : Display current mode . There are TV, AV, S-VIDEO, PC, COMPONENT to display . 2. LANGUAGE : Press VOL+/VOL- to select the OSD language. 3. CC MODE: Press VOL+/VOL- to select ON or OFF. 4. NTSC CAPTION(not available in PC) :Press VOL+/VOL-buttons to select the Closed Caption options. Closed Captioning helps the hearing impaired with the broadcast program, as well as helping children learn how to read. A built in decoder displays the audio portion of a program as text on the screen when this option is selected. CC1: When CC1 on TV means CC MODE is turned on. CC2 to CC4: For other modes of video related broadcast information. TT1: For program guide and other information displayed by broadcasters. (This blocks a large portion of the picture on your screen). TT2 to TT4 :For other modes of information displayed by broadcasters. (This blocks a large portion of the picture on your screen). Repeat step 2 and step 3 until desired settings have been achieved . is displayed IMPORTANT: Closed captioning availability entirely depends on broadcasters supplying the signal. Therefore, closed captioning might not always be available and language availability will differ by broadcast. INPUT SOURCE TV LANGUAGE ENGLISH CC MODE ON NTSC CAPTION CC1 DTV CAPTION LOCK BLUE SCREEN ON ASPECT RATIO NORMAL TIME OSD TIMEOUT SHORT RESET FUNCTION Downloaded from www.Manualslib.com manuals search engine Menu Operations Function Menu Options Continued Note: Select CC1 for full translation of the primary language such as English in your area. Select CC2 for secondary language translation such as French or any other language that may be broadcast in your area. 5.DTV CAPTION (can only be available in DTV):Press CH+/- to select DTV CAPTION and VOL+ to enter . DTV CAPTION SERVICE1 DTV CAPTION STYLE CUSTOMER CUSTOMER Size Normal Font Font0 Text Opacity Solid Text Color White Edge Color Black Edge Type None BG Color Black BG Opacity Solid DTV Caption Style DTV CAPTION: This allows you to configure the way you choose to view the digital captioning. Select one of the digital service channels made available by the caption provider. There are 6 standard services. Service 1 is designated as the Primary Caption Service. This service contains the verbatim, or near-verbatim captions for the primary language being spoken in the accompanying program audio. Service 2 is designated as the Secondary Language Service. This service contains captions in a secondary language which are translations of the captions in the primary Caption Service. The other service subchannels are not pre-assigned. It is up to the discretion of the individual caption provider to utilize the remaining service channels. DTV CAPTION STYLE: To select between Broadcast and Customer. CUSTOMER: (only can be entered when DTV CAPTION STYLE is Customer) Press VOL+ to enter the following display: This allows you to modify how digital captions are displayed on your TV. Select from the following options to change the visual characteristics of your TV`s digital captioning. Size: Select this option to select the size of caption display according to your own preference. Press the VOL+/VOL- button to select them Font: To select the font of caption display according to your own preference. Press the VOL+/VOL- button to select Font0, Font1 Font2, Font3, Font4, Font5, Font6, Font7. DTV CAPTION Downloaded from www.Manualslib.com manuals search engine Menu Operations Function Menu Options Continued Text Opacity: Specify the opacity for the text color. Text Color: Select the text color or the opacity of the text box of caption display according to your own preference. Select a color and one of the opacity options. Edge Color: Press VOL+/VOL- to select the edge color according your own preference Edge Type: Press VOL+/VOL- to select the edge color according your own preference BG Color: Select a background color. BG Opacity: Select the opacity for the background color. 6.BLUE SCREEN: Press VOL+/VOL- to select ON or OFF. To set ON, the screen will turn blue if there is no signal. 7.ASPECT RATIO(not available in PC): To select NORMAL, WIDE and ZOOM .(WIDE is only available in some models) 8.TIME Press CH+/CH- to select this item and VOL+ to enter and display as the following: DATE/TIME TIMER ON TIMER OFF SLEEP TIMER OFF TIME ZONE ALASKA DAYLIGHT ON TIME DATE/TIME: Setting the clock is necessary in order to use the various timer features of the TV. Also, you can check the time while watching the TV. Press VOL+ to enter the following menu to set: Setting MODE to AUTO or MANUAL. DATE and TIME can only be available in MANUAL mode. Press VOL+/VOL- to select the position you want to change and CH+/CH- to set. TIMER ON: Press VOL+ to enter the submenu to set. When this function is used, the TV can automatically turn the power on at the present time in the standby status and display the preset program. MODE MANUAL DATE 01/01/2005 TIME 00:00 DATE/TIME DATE 01/01/2005 TIME 00:00 Downloaded from www.Manualslib.com manuals search engine Menu Operations Function Menu Options Continued Adjust Menu Options 1. Press MENU and VOL+/VOL- button until the following menu appears on the screen ADJUST AUTO CONFIG PHASE CLOCK H POSITION V POSITION Note: This menu appears only in PC mode . 2. Press CH+/CH- button to enter the adjust menu and to go up and down to select the desired option . 3.Press VOL+/VOL- button to increase and decrease the level to adjust the selected option to your preference . 4. Repeat step 2 and step 3 until desired quality has been achieved .. 0 0 0 0 TIME ZONE: This functionallows you to select your local time zone. Broadcasted time information will correct the clock display for your local time. DAYLIGHT: DAYLIGHT is automatically set by specially broadcasted signals. This menu item allows you to disable the automatic setting of daylight. This is useful if you live in an area or state where daylight is no applied, but you receive channels from other areas where daylight signals are broadcasted. 9. OSD TIMEOUT: Press to set the time of the OSD displaying on screen. 10. RESET : Press VOL+ to reset some settings to the factory default . ON TIME --:-- Press CH+/CH- to select MODE and VOL+/VOL- to set it OFF/DAILY/ONCE. Press CH+/CH- to select ON TIME and VOL+ to enter. Press VOL+/VOL- to select the position you want to change and CH+/CH- to set. TIMER OFF: Press VOL+ to enter the submenu to set.. Using this function can turn the TV set automatically into standby status at the preconcerted time. Same as adjustment of TIMER ON . SLEEP TIMER: The sleep timer automatically shuts off the TV after a preset time (from 0 to minutes) 120 MODE OFF ON TIME --:-- TIMER ON Downloaded from www.Manualslib.com manuals search engine Menu Operations Channel Menu Options 1. Press MENU and VOL+/VOL- button until the following menu appears on the screen Note: This menu appears only in TV mode . 2. Press CH+/CH- button to enter the channel menu and to go up and down to select the desired option . 3.Press VOL+/VOL- button to increase and decrease the level to adjust the selected option to your preference . 4. Functions: 1. CH NO. : Press VOL+/VOL-to go up and down to set the channel number. The display will show the current playing channel. 2. NAME: Allows you change the name of the channels in analog signal. And display the channel name automatically in digital signal. Repeat step 2 and step 3 until desired settings have been achieved . CH NO 11.1 NAME TUNER CABLE SKIP OFF AFC ON FINE TUNE AUTO SCAN CHANNEL . Only available in analog signal Functions: AUTO CONFIG : PHASE : CLOCK : H POSITION : Picture horizontal position adjust V POSITION : Picture vertical position adjust . Automatically adjusts picture location frequency and phase parameters . Removes any horizontal distortion and clears or sharpens the displayed characters . Adjust the TFT-LCD to match the PC input source clock frequency Adjust Menu Options Continued Downloaded from www.Manualslib.com manuals search engine Menu Operations Channel Menu Options Continued 5. FINE TUNE : 6. TUNER : Press VOL+/VOL- button to select AIR (VHF and UHF) and CABLE reception preference. 7. AUTO SCAN : Note: The AUTO SCAN function will scan the channels on the selected antenna input. If the TV is connected to cable, please select CABLE under If the image or sound received is not very good , you can press CH+/CH- to select FINE TUNE in the menu . Then , press VOL+/VOL- button to adjust and improve the image quality. Do not use this feature unless reception is poor. Auto search and program channels .Press the VOL+ button to start to search and the following menu will appears on the screen: Press or to select YES and MENU to confirm then the automatic search function operation. All channels now available will be automatically preset in order .After the search has finished, the first digital program number will display on the screen. This search automatically adds only the active channels in your area to the TV's memory. It deletes any channels on which there is no broadcast or a poor signal. ' TUNER ' sub menu. The TV searches channels in analog first and then searches channels in digital signal the second time. CH+/CH- VOL+/VOL- Lock Menu Options 1. Press the MENU and VOL+/VOL- button until the FUNCTION menu appears on the screen . 2. Press CH+/CH- button to select LOCK and VOL+ to enter, the following will display on the screen: 3. Then input the password 0000. It will bring LOCK menu display on the screen. You will see the following menu on your screen: PASSWORD---- AUTO SCAN NO YES 3. 4. AFC : SKIP : If you want skip a channel , press VOL+/VOL- to select ON , and this channel will be skipped next time when you press CH+/CH- . You can press the digit buttons to select the channel . If you want to restore the channel , select OFF. Auto frequency control. Select ON to improve image quality . Downloaded from www.Manualslib.com manuals search engine Menu Operations Lock Menu Options Continued PARENTAL LOCK: Press VOL+/VOL- button to select ON or OFF. parental MPAA RATING: PG RATING: PG CONTENTS: Press to set the grade of the program . When there is this grade of program , this program will not be display . CA ENG RATING: Select this option. You could select from OFF/C/C8+/G/PG/ 14+/18+ . CA FREN RATING: Select this option. You could select from OFF/G/8+/13+/16+/ 18+ . CHANGE PASSWORD: The "Default Password" preset by the manufacturer is "0000" . If you want to change the preset password to your own password, just choose any four digits that can be easily remembered and set. Once you set password for a particular channel, that channel will be blocked. Lock off means the lock function is turned off . If the Parental Lock is in "off" mode then function will not be active to accept the Parental Guidance signal. Parental Lock on means the lock function is turned on. If the lock is in the "on" mode then it actively accepts the Parental Guidance signal. When MPAA rating is selected, you can select OFF/G/PG/PG 13 R/NC17/X . Select the TV Rating option. You can select from OFF/TV-Y/TV-Y7/ TV-G/TV-PG/TV-14/TV-MA. This function enables you to block certain TV channels in accordance to the requirements established by the FCC. CHANGE PASSWORD PARENTAL LOCK ON MPAA RATING PG PG RATING TV-14 PG CONTENTS ( ) CA ENG RATING C8+ CA FREN RATING 8+ DOWNLOAD RATING LOCK Downloaded from www.Manualslib.com manuals search engine Menu Operations Lock Menu Options Continued PARENTAL LOCK TECHNOLOGY: The "P.L. Technology" allows you to use U.S. and Canadian Movies and TV PROGRAMS Guide ratings to block certain types of TV programs and movies. To clearly understand TV program rating codes, read the following information: U.S. TV Program Ratings NR: Not Rated-this means that programs are not rated or rating does not apply. TV-Y: For all children - these types of rated programs are designed for a very young audience, including children from ages 2-6. TV-Y7: Directed towards older children - this type of rated programs may include comedic violence of mild physical, or may frighten children under the age of 7. TV-G: General audience - these types of rated programs contains little or no violence, no strong language, and little or no sexual dialogue and situations. TV-PG:Parental Guidance Suggested-this type of rated programs may contain limited violence, some suggestive sexual dialogue and situations, and rare language. TV-14: Parents strongly cautioned-these types of rated programs may contain sexual content, strong language and more intense violence. TV-MA:Mature audience only these types of rated programs may contain sexual violence, explicit sexual content and profane language. FANTASY VIOLENCE : This type of rated programs contain Fantasy and cartoon violence. DIALOGUE: This type of rated programs contain dialogue with sexual content. LANGUAGE: This type of rated programs contain offensive language. SEX: This type of rated programs contain sex. VIOLENCE: This type of rated programs contain violence. To understand clearly about movie rating codes, read the following list: U.S. Movie Rating Chart NR: This means movie is not rated yet. It is pending government rating approval. G: General Audience-this type of movie rating means all ages admitted to see the movie. PG: Parental guidance suggested. Some material may not be suitable for children. PG 13:Parents Strongly Cautioned - this type of movie rating means some material may not be appropriate for children under13. R: Restricted- This type of movie rating means children under 17 of age require to be with parent or guardian. NC 17:This type of movie rating means no one 17 and under admitted. X: This type of movie rating means adults only. Downloaded from www.Manualslib.com manuals search engine Menu Operations Lock Menu Options Continued To clearly understand Canadian program rating codes, read the following list: Canadian English Rating Chart C: This type of programming is intended for children under age 8. There is no offensive language, nudity or sexual content. C8+:These types of rated programs are generally considered acceptable for children 8 years and over. There is no profanity, nudity or sexual content. G: These types of rated programs are generally suitable for all audiences. PG: Parental Guidance Suggested -in these types of rated programs, some material may not be suitable for children. 14+: In these types of rated programs, some content may not be suitable for viewers under the age of 14.Parents are strongly cautioned not to have their children view 14+ rated programs by pre-teens and early teens. 18+: Adults Only-these types of rated programs are only for adult viewers only. Canadian French Rating Chart OFF: NO controls G:These types of rated programs are generally suitable for all audiences. 8+: Children 8 years and above (French) 13+: 13 years old and above(French) 16+: 16 years old and above(French) 18+: Adults Only-these types of rated programs are only for adult viewers only. Downloaded from www.Manualslib.com manuals search engine DVD Features Basic Playback Preparations 1.Place a disc in the disc tray. If there is no disc placed on the disc tray in DVD mode, OPEN will display on the screen all the times) There is only one disc size . Place the disc in the guide on the disc tray. If the disc is out of the guide, it may damage the disc and cause the DVD player to malfunction. Do not place a disc which is unplayable in this DVD player. 2. After the disc tray entered, the playback will automatically start. 3. Some discs may start playback with a menu. Use the cursor buttons on the remote control to select menu options and press PLAY/ENTER to start. You may also press the digit buttons to select a menu option directly. Many DVDs will not allow this during start-up. 1. Press PAUSE/STEP to pause playback (still mode). The sound will be muted during still mode. 2. Press PLAY/ENTER to resume normal playback. Pause playback 1. Press STOP button to go to stop mode, the TV screen will show the start logo. 2. 3. Press STOP twice to stop completely. With some discs, such as DVD or CDs, the player can resume playback from the point where it was stopped. Press PLAY/ENTER to resume playback from the location where the playback was stopped. Stop playback Previous and Next Fast forward and Fast reverse 1. Press FWD to fast forward through the disc. Each time the FWD button is pressed, the fast forward motion speed changes. 2. Press PLAY/ENTER to resume normal playback. 3. Press REV to fast reverse through the disc. Each time the REV button is pressed, the fast reverse motion speed changes. 4. Press PLAY/ENTER to resume normal playback. Basic playback 1. When paused, press PAUSE/STEP continuous to single step forward to the next frame in the video. 2. Press PLAY/ENTER to resume normal playback. Single step playback Some discs do not start automatically. Press PLAY/ENTER to start playback. Preparations Press the TV/DVD button on the remote control to enter the DVD status. Pause playback Stop playback Previous and Next Fast forward and Fast reverse Basic playback Single step playback Some discs do not start automatically. Press PLAY/ENTER to start playback. During Playing, pressing the PREV key will restart the chapter and skip chapters backwards with each subsequent press until the start of the disc is reached. Each press of NEXT key during playing will skip the current chapter and play the next one. last Downloaded from www.Manualslib.com manuals search engine DVD Features(Continued) Advanced Playback PROGRAM When playing discs, press "PROGRAM" to enter program mode. Press the digit buttons to select the program number that you want. When finished move the cursor to select "START" . Press PLAY/ENTER to confirm. This will start the program playback. REPEAT Press " REPEAT " and Chapter repeat will be displayed on screen, the second press will display Title repeat, the third press will display All repeat, the fourth press will cancel this function. CAPTION Press " SUBTITLE ", the screen will display "SUBTI- TLE 01/XX XXXXX", "01" indicates the ordinal number of this language; "XX" indicates total number of language; "XXXXXX" indicates the language of country. (the number of language depends on disc). This function can select up to 32 languages display- ed on screen. A-B Press " A-B " to begin start-point, press again to set an end point and complete setting. The selected section A-B will be repeated. The third press will cancel this function. SEARCH SLOW D.MENU Press this key to display the root menu, select items according to your preference. (This function will work on a DVD with a multi-layer menu.) ANGLE When enjoying sports, concert or theatre, press this key to watch same actions in different angles. (Valid for discs possessing this function. Using a disc recorded in multi-angle you can view the scene from different angles,for example,front, side, whole view and exterior scene). Press this key can change the mode of audio. such as: Audio 1/2: AC 3 2 CH English Audio 2/2: AC 3 5.1 CH English Press this button to cycle between Mono Left, Mono Right, Mix-Mono and Stereo. AUDIO TITLE/PBC With some DVD discs pressing this key will display the title menu. You can then use the digit buttons to select the item you prefer. D.CALL PROGRAM REPEAT SUBTITLE A-B Press " A-B " to begin start-point, press again to set an end point and complete setting. The selected section A-B will be repeated. The third press will cancel this function. SEARCH Press "SEARCH" once to display the search menu. Press the button again to select. Press the program number buttons to input the item you require. Press PLAY/ENTER to confirm. SLOW Press SLOW to play a disc in slow motion. Each time the SLOW button is pressed, the slow motion speed changes. Press PLAY/ENTER to resume normal playback; Note: This function dose not work for CD . D.MENU ANGLE AUDIO TITLE/PBC Pressing this key will cycle through "Title Elapsed", "Title Remain", "Chapter Elapsed", "Chapter Remain" and "Display off ". D.CALL ALL DESCRIBED FUNCTIONS A FOR DVD DISCS. IF YOU PLAY OTHER DISC FORMATS THE OPERATION AND ON SCREEN DISPLAY WILL BE DIFFERENT. IMPORTANT NOTE: Note: When press this button continuously, you must allow a 3 second interval between selections. Downloaded from www.Manualslib.com manuals search engine Special Function Playback JPEG DISC PLAYBACK This unit employs a screen saver mode to help protect the tube during static video pictures. This can be turned off on the GENERAL SETUP PAGE. When a disc containing standard JPEG picture files is inserted into the player, a navigation menu will be displayed automatically. Use the UP and DOWN cursor buttons to select a file then press PLAY/ENTER. The slide show will commence. Press PREVIOUS or NEXT to move between pictures. Press pause to stop on the current picture. Press PLAY/ENTER to resume normal playing. A JPEG disc contains JPEG (.jpg) format picture information that can be decoded by a micro-computer software and displayed through the video output interface or on the television screen. This function has many applications. For example one can save files from a scanner or digital camera in the JPEG format, record these on a CD-R disc and present them to an audience through this player. The JPEG format is a convienient method to store images in a small amount of memory space, and is ideal for archiving information. SCREEN SAVER FUNCTION Downloaded from www.Manualslib.com manuals search engine DVD System Setup DVD System Setup General Setup Process 1.Press the SETUP button, the General Setup Page,Preference Page will be displayed in turn. 2.Press CH+/- b to select, the item, then press to enter the submenu. 3.Press CH+/- bu to select then press PLAY/ENTER to confirm. 4.Press SETUP repeatedly to exit the set-up menus. or or ..General Setup Page.. Tv Display LB Angle Mark On Osd Lang ENG Caption On Screen Saver Off 4 3:Ps 4 3:Lb 16 9 . . Parental Password Default ..Preference Page.. General Setup Page When using the DVD with the internal TV, select 4 3/LB. The following information applies only when the DVD output is connected to an external TV. 4:3/PS (PS = Pan and Scan) You may select if you have a normal aspect ratio (4:3) TV, although the NORMAL/LB (letter box) is a more common choice. In PS mode, widescreen material will fill the screen, but at the expense of chopping off extreme left and right edges of the original film picture. For this feature to work, the disc must be specially coded. Such discs are uncommon. 4:3/LB (LB = Letter Box) You may select this if you have a normal aspect ratio (4:3) TV. Widescreen material will be shown in pure unaltered form, allowing the entire picture area of the original film to be viewed without any side cropping. Black bars will appear above and below the picture. 16:9 You may select this if you have a widescreen (16:9) TV. Back bars may still appear above and below the picture even if using a widescreen TV. This is because some film directors prefer to use ultra widescreen aspect ratios e.g. 2.35:1. This will normally be indicated on the DVD packaging. ASPECT RATIO DESCRIPTION ..General Setup Page.. Tv Display LB Angle Mark On Osd Lang ENG Caption On Screen Saver Off 4 3:Ps 4 3:Lb 16 9 . . 1 Kid Saf 2 G 3 Pg 4 Pg 13 5 Pgr 6 R 7 Nc17 8 Adult SETUP PLAY/ENTER SETUP PLAY/ENTER Downloaded from www.Manualslib.com manuals search engine DVD System Setup(Continued) DVD System Setup General Setup Page CAPTION: This function allows you to display or hide the caption. SCREEN SAVER: If the screen saver is on, then there will be an animated picture of DVD on the screen whenever the DVD player is idle for more than 3 minutes . ..General Setup Page.. Angle Mark On Osd Lang ENG Caption On Screen Saver Off On Off Tv Display LB This item allows you to set Angle Mark ON or OFF. ANGLE MARK: Users can select a particular camera angle when playing a DVD which offers multiple angles. On Screen Display (OSD) Language: Users can select on-screen display language. . ..General Setup Page.. Tv Display LB Angle Mark On Osd Lang ENG Caption On Screen Saver Off On Off ..General Setup Page.. Tv Display LB Angle Mark On Osd Lang ENG Caption On Screen Saver Off English Spanish ..General Setup Page.. Angle Mark On Osd Lang ENG Caption On Screen Saver Off On Off Tv Display LB Downloaded from www.Manualslib.com manuals search engine DVD System Setup(Continued) DVD System Setup The Preference Page is only available when there is no disc in the player. Preference Page PARENTAL: The parental control function works in conjunction with the different censorship classes assigned to DVDs. These classes help to control the types of DVDs that the family watches, There are up to 8 censorship classes for DVDs. Note: 1 To change this setting you must enter your password. (Initial password is ) 2 When set to OFF, all discs may be viewed. 1234 ..Preference Page.. Parental Password Change Default Old Password New Password Confirm Pwd PASSWORD CHANGE: You can change your password by entering 4 digits. You must confirm the 4 digits before the new password can be accepted. ..Preference Page.. Parental Password Default 1 Kid Saf 2 G 3 Pg 4 Pg 13 5 Pgr 6 R 7 Nc17 8 Adult SETUP PLAY/ENTER SETUP PLAY/ENTER NOTE:If you forget your password or a password is accidentally set enter as the password. This will enable you to regain control. 1369 Downloaded from www.Manualslib.com manuals search engine DVD System Setup(Continued) DVD System Setup DEFAULT: Resets all settings (except password and parental lock status) for this DVD player back to the manufacturers original settings. Press ENTER to perform the reset. Note: Some functions may not be available depending on the type of disc. Parental Password Default ..Preference Page.. Reset SETUP PLAY/ENTER Downloaded from www.Manualslib.com manuals search engine Playable Discs The following discs can be played: You cannot play discs other than those listed above. You cannot play non-standardized discs, even if they may be labelled as above. The performance of CD-R or CD-RW disc depends on the way the disc was burned. In a few cases, their performance may not be consistant or may not even operate at all. This DVD Player is designed and manufactured according to the Region Management Information that is recorded on a DVD disc. If the Region number described on the DVD disc does not correspond to the Region number of this DVD Player, this DVD player will not play that disc. This Region number of this DVD Player is . 1 Downloaded from www.Manualslib.com manuals search engine Disc Protection and DVD Characteristics Downloaded from www.Manualslib.com manuals search engine Troubleshooting Guide To assist in location possible faults use help guide below. Note: 1.If the fault can not be repaired using the above guide consult with your local authorized service center. 2.The TV set must only be repaired by a qualified registered service person. Never attempt to remove the back cover as the TV set has dangerous voltages levels inside that may be fatal or cause fire. Troubleshooting No picture, no sound Verify if the television is properly plugged in. Verify if the television is properly supplied with power. Verify that electricity is available. Blank screen Verify if correct signals are input. Press TV/AV button to change signal input to TV input. Restart the television of power supply is interrupted. No sound Press MUTE button and verify if Mute mode is on. Switch to another channel and verify if the same problem happens. Press VOL+ button to see if the problem can be solved. Poor sound Verify if sound system is functional. Refer to chapter on adjusting. No picture in some channel Verify if correct channel is selected. Adjust the antenna. Make adjustments by FINE TUNE No color for some channel program (black and white) Verify if the same problem exists in other channels. Check picture and sound systems. Refer to relative instructions in the Manual for color adjust. Spots with some or all pictures Verify if the antenna is correctly connected. Verify if the antenna is in good condition. Make fine adjustment of channel. Abnormal functioning Disconnect the television from power supply and, 10 seconds later, reconnect to the power supply. If the problem still exists, contact an authorized service depot for technical assistance. Downloaded from www.Manualslib.com manuals search engine Specifications Specifications of the television that you have just purchased may vary from the information in this table due to technical innovations. Accessories Picture, sound system Audio output External input port Power requirements Temperature 1.5W+1.5W AV input PC input S-VIDEO input PC audio input Headphone output YPbPr input Antenna input ~120V 60Hz NTSC, ATSC, Cliar QAM Working:+5 ~+35 Storage:-15 ~+45 Power consumption 80W Model ELD1547 LV1513 / Remote control Batteries User manual Warranty card NOTE Design and specifications are subject to change without notice. Dimensions quoted in this manual are approximate. LV1913 ALD1967 / 60W Humidity Working:20% ~ 80% Storage: 5% ~ 90% Downloaded from www.Manualslib.com manuals search engine Warranty terms Downloaded from www.Manualslib.com manuals search engine V0.2 0090508051C Downloaded from www.Manualslib.com manuals search engine
版权声明
1. 本站所有素材,仅限学习交流,仅展示部分内容,如需查看完整内容,请下载原文件。
2. 会员在本站下载的所有素材,只拥有使用权,著作权归原作者所有。
3. 所有素材,未经合法授权,请勿用于商业用途,会员不得以任何形式发布、传播、复制、转售该素材,否则一律封号处理。
4. 如果素材损害你的权益请联系客服QQ:77594475 处理。