三洋DP55441液晶彩电使用说明书
 "三洋DP55441液晶彩电使用说明书-0")
 "三洋DP55441液晶彩电使用说明书-1")
 "三洋DP55441液晶彩电使用说明书-2")
 "三洋DP55441液晶彩电使用说明书-3")
 "三洋DP55441液晶彩电使用说明书-4")
 "三洋DP55441液晶彩电使用说明书-5")
 "三洋DP55441液晶彩电使用说明书-6")
 "三洋DP55441液晶彩电使用说明书-7")
 "三洋DP55441液晶彩电使用说明书-8")
 "三洋DP55441液晶彩电使用说明书-9")
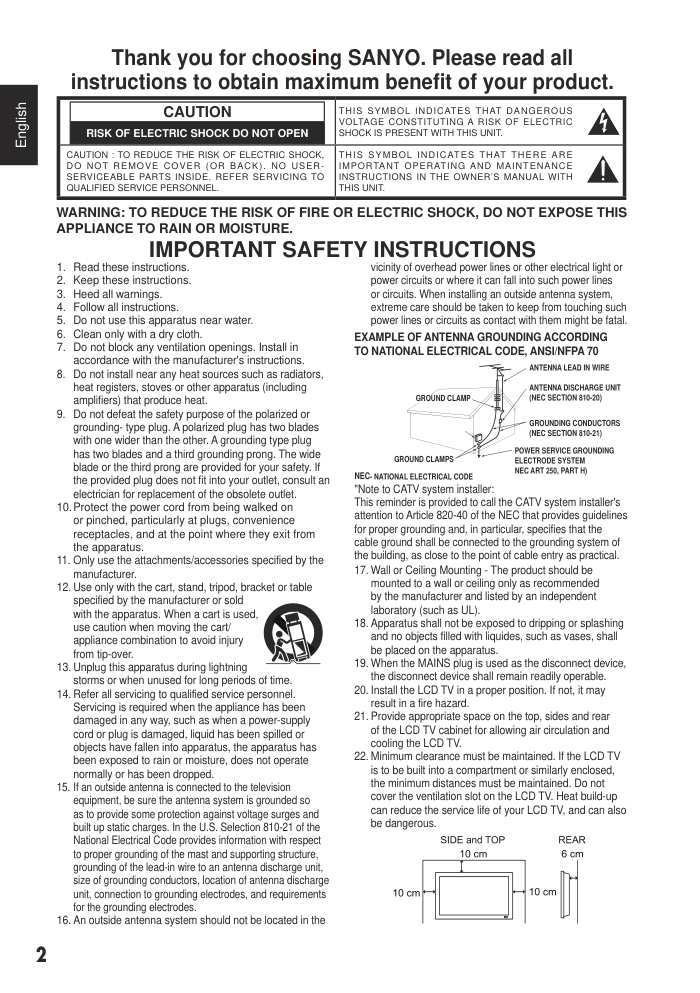
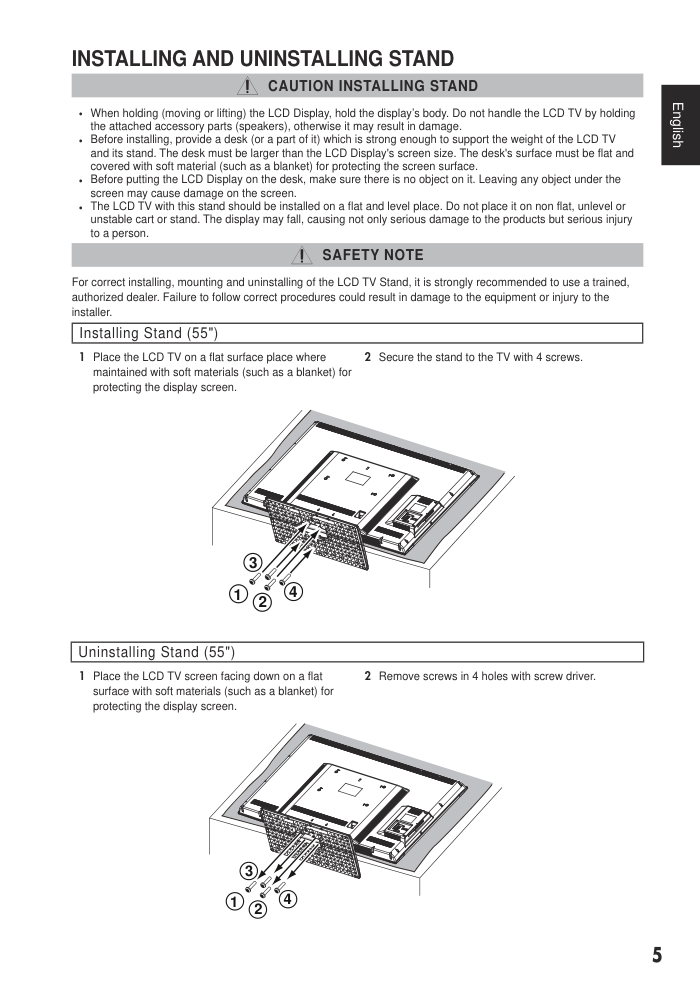
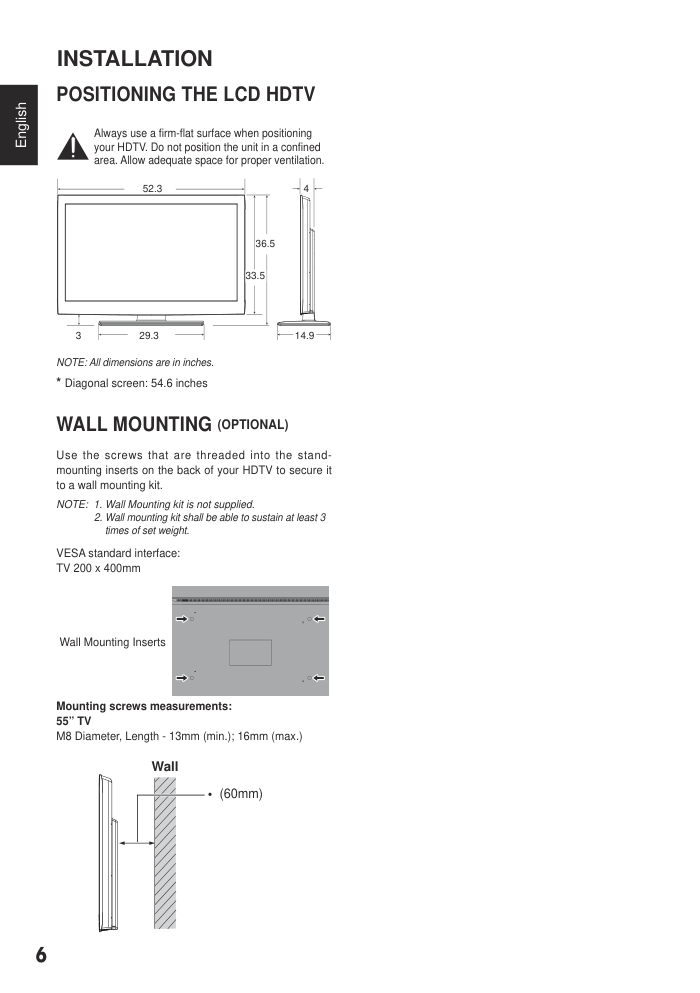
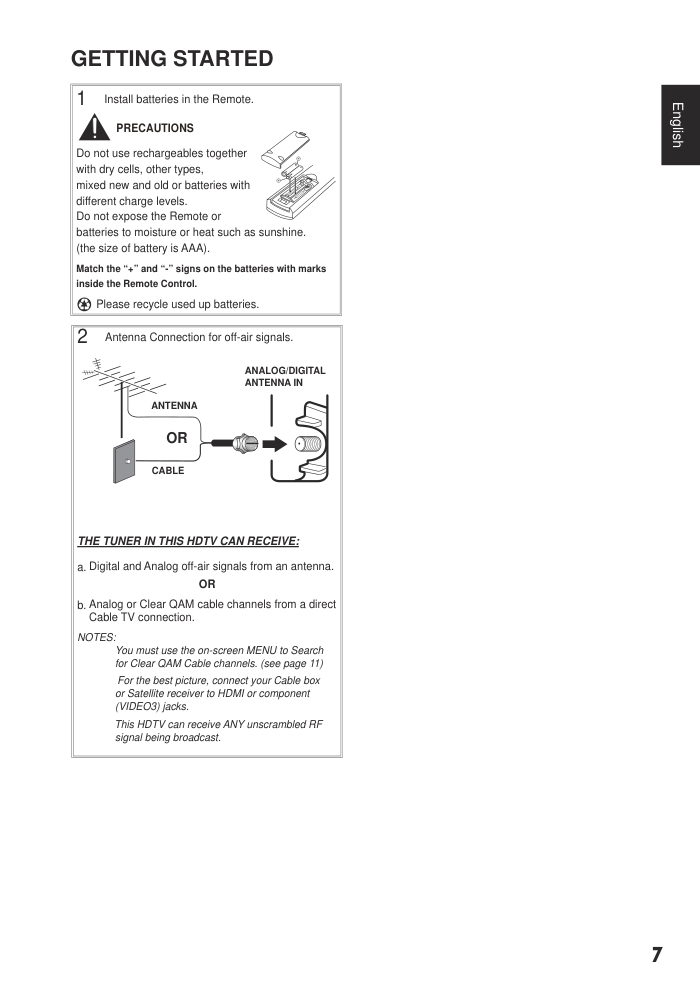
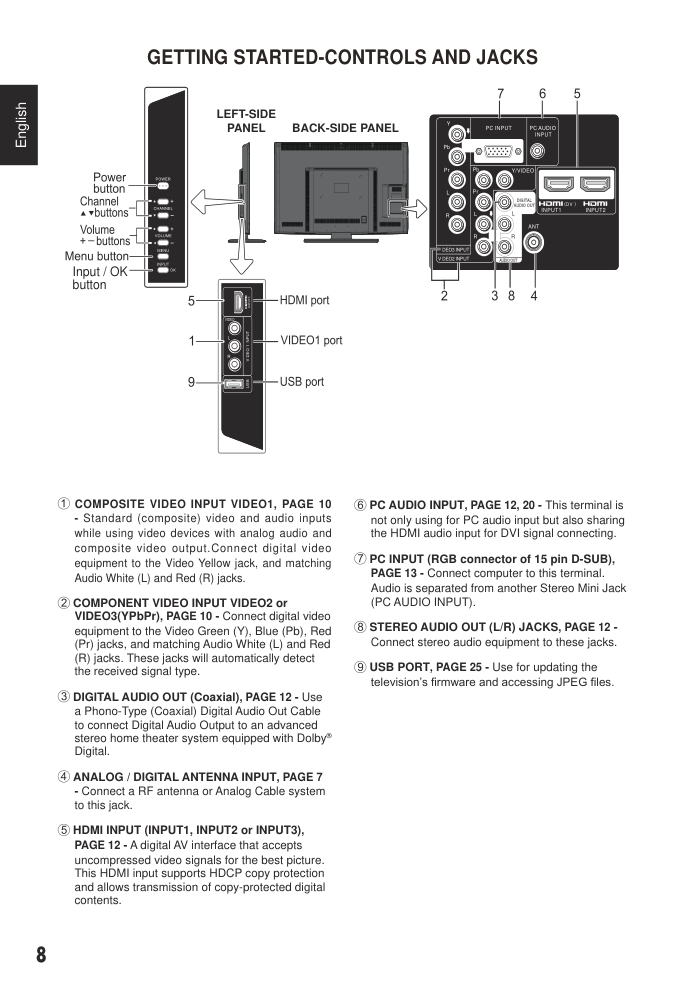
CO U RECYC IN F NYO TE EVI I N CO TIE E MP R DE MER URIO DE E H R O RECIC AJE DE TE EVISORES S NYO e e c e c 9 e e CO J T E 7 0 e e q r e e a e O e e c e c a 9 g e 2 English CAUTION RISK OF ELECTRIC SHOCK DO NOT OPEN THIS SYMBOL INDICATES THAT DANGEROUS VOLTAGE CONSTITUTING A RISK OF ELECTRIC SHOCK IS PRESENT WITH THIS UNIT. CAUTION : TO REDUCE THE RISK OF ELECTRIC SHOCK, DO NOT REMOVE COVER (OR BACK). NO USER- SERVICEABLE PARTS INSIDE. REFER SERVICING TO QUALIFIED SERVICE PERSONNEL. THIS SYMBOL INDICATES THAT THERE ARE IMPORTANT OPERATING AND MAINTENANCE INSTRUCTIONS IN THE OWNER’S MANUAL WITH THIS UNIT. WARNING: TO REDUCE THE RISK OF FIRE OR ELECTRIC SHOCK, DO NOT EXPOSE THIS APPLIANCE TO RAIN OR MOISTURE. IMPORTANT SAFETY INSTRUCTIONS 1. Read these instructions. 2. Keep these instructions. 3. Heed all warnings. 4. Follow all instructions. 5. Do not use this apparatus near water. 6. Clean only with a dry cloth. 7. Do not block any ventilation openings. Install in accordance with the manufacturer's instructions. 8. Do not install near any heat sources such as radiators, heat registers, stoves or other apparatus (including amplifiers) that produce heat. 9. Do not defeat the safety purpose of the polarized or grounding- type plug. A polarized plug has two blades with one wider than the other. A grounding type plug has two blades and a third grounding prong. The wide blade or the third prong are provided for your safety. If the provided plug does not fit into your outlet, consult an electrician for replacement of the obsolete outlet. 10. Protect the power cord from being walked on or pinched, particularly at plugs, convenience receptacles, and at the point where they exit from the apparatus. 11. Only use the attachments/accessories specified by the manufacturer. 12. Use only with the cart, stand, tripod, bracket or table specified by the manufacturer or sold with the apparatus. When a cart is used, use caution when moving the cart/ appliance combination to avoid injury from tip-over. 13. Unplug this apparatus during lightning storms or when unused for long periods of time. 14. Refer all servicing to qualified service personnel. Servicing is required when the appliance has been damaged in any way, such as when a power-supply cord or plug is damaged, liquid has been spilled or objects have fallen into apparatus, the apparatus has been exposed to rain or moisture, does not operate normally or has been dropped. 15. If an outside antenna is connected to the television equipment, be sure the antenna system is grounded so as to provide some protection against voltage surges and built up static charges. In the U.S. Selection 810-21 of the National Electrical Code provides information with respect to proper grounding of the mast and supporting structure, grounding of the lead-in wire to an antenna discharge unit, size of grounding conductors, location of antenna discharge unit, connection to grounding electrodes, and requirements for the grounding electrodes. 16. An outside antenna system should not be located in the vicinity of overhead power lines or other electrical light or power circuits or where it can fall into such power lines or circuits. When installing an outside antenna system, extreme care should be taken to keep from touching such power lines or circuits as contact with them might be fatal. EXAMPLE OF ANTENNA GROUNDING ACCORDING TO NATIONAL ELECTRICAL CODE, ANSI/NFPA 70 "Note to CATV system installer: This reminder is provided to call the CATV system installer's attention to Article 820-40 of the NEC that provides guidelines for proper grounding and, in particular, specifies that the cable ground shall be connected to the grounding system of the building, as close to the point of cable entry as practical. 17. Wall or Ceiling Mounting - The product should be mounted to a wall or ceiling only as recommended by the manufacturer and listed by an independent laboratory (such as UL). 18. Apparatus shall not be exposed to dripping or splashing and no objects filled with liquides, such as vases, shall be placed on the apparatus. 19. When the MAINS plug is used as the disconnect device, the disconnect device shall remain readily operable. 20. Install the LCD TV in a proper position. If not, it may result in a fire hazard. 21. Provide appropriate space on the top, sides and rear of the LCD TV cabinet for allowing air circulation and cooling the LCD TV. 22. Minimum clearance must be maintained. If the LCD TV is to be built into a compartment or similarly enclosed, the minimum distances must be maintained. Do not cover the ventilation slot on the LCD TV. Heat build-up can reduce the service life of your LCD TV, and can also be dangerous. ANTENNA LEAD IN WIRE GROUND CLAMP ANTENNA DISCHARGE UNIT (NEC SECTION 810-20) GROUNDING CONDUCTORS (NEC SECTION 810-21) GROUND CLAMPS POWER SERVICE GROUNDING ELECTRODE SYSTEM NEC ART 250, PART H) NEC- NATIONAL ELECTRICAL CODE Thank you for choosing SANYO. Please read all instructions to obtain maximum benefit of your product. 3 English FCC INFORMATION This equipment has been tested and found to comply with the limits for a Class B digital device, pursuant to Part 15 of the FCC Rules. These limits are designed to provide reasonable protection against harmful interference in a residential installation. This equipment generates, uses and can radiate radio frequency energy and, if not installed and used in accordance with the instructions, may cause harmful interference to radio communications. However, there is no guarantee that interference will not occur in a particular installation. If this equipment does cause harmful interference to radio or television reception, which can be determined by turning the equipment off and on, the user is encouraged to try to correct the interference by one or more of the following measures: - Reorient or relocate the receiving antenna. - Increase the separation between the equipment and receiver. - Connect the equipment into an outlet on a circuit different from that to which the receiver is connected. - Consult the dealer or an experienced radio/TV technician for help. CAUTION: FCC Regulations state that improper modifications or unauthorized changes to this unit may void the user’s authority to operate the unit. ENERGY STAR® USER INFORMATION ENERGY STAR User Information Statement: the factory default settings of this television meet ENERGY STAR requirements. Changing Picture Settings may increase energy consumption, possibly beyond the limits required for ENERGY STAR qualification. To ensure your television is operating at an optimal energy efficiency, select default picture mode. TRADEMARKS Manufactured under license from Dolby Laboratories. “Dolby“ and the double-D symbol are trademarks of Dolby Laboratories. HDMI, the HDMI logo and High-Definition Multimedia Interface are trademarks or registered trademarks of HDMI Licensing LLC in the United States and other countries. “As an Energy Star® Partner, Sanyo Electric co., Ltd. has determined that this product meets the Energy Star® guidelines for energy efficiency.” This symbol on the nameplate means the product is Listed by Intertek Testing Services Taiwan Ltd. It is designed and manufactured to meet rigid U.L. safety standards against risk of fire, casualty and electrical hazards. PROTECTING THE LCD SCREEN The screen can be damaged if it is not maintained properly. Do not use hard objects such as hard cloth or paper. Do not use excessive pressure when cleaning the screen; excessive pressure can cause permanent discoloration or dark spots. NEVER spray liquids on the screen. HANDLING PRECAUTIONS • Handle by the cabinet only. Never touch the screen when handling. • Excessive pressure on the screen can cause permanent discoloration or dark spots. • Handling damage is not covered under warranty. CONTAINS MERCURY LAMPS, DISPOSE OF PROPERLY 4 English CONTENTS IMPORTANT SAFETY INSTRUCTIONS ..2 FCC INFORMATION ..................................3 ENERGY STAR® USER INFORMATION .3 TRADEMARKS ..........................................3 PROTECTING THE LCD SCREEN .............3 HANDLING PRECAUTIONS .......................3 INSTALLING AND UNINSTALLING STAND ..................................................5 INSTALLATION ..........................................6 POSITIONING THE LCD HDTV ..................6 WALL MOUNTING (OPTIONAL) .................6 GETTING STARTED ..................................7 PReCAUTIONS ............................................7 GETTING STARTED-CONTROLS AND JACKS ....................................................8 REMOTE CONTROL OPERATION .............9 GETTING STARTED-CONNECTIONS .....10 POWER CONNECTION ............................11 INITIAL SETUP ...........................................11 INITIAL CHANNEL SCAN ..........................11 GETTING STARTED-POWER CONNECTION/CHANNEL SEARCH .11 ADVANCED AV CONNECTIONS .......... 12 ADVANCED DIGITAL SIGNAL CONNECTIONS-HDMI TO HDMI .......12 DVI TO HDMI ..............................................12 DIGITAL AUDIO ..........................................12 AUDIO OUT JACKS ...................................12 PC CONNECTIONS ................................ 13 PC MONITOR OPERATION ......................13 SPORTS MODE ...................................... 14 ON-SCREEN MENU OPERATION ................ 15 MENU NAVIGATION MAP .........................15 CHANNEL ADJUSTMENT .........................15 CHANNEL LIST OPERATION ...................16 PARENT ADJUSTMENT ............................17 PICTURE/ AUDIO/ ADVANCED ADJUSTMENT .....................................19 PICTURE .....................................................19 AUDIO..........................................................19 ADVANCED .................................................20 SYSTEM ......................................................22 USB PHOTO VIEWER ...............................25 HELPFUL HINTS - Problems / Solutions 28 SPECIFICATIONS .................................. 29 CONFIGURATIONS OF VGA TERMINALS ..................................... 30 PC / HDMI SIGNAL MODES .................. 30 5 English INSTALLING AND UNINSTALLING STAND CAUTION INSTALLING STAND • When holding (moving or lifting) the LCD Display, hold the display’s body. Do not handle the LCD TV by holding the attached accessory parts (speakers), otherwise it may result in damage. • Before installing, provide a desk (or a part of it) which is strong enough to support the weight of the LCD TV and its stand. The desk must be larger than the LCD Display's screen size. The desk's surface must be flat and covered with soft material (such as a blanket) for protecting the screen surface. • Before putting the LCD Display on the desk, make sure there is no object on it. Leaving any object under the screen may cause damage on the screen. • The LCD TV with this stand should be installed on a flat and level place. Do not place it on non flat, unlevel or unstable cart or stand. The display may fall, causing not only serious damage to the products but serious injury to a person. SAFETY NOTE For correct installing, mounting and uninstalling of the LCD TV Stand, it is strongly recommended to use a trained, authorized dealer. Failure to follow correct procedures could result in damage to the equipment or injury to the installer. Installing Stand (55") 1 Place the LCD TV on a flat surface place where maintained with soft materials (such as a blanket) for protecting the display screen. 2 Secure the stand to the TV with 4 screws. 4 1 2 3 Uninstalling Stand (55") 1 Place the LCD TV screen facing down on a flat surface with soft materials (such as a blanket) for protecting the display screen. 2 Remove screws in 4 holes with screw driver. 4 1 2 3 6 English POSITIONING THE LCD HDTV Always use a firm-flat surface when positioning your HDTV. Do not position the unit in a confined area. Allow adequate space for proper ventilation. 4 14.9 52.3 29.3 3 33.5 36.5 NOTE: All dimensions are in inches. * Diagonal screen: 54.6 inches WALL MOUNTING (OPTIONAL) Use the screws that are threaded into the stand- mounting inserts on the back of your HDTV to secure it to a wall mounting kit. NOTE: 1. Wall Mounting kit is not supplied. 2. Wall mounting kit shall be able to sustain at least 3 times of set weight. VESA standard interface: TV 200 x 400mm Wall Mounting Inserts Mounting screws measurements: 55” TV M8 Diameter, Length - 13mm (min.); 16mm (max.) Wall • (60mm) INSTALLATION 7 English 1 Install batteries in the Remote. PRECAUTIONS Do not use rechargeables together with dry cells, other types, mixed new and old or batteries with different charge levels. Do not expose the Remote or batteries to moisture or heat such as sunshine. (the size of battery is AAA). Match the “+” and “-” signs on the batteries with marks inside the Remote Control. Please recycle used up batteries. 2 Antenna Connection for off-air signals. ANTENNA CABLE OR ANALOG/DIGITAL ANTENNA IN THE TUNER IN THIS HDTV CAN RECEIVE: a. Digital and Analog off-air signals from an antenna. OR b. Analog or Clear QAM cable channels from a direct Cable TV connection. NOTES: You must use the on-screen MENU to Search for Clear QAM Cable channels. (see page 11) For the best picture, connect your Cable box or Satellite receiver to HDMI or component (VIDEO3) jacks. This HDTV can receive ANY unscrambled RF signal being broadcast. GETTING STARTED 8 English COMPOSITE VIDEO INPUT VIDEO1, PAGE 10 - Standard (composite) video and audio inputs while using video devices with analog audio and composite video output.Connect digital video equipment to the Video Yellow jack, and matching Audio White (L) and Red (R) jacks. COMPONENT VIDEO INPUT VIDEO2 or VIDEO3(YPbPr), PAGE 10 - Connect digital video equipment to the Video Green (Y), Blue (Pb), Red (Pr) jacks, and matching Audio White (L) and Red (R) jacks. These jacks will automatically detect the received signal type. DIGITAL AUDIO OUT (Coaxial), PAGE 12 - Use a Phono-Type (Coaxial) Digital Audio Out Cable to connect Digital Audio Output to an advanced stereo home theater system equipped with Dolby® Digital. ANALOG / DIGITAL ANTENNA INPUT, PAGE 7 - Connect a RF antenna or Analog Cable system to this jack. HDMI INPUT (INPUT1, INPUT2 or INPUT3), PAGE 12 - A digital AV interface that accepts uncompressed video signals for the best picture. This HDMI input supports HDCP copy protection and allows transmission of copy-protected digital contents. GETTING STARTED-CONTROLS AND JACKS DEO3 INPUT ANT PC AUDIO INPUT V DEO2 INPUT INPUT1 DV INPUT2 R L L R Pr Pb Pr Pb R L PC INPUT Y/VIDEO Y V DEO 1 NPUT DEO3 INPUT ANT PC AUDIO INPUT V DEO2 INPUT INPUT1 DV INPUT2 R L L R Pr Pb Pr Pb R L PC INPUT Y/VIDEO Y V DEO 1 NPUT Input / OK button LEFT-SIDE PANEL BACK-SIDE PANEL PC AUDIO INPUT, PAGE 12, 20 - This terminal is not only using for PC audio input but also sharing the HDMI audio input for DVI signal connecting. PC INPUT (RGB connector of 15 pin D-SUB), PAGE 13 - Connect computer to this terminal. Audio is separated from another Stereo Mini Jack (PC AUDIO INPUT). STEREO AUDIO OUT (L/R) JACKS, PAGE 12 - Connect stereo audio equipment to these jacks. USB PORT, PAGE 25 - Use for updating the television’s firmware and accessing JPEG files. 9 English MUTE Button- Press to mute or restore the sound. Numeric Buttons- Press numeric buttons to select a channel. Example: Press 6 then OK button to select analog channel A6. Press 6 then 1-- button to select digital channel D6. INPUT Button- Press to select the source to view: TV, VIDEO1, VIDEO2, VIDEO3, HDMI1, HDMI2, HDMI3, PC or USB Input. SPORTS Button- Press to choose options Football, Winter Sports, Marine Sports, Indoor Sports, and Off in turn. ECO Button - Press to select Energy saving mode options Off, ECO1, ECO2, and ECO3 in turn. Volume Up / Down (VOL+ / - )Buttons- Press to decrease or increase the audio volume. PIX SHAPE Button- Press to choose options Stan- dard, WaterGlass, Zoom1, Full and Zoom2. Available options depend on the signal and the aspect ratio of the broadcast. AUDIO Button- Press to select the desired audio mode, if available. MENU- Press to display on-screen menu. CURSOR ▲ (up) ▼ (down) Buttons - Press these buttons to move the cursor up and down. CURSOR ◄ (left) ► (right) Buttons - Press hese but- tons to move the cursor left and right. OK Button - Press to select an option from the menu, when required. EXIT Button - Press to exit from the menu. 1-- Button - Press numeric button then press this but- ton to select digital channel. GUIDE Button- Press to show the information window about the current channel on your HDTV screen.( only for digital channels). INFO Button- Press to display channel information banner. Digital Banner may contain: Channel Number, CC State, Channel Title, Video Resolution, Video Ratio, Signal Strength, Digital Sound information and Pro- gram Rating. Analog Banner may contain: Channel Number, CC State, Channel Title, Video Resolution, Analog Sound information, and Program Rating. RECALL Button- Press to switch to the last channel or input source. Channel Up / Down (CH+ / - ) Buttons- Press to switch to the last or next channel. RESET Button - Press this button to display RESET menu. If you execute RESET function, the TV will clear all customized settings. REMOTE CONTROL OPERATION NOTE : The Channel Scan Memory database will be reset to default (all analog channel enabled). You will need to execute Channel Scan after RESET. SLEEP Button- Press this button to set Off Timer function among Off, 30 min, 60 min, 90 min, 120 min, 150 min and 180 min. NOTE : The Off Timer will be canceled when the TV is turned off or when a power failure occurs. CAPTION Button- Press this button to switch CC mode among “Off“, “CC Display“ and “Muted=On“. Digital Captions can be changed through the SYSTEM CC Stytle Settings from menu. 10 English GETTING STARTED-CONNECTIONS 3 Analog Signal Connections - VIDEO1 or VIDEO2 (Shared with Component-Y). Connect an analog device such as an Analog Cable Box, Satellite Receiver or VCR. Composite connectors are included on your HDTV to provide continued compatibility with older analog devices such as a VCR. (Cables are not supplied) 1 Connect an AV cable to the VIDEO1 or VIDEO2 jack on the HDTV and to your analog AV equipment as shown. Match the connector colors to jack colors. 2 Press the INPUT button to step through the signal inputs to select Video1 or Video2. ANALOG DEVICE 4 Component Signal Connections - VIDEO2 or VIDEO3 (YPbPr) Connect Digital devices such as a HD Cable Box, HD Satellite Receiver, DVD Player, and Game System. The Component jacks on this HDTV will accept HDTV, EDTV, and SDTV video signals and make a great choice for Component when connecting your compatible external devices. 1 Connect a COMPONENT cable to set Green, Blue, and Red video jacks asVIDEO2 or VIDEO3(YPbPr) on the HDTV andto your digital device as shown. (Cable is not supplied) 2 Connect an AUDIO cable to the matching White and Red audio jacks as shown. (Cable is not supplied)) 3 Press the INPUT button to select the input signal as VIDEO2 or VIDEO3(YPbPr). NOTES: • The VIDEO2 with Green video jack, White and Red audio jacks can be used as Composite connectors like VIDEO1 (Shared with Component-Y). • You may follow the VIDEO2 OPERATION to choose suitable function (Video or YPbPr) for external devices. DVD PLAYER SATELLITE RECEIVER 11 English GETTING STARTED-POWER CONNECTION/CHANNEL SEARCH POWER CONNECTION 5 Plug in AC power cord (120V AC, 60Hz) 6 Press the POWER button, (Follow the on-screen instructions). INITIAL SETUP 7 Use the CURSOR ▲ and ▼ buttons to highlight Store or Home. Press the OK button. TVs will enter INITIAL CHANNEL SCAN automatically. Store : This mode is for the retail display setup. Home : This mode qualifies for ENERGY STAR. Move Enter OK INITIAL CHANNEL SCAN NOTE : Skip the following process if there is no cable or antenna being plugged-in to tuner connector. 8 Use the CURSOR ▲ and ▼ buttons to highlight the Channel Scan. Press the OK button. Choose the Scan to start the channel scanning. The scanned channels are stored in Channel List and can be scanned using the CURSOR ▲ and ▼ buttons. To 120V AC outlet. 12 English ADVANCED DIGITAL SIGNAL CONNECTIONS-HDMI TO HDMI Connect compatible Digital devices such as a HD Cable Box, HD Satellite Receiver, DVD Player, and Game System. HDMI-High-Definition Multimedia Interface. This is a digital AV interface that accepts uncompressed video signals for the best picture quality possible. It supports HDCP copy protection and allows transmission of copy-protected digital content. The signal can also include Dolby® Digital or PCM audio when available. 1 Connect the HDMI input and your external device with HDMI cable. NOTE : Press the INPUT button to select the input signal as HDMI1,HDMI2 or HDMI3. DVI TO HDMI (ONLY HDMI1 IS COMPATIBLE WITH THIS FUNCTION) 1 Use an adapter (not supplied) to connect a DVI device to a HDMI1 input jack. NOTE : HDMI Audio setting is necessary. (refer to page 20) 2 Connect the audio out of the device to the PC AUDIO INPUT. BACK-SIDE VIEW OF HDTV SATELLITE RECEIVER PC DIGITAL AUDIO 1 Connect the Digital Audio output to a multichannel receiver as shown. NOTE: NOTE: Dolby Digital audio signal is available from the Digital Audio output terminal only when receiving a part of a Digital input on the screen. (Coaxial) DIGITAL AUDIO CABLE (Not supplied) MULTICHANNEL RECEIVER BACK-SIDE VIEW OF HDTV AUDIO OUT JACKS 1 Connect the Audio output to a multichannel receiver as shown. STEREO AMPLIFIER Cable not supplied BACK-SIDE VIEW OF HDTV ADVANCED AV CONNECTIONS 13 English NOTE: Before connecting any cables, disconnect the AC Power Cords of both the HDTV and Personal Computer from the AC outlets. 1 Connect a RGB cable from the monitor output on your PC to the RGB connector on the HDTV and tighten the screws. (Monitor Cable not supplied). 2 Insert one end of a Stereo Mini-Audio cable into the PC Audio Out jack and the other end into the HDTV PC AUDIO INPUT jack. (Stereo Mini-Audio Cable not supplied). HINT: Volume can be adjusted both from the PC and the HDTV VOLUME + / - buttons. 3 Select Auto Adjustment from the PC Setup Menu. NOTE: Power on the HDTV and any other peripheral equipment before powering on the computer. PC MENU NAVIGATION MAP PC MONITOR OPERATION PC PREPARATION To avoid a “No Support“ condition, preset your PC’s output resolution to a XGA value such as 1024 x 768 before you disconnect it from your regular monitor. PC MENU- AUTO ADJUSTMENTS OPERATION 1 Use the CURSOR ▲ and ▼ buttons on the remote control to highlight the Auto Adjust in the PC menu. Press the OK button to start automatically adjust function. PC MENU- MANUAL ADJUSTMENT OPERATION The Clock, Phase, Horizontal Position, and Vertical Position are set automatically when Auto Adjustment is completely done. Clock- Adjust the Dot frequency to match the dot frequency of your computer. Phase- Adjust the phase when the picture appears flicker or blur. H-Position- Move the image horizontally. V-Position- Move the image vertically. 1 Use the CURSOR ▲and ▼ buttons on the remote control to highlight H-Position, V-Position, Clock or Phase. Press the OK button. 2 Use the CURSOR ◄ and ► buttons to adjust the value of setting. Press the MENU button to return. 3 Press the EXIT button on the remote control to exit the current menu. PC MENU OPERATING TIPS The Picture settings in the PC input will not affect other input settings. PC CONNECTIONS 14 English SPORTS MODE By simply pressing the “ SPORTS“ button on the remote control, the TV will automatically optimize both picture and sound settings for the programs shown. ■ Off ■ Football − For golf, football programs etc. − Fresh greenness of the lawn − Enfolding cheering voices, ball hitting sounds ■ Winter Sports − For skiing, ice skating programs etc. − Details kept white, vivid color of costume − Enhanced skiing/skating sounds ■ Marine Sports − For swimming, diving programs etc. − Sparkling blue of sea, azure sky − Delightful splashing and surf sounds ■ Indoor Sports − For basketball, boxing programs etc. − Alive reddish flesh − Clear announcements, powerful banging sounds NOTE : When the "SPORTS" button is pushed, an OSD showing the current sports mode will appear on the lower left of the screen. Once the channel or the input source is changed, the sports mode will automatically be set to "Off", and the "Sports Off" OSD will appear on the upper right of the screen. If the channel or input source is changed under the "Sports Off" status, the "Sports Off" OSD will not appear on the upper right of the screen. 15 English MENU NAVIGATION MAP MAIN MENU SUB-MENU OPTIONS CHANNEL ADJUSTMENT SIGNAL SOURCE OPERATION There are two categories: ● Air ● Cable AIR(Antenna) Search: It will search for analog and digital channels that are broadcasted over-the-air. Cable Search: It looks for analog cable channels and unscrambled (Clear QAM) digital cable channels. 1 Press the MENU button on the remote control to display the Main menu. Use the CURSOR ◄ and ► buttons to highlight CHANNEL. Press the OK button. 2 Highlight Air or Cable. Press the OK button. 3 Use the CURSOR ▲ and ▼ buttons to highlight All. Press the OK button. (A red hook will appear beside the selected item). 4 Use the CURSOR ▲ and ▼ buttons to highlight Channel Scan. Press the OK button. Choose the Scan to start the channel scanning. Move Enter Return Exit OK MENU EXIT ON-SCREEN MENU OPERATION 16 English CHANNEL LIST OPERATION The Channel List is a database of active channels you can scan through using the CURSOR ▲ and ▼ buttons. Customize it by deleting or adding channels. 1 Press the MENU button on the remote control to display the Main menu. 2 Use the CURSOR ◄ and ► buttons to highlight CHANNEL mode. Press the OK button. 3 Use the CURSOR ▲ and ▼ buttons to highlight Channel Scan. Press the OK button. Make the channel scan process completely, then press OK or Menu to exit. ADDING CHANNELS TO CHANNEL LIST 1 Use the CURSOR ▲ and ▼ buttons to highlight the Channel List. Press the OK button. 2 Use the CURSOR ◄ and ► buttons to change pages. 3 Use the CURSOR ▲ and ▼buttons to select and highlight the channel you want to add. 4 Press the VOL+ to add the channel to the Channel List. (A white Y will appear in the squared region. This means the channel is added to the Channel List.) DELETING CHANNELS FROM THE CHANNEL LIST 1 Use the CURSOR ▲ and ▼ buttons to highlight the Channel List. Press the OK button. 2 Use the CURSOR ◄ and ► buttons to change pages. 3 Use the CURSOR ▲ and ▼ buttons to select and highlight the channel you want to delete. 4 Press the VOL+ button to delete the channel from the Channel List. (A white Y will disappear in the squared region. This means the channel has been deleted from the Channel List.) RENAMING CHANNELS FROM THE CHANNEL LIST You can rename each channel of the Channel List with following operation: 1 Use the CURSOR ▲ and ▼ buttons to highlight the Channel List. Press the OK button. 2 Use the CURSOR ◄ and ► buttons to show more unshowed channels. 3 Use the CURSOR ▲ and ▼ buttons to select and highlight the channel you want to rename. 4 Press the INFO button. 5 Use 0 ~ 9 buttons to type the channel renaming with each appointed English word, numbers, and symbols by continuously pressing. (HINT: Use CURSOR ◄ and ► buttons to move forward or backward. Use 1-- button to delete.) 6 Press the INFO button to confirm. Number Button Characters Number Button Characters 0 0.,?!`-()@/+= 5 JKLjkl5 1 1 6 MNOmno6 2 ABCabc2 7 PQRSpqrs7 3 DEFdef3 8 TUVtuv8 4 GHIghi4 9 WXYZwxyz9 ON-SCREEN MENU OPERATION (CONTINUED) 17 English PARENT ADJUSTMENT This SANYO television is equipped with an electronic V-Chip to interpret MPAA (Motion Picture Association of America) and TV Parental Guidelines rating codes. When these codes are detected, the HDTV will automatically display or block the program, depending upon choices you make when setting up the PARENT menu. Use this feature to automatically block programs with content you deem as inappropriate for your children to view. MORE INFORMATION Additional information about MPAA and V-Chip rating can be found at: www.mpaa.org and www.v-chip.org, respectively. PASSWORD SETTING You will need to set a passowrd when using this TV and entering the PARENT menu for the first time. Enter this password to access the PARENT menu from the second time. 1 Press the MENU button and then use the CURSOR ◄ and ► buttons to highlight PARENT menu. Press the OK button. 2 Use the 0 - 9 buttons to enter “NEW PIN“ (the new password you want to assign). Press the OK button. 3 Use the 0 - 9 buttons to enter “Confirm“ numbers. Press the OK button. NOTE : Please carefully remember new password. If you forget the former password, press 1-- button 4 times to reset password. Change password OPERATION 1 Press the MENU button and then use the CURSOR ◄ and ► buttons to highlight PARENT menu. Press the OK button. 2 Enter password. If the password is correct, it will automatically return to PARENT menu. If the password is wrong, you can enter password again or press MENU button to return to PARENT menu. 3 Use the CURSOR ▲ and ▼ buttons to highlight Change Password. Press the OK button. 4 Use the 0 - 9 buttons to enter the "OLD PIN" (the former password), "NEW PIN" (the new password you want to assign), and enter "Confirm" numbers in turn. Press the OK button. ON-SCREEN MENU OPERATION (CONTINUED) V-Chip OPERATION This TV follows the restricted channels broad casting setting within MPAA and TV Rating option in PARENT menu. 1 Press the MENU button and then use the CURSOR ◄ and ► buttons to highlight PARENT. Press the OK button. 2 Enter your password. If the password is correct, it will automatically return to the PARENT menu. If the password is wrong, you can enter the password again or press MENU button to return to the PARENT menu. 3 Use the CURSOR ▲ and ▼ buttons to highlight V-Chip. Press the OK button. 4 Use the CURSOR ▲ and ▼ buttons to select On,Off or Reset. Press the OK button. Lock- Block the broadcast of the current displayed channel directly or current source input. 1 Press the MENU button and then use the CURSOR ◄ and ► buttons to highlight PARENT. Press the OK button. 2 Enter your password. If the password is correct, it will automatically return to the PARENT menu. If the password is wrong, you can enter the password again or press MENU button to return to the PARENT menu. 3 Use the CURSOR ▲ and ▼ buttons to highlight Lock. Press the OK button. 4 Select On or Off. Press the OK button. Note:Turn on V-Chip function,you can operate V-Chip Adjust. V-Chip Adjust OPERATION STANDARD- Decides which kind of classified channel in the Channel List can be viewed. You can block portions of the TV rating by choosing one or more of the content ratings (D, L, S, V and FV). By blocking just the L and S content ratings of TV-14, for example, TV-14 rated programs with a D and V content rating could still be viewed. 1 Press the MENU button and then use the CURSOR ◄ and ► buttons to highlight PARENT. Press the OK button. 2 Enter your password. If the password is correct, it will automatically return to the PARENT menu. If the password is wrong, you can enter the password again or press the MENU button to return to the PARENT menu. 3 Use the CURSOR ▲ and ▼ buttons to highlight V-Chip Adjust for TV Rating. Press the OK button. 4 Use the CURSOR ▲ and ▼buttons to select the options you want to adjust and press the OK button. (MPAA,Block All,TV-Y,TV-Y7,TV-G,TV-PG,TV-14,and TV-MA.) 5 Use the CURSOR ▲ and ▼buttons to select the options you want to adjust and press the OK button. Then the option you selected will be locked. (A yellow lock will appear in the squared region). 18 English MPAA OPERATION MPAA- Decides which kind of classified movie rating signal can be viewed. 1 Press the MENU button and then use the CURSOR ◄ and ► buttons to highlight PARENT. Press the OK button. 2 Enter your password. If the password is correct, it will automatically return to the PARENT menu. If the password is wrong, you can enter the password again or press MENU button to return to the PARENT menu. 3 Use the CURSOR ▲ and ▼ buttons to highlight V-Chip Adjust. Press the OK button. 4 Use the CURSOR ▲ and ▼ buttons to highlight MPAA for movie Rating. Press the OK button. 5 Use the CURSOR ▲ and ▼ buttons to select the setting you want to adjust and press the OK button. (A yellow lock will appear in the squared region). CAN ENGLISH OPERATION 1 Press the MENU button and then use the CURSOR ◄ and ► buttons to highlight PARENT. Press the OK button. 2 Enter your password. If the password is correct, it will automatically return to PARENT menu. If the password is wrong, you can enter password again or press the MENU button to return to PARENT menu. 3 Use the CURSOR ▲ and ▼ buttons to highlight Can English. Press the OK button. 4 Use the CURSOR ▲ and ▼ buttons to select the setting you want to adjust and press the OK button. (A yellow lock will appear in the squared region). CAN FRENCH OPERATION 1 Press the MENU button and then use the CURSOR ◄ and ► buttons to highlight PARENT. Press the OK button. 2 Enter your password. If the password is correct, it will automatically return to PARENT menu. If the password is wrong, you can enter password again or press the MENU button to return to PARENT menu. 3 Use the CURSOR ▲ and ▼ buttons to highlight Can French. Press the OK button. 4 Use the CURSOR ▲ and ▼ buttons to select the setting you want to adjust and press the OK button. (A white mark will appear in the squared region.) NOTE : Press the OK button to make or cancel the selected settings. A lock symbol will appear beside the selected rating option indicating that it is blocked. V-Chip Adjust OPERATION ADVANCED- For V-chip Regional Rating5(RRT5). An advanced V-Chip ratings system for digital channels that are received with an antenna. When the HDTV detects compatible RRT5 data, it is downloaded and stored in memory and the menu is modified to include advanced adjustment option. 1 Press the MENU button and then use the CURSOR ◄ and ► buttons to highlight PARENT. Press the OK button. 2 Enter your password. If the password is correct, it will automatically return to PARENT menu. If the password is wrong, you can enter password again or press the MENU button to return to the PARENT menu. 3 Use the CURSOR ▲ and ▼ buttons to highlight V-Chip Adjust. Press the OK button. 4 Use the CURSOR ► buttonto highlight ADVANCED. 5 Use the CURSOR ▲ and ▼ buttons to select the option you want to adjust. Press the OK button. (Dim0,Dim1,Dim2 or Dim3) 6 Use the CURSOR ▲ and ▼ buttons to select the option you want to adjust. Press the OK button. Then the option you selected will be locked. (A yellow lock will appear in the squared region). NOTE : If current program stream is without RRT5 data, this function will be grayed out. This function is only effective for digital channels including RRT5 data. ON-SCREEN MENU OPERATION (CONTINUED) 19 English PICTURE/ AUDIO/ ADVANCED ADJUSTMENT PICTURE ADJUSTING THE PICTURE LEVELS PICTURE MODE OPERATION 1 Press the MENU button on the remote control to display the Main menu. 2 Use the CURSOR ◄ and ► buttons to highlight PICTURE. Press the OK button. 3 Use the CURSOR ▲ and ▼ buttons to select the Picture Mode. Press the OK button. 4 Use the CURSOR ▲ and ▼ buttons to select the Cinema, Standard, Vivid or User. Press the OK button to add a red hook in the blank space. BRIGHTNESS/ CONTRAST/ SATURATION/ HUE/ SHARPNESS OPERATION 1 Press the MENU button on the remote control to display the Main menu. 2 Use the CURSOR ◄ and ► buttons to highlight PICTURE. Press the OK button. 3 Use the CURSOR ▲ and ▼ buttons to select the Brightness, Contrast, Saturation, Hue or Sharpness. Press the OK button. 4 Use the CURSOR ◄ and ► buttons to adjust the picture setting. NOTE: • These items will be grayed out if you are not select the User mode. • User mode (Picture Mode) will allow to adjust brightness, contrast,saturation,hue and sharpness function by user. COLOR TEMPERATURE OPERATION 1 Press the MENU button to display the Main menu. Press the OK button. 2 Use the CURSOR ◄ and ► buttons to highlight PICTURE. Press the OK button. 3 Use the CURSOR ▲ and ▼ buttons to highlight Color Temperature. Press the OK button. 4 Use the CURSOR ▲ and ▼ buttons to select Warm, Normal or Cool. Press the OK button. VIDEO2 OPERATION 1 Press the MENU button to display the Main menu. Press the OK button. 2 Use the CURSOR ◄ and ► buttons to highlight PICTURE. Press the OK button. 3 Use the CURSOR ▲ or ▼ buttons to highlight Video2. Press the OK button. 4 Use the CURSOR ▲ and ▼ buttons to select YPbPr or Video. Press the OK button. RESET PICTURE OPERATION Reset Picture- Make the previous adjustment settings under the PICTURE mode recovered from the factory default value. 1 Use the CURSOR ◄ and ► buttons to highlight PICTURE. Press the OK button. 2 Use the CURSOR ▲ and ▼ buttons to highlight Reset Picture. Press the OK button. 3 Use the CURSOR ▲ and ▼ buttons to select Reset or Cancel. Press the OK button. NOTE : Press the MENU button to return to the PICTURE mode menu. AUDIO SOUND MODE OPERATION 1 Press the MENU button on the remote control to display the Main menu. 2 Use the CURSOR ◄ and ► buttons to highlight AUDIO. Press the OK button. 3 Use the CURSOR ▲ and ▼ buttons to select Sound Mode. Press the OK button. 4 Use the CURSOR ◄ and ► buttons to adjust the audio setting.(Off/Rock/Pop/Jazz/Vocal/User). NOTES: • User mode (Sound Equalizer) will allow to adjust frequency response from 100Hz to 10kHz by user. • Use the CURSOR ▲ and ▼ buttons to select frequency. • Use the to CURSOR ◄ and ► buttons to adjust the frequency setting. 20 English ADJUSTING THE AUDIO LEVELS TREBLE/ BASS/ BALANCE OPERATION 1 Press the MENU button on the remote control to display the Main menu. 2 Use the CURSOR ◄ and ► buttons to highlight AUDIO. Press the OK button. 3 Use the CURSOR ▲ and ▼ buttons to select Treble, Bass or Balance. Press the OK button. 4 Use the CURSOR ◄ and ► buttons to adjust the audio setting. BASS BOOST OPERATION 1 Press the MENU button on the remote control to display the Main menu. 2 Use the CURSOR ◄ and ► buttons to highlight AUDIO. Press the OK button. 3 Use the CURSOR ▲ and ▼ buttons to highlight Bass Boost. Press the OK button. 4 Use the CURSOR ▲ and ▼ buttons to highlight Off, Low or High. Press the OK button. SURROUND OPERATION 1 Press the MENU button on the remote control to display the Main menu. 2 Use the CURSOR ◄ and ► buttons to highlight AUDIO. Press the OK button. 3 Use the CURSOR ▲ and ▼ buttons to highlight Surround. Press the OK button. 4 Use the CURSOR ▲ and ▼ buttons to highlight Off, Low or High. Press the OK button. HDMI AUDIO OPERATION HDMI AUDIO SETTINGS HDMI1 includes three categories, Auto, Digital and Analog. (Default setting is Auto) For the other HDMI port, the HDMI Audio setting will be blocked out and fixed in Digital. Auto- During this setting, the system will analyze HDMI1 signal type (by info frame) to detect if this input source is pure HDMI or DVI signal. Then it will select the audio input signal from HDMI port or PC AUDIO INPUT port automatically (refer to page 13). Digital- During this setting, the audio input signal will be fixed to the HDMI1 port. NOTE : If the HDMI is a DVI signal type, there will be no sound output. Analog- During this setting, the audio input signal will be fixed to PC AUDIO INPUT port. NOTE : Even though the HDMI is pure HDMI type, the audio still is selected from the PC AUDIO INPUT port. 1 Press the MENU button on the remote control to display the Main menu. 2 Use the CURSOR ◄ and ► buttons to highlight AUDIO. Press the OK button. 3 Use the CURSOR ▲ and ▼ buttons to highlight HDMI Audio. Press the OK button. 4 Use the CURSOR ▲ and ▼ buttons to select Auto, Digital or Analog option. Press the OK button. (A red hook will appear in the white blank space). RESET AUDIO OPERATION Reset Audio- It can reset previous adjusting settings during the AUDIO mode to the factory default value. 1 Use the CURSOR ◄ and ► buttons to highlight AUDIO. Press the OK button. 2 Use the CURSOR ▲ and ▼ buttons to highlight the Reset Audio. Press the OK button. 3 Use the CURSOR ▲ and ▼ buttons to select Reset or Cancel. Press the OK button. NOTE : Press the MENU button to return to the AUDIO menu. ADVANCED SPORTS OPERATION (See PAGE 14) 1 Press the MENU button on the remote control to display the Main menu. 2 Use the CURSOR ◄ and ► buttons to highlight ADVANCED. Press the OK button. 3 Use the CURSOR ▲ and ▼ buttons to select Sports. Press the OK button. 4 Use the CURSOR ▲ and ▼ buttons to select Off, Football, Winter Sports, Marine Sports or Indoor Sports. Press the OK button. NOISE REDUCTION OPERATION 1 Press the MENU button on the remote control to display the Main menu. 2 Use the CURSOR ◄ and ► buttons to highlight ADVANCED. Press the OK button. 3 Use the CURSOR ▲ and ▼ buttons to select Noise Reduction. Press the OK button. 4 Use the CURSOR ▲ and ▼ buttons to select Off, Weak, Medium or Strong. Press the OK button. DVD player, cable/satellite box and digital camera 21 English signals usually will not need noise reduction. MPEG NR OPERATION 1 Press the MENU button on the remote control to display the Main menu. 2 Use the CURSOR ◄ and ► buttons to highlight ADVANCED. Press the OK button. 3 Use the CURSOR ▲ and ▼ buttons to select MPEG NR. Press the OK button. 4 Use the CURSOR ▲ and ▼ buttons to select Off, Weak, Medium or Strong. Press the OK button. DYNAMIC AI OPERATION 1 Press the MENU button on the remote control to display the Main menu. 2 Use the CURSOR ◄ and ► buttons to highlight ADVANCED. Press the OK button. 3 Use the CURSOR ▲ and ▼ buttons to select the Dynamic AI. Press the OK button. 4 Use the CURSOR ▲ and ▼ buttons to select Off, Weak, Medium or Strong. Press the OK button. NOTE : Please set PICTURE MODE to User then can turn on this function PAGE 19. PICTURE (PIX) SHAPE OPERATION Pix Shape- Divided into three categories. The options during the Pix Shape mode change by the detection of HD, SD or PC inputs. HD: Full / WaterGlass / Zoom1 / Zoom2 SD: Standard / WaterGlass / Zoom1 / Full / Zoom2 PC: Normal / Full / Dot by Dot 1 Press the MENU button on the remote control to display the Main menu. 2 Use the CURSOR ◄ and ► buttons to highlight ADVANCED. Press the OK button. 3 Use the CURSOR ▲ and ▼ buttons to select Pix Shape. Press the OK button. 4 Use the CURSOR ▲ and ▼ buttons to select Standard, WaterGlass, Zoom1, Full or Zoom2. Press the OK button. NOTE : The remote controls of HD cable and satellite boxes also have similar zoom choices. Try having the TV setting on FULL first, and adjust via the cable/satellite box's remote control. BACKLIGHT OPERATION 1 Press the MENU button on the remote control to display the Main menu. 2 Use the CURSOR ◄ and ► buttons to highlight ADVANCED. Press the OK button. 3 Use the CURSOR ▲ and ▼ buttons to select Backlight. Press the OK button. 4 Use the CURSOR ◄ and ► buttons to select the desired value between 0 to 50. NOTE: • This item will be grayed out if you turn on the Light sensor function. • Please set Light sensor operation to off then can turn on this function. LIGHT SENSOR OPERATION Picture brightness will automatically be boosted or reduced depending on the room brightness. 1 Press the MENU button on the remote control to display the Main menu. 2 Use the CURSOR ◄ and ► buttons to highlight ADVANCED. Press the OK button. 3 Use the CURSOR ▲ and ▼ buttons to select Light Sensor. Press the OK button. 4 Use the CURSOR ▲ and ▼ buttons to select Off ,Low ,Middle or High. Press the OK button. NOTE: • The initial setting of Light sensor in the Home mode is High. • Change this setting to Middle, Low or Off if a picture is too dark in your home. OSD DISPLAY TIME OPERATION OSD Display Time 1 Press the MENU button on the remote control to display the Main menu. 2 Use the CURSOR ◄ and ► buttons to highlight ADVANCED. Press the OK button. 3 Use the CURSOR ▲ and ▼ buttons to select the OSD Display Time option. Press the OK button. 4 Use the CURSOR ◄ and ► buttons to choose from 20 Seconds, 30 Seconds, 40 Seconds, 50 Seconds or 60 Seconds. Press the OK button. NEXT PAGE OPERATION NEXT PAGE - Jump to next page menu. 1 Press the MENU button on the remote control to display the Main menu. 2 Use the CURSOR ◄ and ► buttons to highlight ADVANCED. Press the OK button. 3 Use the CURSOR ▲ and ▼ buttons to select the Next Page. 4 Press the OK button to jump to the next page. 120Hz CONDITION OPERATION 1 Press the MENU button on the remote control to display the Main menu. 2 Use the CURSOR ◄ and ► buttons to highlight ADVANCED. Press the OK button. 3 Use the CURSOR ▲ and ▼ buttons to select the Next Page. Press the OK button. 4 Use the CURSOR ▲ and ▼ buttons to select the 120Hz Condition option. 5 Use the CURSOR ◄ and ► buttons to adjust the 120Hz Condition setting to On or Off. 22 English NOTES : • When you select to PC source or USB mode, the120Hz CONDITION default setting is set to Off. • When display happened double shadow or Outer Glow ,please turn off the 120Hz CONDITION. RESET ADVANCED OPERATION Reset Advanced- Reset the previous adjustment settings under the ADVANCED mode to the factory default value. 1 Use the CURSOR ◄ and ► buttons to highlight ADVANCED. Press the OK button. 2 Use the CURSOR ▲ and ▼ buttons to highlight Reset Advanced. Press the OK button. 3 Use the CURSOR ▲ and ▼ buttons to select Reset or Cancel. Press the OK button. NOTE : Press the MENU button to return to the previous ADVANCED menu. PREVIOUS PAGE OPERATION PREVIOUS PAGE - Return to previous page. 1 Press the MENU button on the remote control to display the Main menu. 2 Use the CURSOR ◄ and ► buttons to highlight ADVANCED. Press the OK button. 3 Use the CURSOR ▲ and ▼ buttons to select the Previous Page. 4 Press the OK button can return to previous page. SYSTEM LANGUAGE OPERATION Language- Choose from English, Français, and Español for the on-screen display of menus and messages. 1 Press the MENU button on the remote control to display the Main menu. 2 Use the CURSOR ◄ and ► buttons to highlight SYSTEM. Press the OK button. 3 Use the CURSOR ▲ and ▼ buttons to highlight Language option. Press the OK button. 4 Use the CURSOR ▲ and ▼ buttons to select English, Français or Español. Press the OK button. A red hook will appear in the squared and blank region. TIME OPERATION Time Zone - Choose from six categories in different location, U.S.A. of Eastern, Central, Mountain, Pacific, Alaska, and Hawaii, for your choice of setting all displayed time zone on all ON- Screen Menu. 1 Press the MENU button on the remote control to display the Main menu. 2 Use the CURSOR ◄ and ► buttons to highlight SYSTEM. Press the OK button. 3 Use the CURSOR ▲ and ▼ buttons to highlight Time. Press the OK button. 4 Use the CURSOR ▲ and ▼ buttons to select Eastern, Central, Mountain, Pacific, Alaska or Hawaii. Press the OK button. A red hook will appear in the squared and blank region. Current Year 1 Press the MENU button on the remote control to display the Main menu. 2 Use the CURSOR ◄ and ► buttons to highlight SYSTEM. 3 Use the CURSOR ▲ and ▼(Down buttons to highlight Time. Press the OK button. 4 Use the CURSOR ▲ and ▼ buttons to highlight Current Year. 5 Use the CURSOR◄ and ► buttons to select year. Current Date 1 Press the MENU button on the remote control to display the Main menu. 2 Use the CURSOR ◄ and ► buttons to highlight SYSTEM. 3 Use the CURSOR ▲ and ▼ buttons to highlight Time. Press the OK button. 4 Use the CURSOR ▲ and ▼ buttons to highlight Current Date. 5 Use the CURSOR ◄ and ► buttons to select month number. Press the OK button. 6 Use the CURSOR ◄ and ► buttons to select date number. Press the OK button. Current Time 1 Press the MENU button on the remote control to display the Main menu. 2 Use the CURSOR ◄ and ► buttons to highlight SYSTEM. 3 Use the CURSOR ▲ and ▼ buttons to highlight Time. Press the OK button. 23 English 4 Use the CURSOR ▲ and ▼ buttons to highlight Current Time. 5 Use the CURSOR◄ and ► buttons to select hour.Press the OK button. 6 Use the CURSOR◄ and ► buttons to select minutes.Press the OK button. On Time Function- turn on Switch on Time function 1 Press the MENU button on the remote control to display the Main menu. 2 Use the CURSOR ◄ and ► buttons to highlight SYSTEM. 3 Use the CURSOR ▲ and ▼ buttons to highlight Time. Press the OK button. 4 Use the CURSOR ▲ and ▼ buttons to highlight On Time Function. 5 Use the CURSOR◄ and ► buttons to select On or Off. Press the OK button. Switch On Time - You can automatic turn on TV at your setting time. 1 Press the MENU button on the remote control to display the Main menu. 2 Use the CURSOR ◄ and ► buttons to highlight SYSTEM. 3 Use the CURSOR ▲ and ▼ buttons to highlight Time.Press the OK button. 4 Use the CURSOR ▲ and ▼ buttons to highlight Switch On Time. 5 Use the CURSOR◄ and ► buttons to select hour.Press the OK button. 6 Use the CURSOR◄ and ►> buttons to select minutes. Press the OK button. POWER SAVING OPERATION 1 Press the MENU button on the remote control to display the Main menu. 2 Use the CURSOR ◄ and ► buttons to highlight SYSTEM. 3 Use the CURSOR ▲ and ▼ buttons to highlight Power Saving. Press the OK button. Sleep- Choose from Off, 30 min, 60 min, 90 min,120 min, 150 min, and 180 min for your choice of setting the counting down of time you desire the HDTV to be turned off by itself. The default setting is Off. 1 Press the MENU button on the remote control to display the Main menu. 2 Use the CURSOR◄ and ► buttons to highlight SYSTEM. Press the OK button. 3 Use the CURSOR ▲ and ▼ buttons to highlight Power Saving. Press the OK button. 4 Use the CURSOR ▲ and ▼ buttons to highlight Sleep. Press the OK button. 5 Use the CURSOR ▲ and ▼ buttons to select Off, 30 min, 60 min, 90 min, 120 min, 150 min or 180 min. Press the OK button. A red hook will appear in the squared and blank region. No Signal Standby- Automatic power saving, when no TV signal input display on your panel. 1 Press the MENU button on the remote control to display the Main menu. 2 Use the CURSOR ◄ and ► buttons to highlight SYSTEM. 3 Use the CURSOR ▲ and ▼ buttons to highlight Power Saving. Press the OK button. 4 Use the CURSOR ▲ and ▼ buttons to highlight No Signal Standby. Press the OK button. 5 Use the CURSOR ▲ and ▼ buttons to select On or Off. Press the OK button. ANALOG CLOSED-CAPTION OPERATION Analog CC- Choose from eight types of captions for Analog TV signal for your choice of setting the desired caption type to be displayed with Analog TV signal programs on your HDTV. 1 Press the MENU button on the remote control to display the Main menu. 2 Use the CURSOR ◄ and ► buttons to highlight SYSTEM. Press the OK button. 3 Use the CURSOR ▲ and ▼ buttons to highlight Analog CC. Press the OK button. 4 Use the CURSOR ▲ and ▼ buttons to select CC1, CC2, CC3, CC4, TT1, TT2, TT3 or TT4. Press the OK button. A red hook will appear in the squared and blank region. DIGITAL CLOSED-CAPTION OPERATION Digital CC- Choose from six types of captions for Digital TV signal for your choice of setting the desired caption type to be displayed with Digital TV signal programs on your HDTV. 1 Press the MENU button on the remote control to display the Main menu. 2 Use the CURSOR ◄ and ► buttons to highlight SYSTEM. Press the OK button. 3 Use the CURSOR ▲ and ▼ buttons to highlight Digital CC. Press the OK button. 4 Use the CURSOR ▲ and ▼ buttons to select CS1, CS2, CS3, CS4, CS5 or CS6. Press the OK button. A red hook will appear in the squared and blank region. 24 English CC STYLE SETTING OPERATION CC Style Setting- Caption is a textual information transmitted along with the picture and sound. Turning captioning ON causes the HDTV to open these captions (Digital or Analog) and superimpose them on the screen (Local broadcasters decide which caption signals to transmit). Digital Captions can be changed by your choice of the CC Style Setting as shown. There are several Subcatalogs for each nine categories under the CC Style Setting for your choice of setting the desired caption style superimposed on your HDTV screen. Category Title Subcatalog of the Category Title CC Setting CC Display / Muted=On / Off CC Priority Automatic / Analog CC / Digital CC Digital CC Preset Default / Custom Font Size Standard / Large / Small Font Color White / Red / Green / Blue / Yellow / Magenta / Cyan / Black Font Style Style1 / Style2 / Style3 / Style4 / Style5 / Style6 / Style7 Edge Type None / Raised / Depressed / Outline / L.shadow / R.shadow Edge Color White / Red / Green / Blue / Yellow / Magenta / Cyan / Black Background Color White / Red / Green / Blue / Yellow / Magenta / Cyan / Black 1 Press the MENU button on the remote control to display the Main menu. 2 Use the CURSOR ◄ and ► buttons to highlight SYSTEM. Press the OK button. 3 Use the CURSOR ▲ and ▼ buttons to highlight CC Style Setting. Press the OK button. 4 Use the CURSOR ▲ and ▼ buttons to select CC Setting, CC Priority, Digital CC, Present, Font Size, Font Color, Font Style, Edge Type, Edge Color or Background Color. Press the OK button. 5 Use the CURSOR ◄ and ► buttons to select the above-mentioned Subcatalog of the Category Title you want to set. Press the OK button. RESET SYSTEM OPERATION Reset System- Reset the previous adjustment settings under the SYSTEM mode to the factory default value. 1 Use the CURSOR ◄ and ► buttons to highlight SYSTEM. Press the OK button. 2 Use the CURSOR ▲ and ▼ buttons to highlight Reset System. Press the OK button. 3 Use the CURSOR ▲ and ▼ buttons to select Reset or Cancel. Press the OK button. DEFAULT OPERATION Default- A function linked to the RESET button on the remote control. Allows you to reset the previous adjustment settings of all ON-Screen Menu Operations to the default value. NOTE: Be sure you wish to execute this function. 1 Use the CURSOR ◄ and ► buttons to highlight SYSTEM. Press the OK button. 2 Use the CURSOR ▲ and ▼ buttons to highlight Default. Press the OK button. 3 Use the CURSOR ▲ and ▼ buttons to select Reset or Cancel. Press the OK button. SYSTEM INFO OPERATION System Info- Allows your checking the record of the Firmware Code version and release Date kept in your HDTV memory. 1 Use the CURSOR ◄ and ► buttons to highlight SYSTEM. Press the OK button. 2 Use the CURSOR ▲ and ▼ buttons to highlight System Info. Press the OK button. 3 Use the MENU button to return to SYSTEM menu or use the EXIT button to close the ON-Screen menu. 25 English USB PHOTO VIEWER MEDIA BROWSER OPERATION 1 Press the INPUT button on the remote control and use the CURSOR ▲ and ▼ buttons to highlight USB. Press the OK button. 2 Use the CURSOR ▲ and ▼ buttons to highlight Media Browser. Press the OK button. 3 Use the CURSOR ▲ and ▼ buttons to select JPEG file or JPEG folder. Press the OK button. SINGLE VIEW (Open) 1 Use the CURSOR ▲ and ▼ buttons to select Open. Press the OK button. 2 Use the CURSOR ▲ and ▼ buttons to select JPEG file. Press the OK button. 3 Use CURSOR ▲ and ▼ buttons can rotate he image. NOTE:CURSOR ▲ button can rotate view clockwise. CURSOR ▼ button can rotate view counterclockwise 4 Press OK button can zoom in x2 and press OK button again can zoom in x4. Press EXIT button can minify the image and press exit again can to original size. Note:CURSOR ◄ ► ▲ ▼ buttons can scroll over the screen only in Zoom mode(x2,x4) 5 Use the EXIT button to exit this function. MULTI VIEW (Thumbnail) 1 Use the CURSOR ▲ and ▼ buttons to select Thumbnail. Press the OK button. 2 Press the OK button then use the CURSOR ◄ ►▲ ▼ buttons to select a JPEG file. Press the OK button. 3 If the JPEG file more than 15 files. Use the CURSOR ◄ ►▲ ▼ buttons to select next page JPEG file. 4 Use the EXIT button to exit this function. SLIDESHOW 1 Use the CURSOR ▲ and ▼ buttons to select Slideshow. Press the OK button. 26 English 2 Use the EXIT button to exit this function. SETTINGS (for Slideshow function) OPERATION 1 Use the CURSOR ▲ and ▼ buttons to highlight Settings. Press the OK button. 2 Use the CURSOR ▲ and ▼ buttons to highlight Slideshow Interval. Use the CURSOR ◄ and ► buttons to select 3sec, 5sec or 10sec. 3 Use the CURSOR ▲ and ▼ buttons to highlight Slideshow Effect. Use the CURSOR ◄ and ► buttons to select Off, Wipe Right, Wipe Down, Comb Side, Comb UpDown, Checker, Mosaic, Fade, Blind Left, Blind Down, Box In and Box Out. 4 Use the CURSOR ▲ and ▼ buttons to highlight Slideshow Repeat. Use the CURSOR ◄ and ► buttons to select On or Off. NOTES: • The operation bar of JPEG viewer (OSD) will disappear within three seconds. Press the INFO button to display the operation bar again. • Use the CURSOR ◄ and ► buttons to view Next or Previous picture . • Use the INFO button to close OSD information 27 English PHOTO VIEWER SPECIFICATIONS Playable media USB memory (Should be a flash memory type with USB mass storage.) No support for USB HUB. Format FAT16, FAT32 Maximum number of files 10000 Maximum number of folders 1000 File path Up to 260 characters Directory/File name 8 characters Image file format JPEG Base Line format (Supported) with English file name. Progressive/JPEG 2000/Uncompressed (Not supported) Pixel size 8x8 to 16384x8640 Zoom-in-limit x16 Zoom-out limit 4069x2160 (Width x Height) or less: x 1/16 Larger than 4096x2160 (Width x Height) and 8192x4320 (Width x Height) or less: x 1/32 Larger than 8192x4320 (Width x Height): x1/64 Character code supported in file system library Symbol : ! - _ # $ % & ’ @ ^ ` Number: 0 1 2 3 4 5 6 7 8 9 Alphabet: A B C D E F G H I J K L M N O P Q R S T U V W X Y Z a b c d e f g h i j k l m n o p q r s t u v w x y z *No operation is guaranteed for use Symbol only as a directory name or file name. NOTES: • Connectivity is not guaranteed for all devices. • Gently insert the USB device into the port and do no remove while viewing Media Player. • USB device: USB Mass Storage Class device ( MSC) • Connect the USB device to the TV directly. • Do not use a USB Hub. • You must obtain any required permission from copyright owners to use copyright content. SANYO cannot and does not grant such permission.Imusam earume doluptaspid quiat que eos et hillignam abo. Ut quiassition reni beaqui ducit, similicideri del et la sus siti cum utes que preptatem et doluptatibus dem reiumque endit evelent aut volupta turemol uptate quossim illaccusdae vendandiorum rero dolorun tectat qui utatem nos rehentur aditiatquide sandissit estotas re volles et min explita tatestenis ipsam que nobitas ut explic tem nuscipid min nis dest as molendebitae volum aperit, quo tores rae volorectore eum ditatiore sunt il mil ipiderunt aut aliquaest, ulparchil ipiditi omnissi minvenis sum labore doloribus. • Tas alibeature et volut iliqui ab ipsunt utem que suntur? • Ta vel eos aut vent. Osti consequi ut as qui ut velliquae qui te et elitium exceaquas aut accusapelent qui ventio. Udi idendebit omnistia volum consequam qui acid maio inis erem as eicid maiore volesequo conest, ne et dellupt atiassim exped etustotat mod qui optatur? • Pa doluptibus. Ed que volestio dit et eiuribus alignis et exceris cuptas prerro exerum solorum qui num qui volupid eliquibus minis earum voluptae. Liqui volor aut doluptat lis restotat. • Obis dis estem fugia iur arum este dolum volupti quuntorem voluptatia in expeles ecuscipsum harci duciuriorem fugita voluptasi sitati doloreh enturib ustiustius si consequi vit, corenim porest, sitas reria se doles que enis assequaectem sin porro in est pos suntium ut aut aut dis utat ped etus aut aut vent alit verenih itateni dolor molorest pro vel illupta adicitiuntem laut lautemo luptati onsequi sciist aut modit alit doluptaspici ommodit min cumquam quis unt. • Est que odis diciduciis autas voluptiberum quam volendantis sin consequ oditae venihic atempos estrum facesto con rempos quisquas eos errovidi beat explici maximoles noneculliant omnis volupta quiaspe rsperro ium rernatibus eum dolupta turiaes est aliberu ptatur? Debis maximo is et od ulparcient quasin perrum fugia de vollecepe veror simin consequi quo corendiorum, il in cone es autate volupti ratiorerum et maximillorro mollor restota ecust, ipsus elibus aut enim sa doluptam que nihilique pariam dolene alis aciis sit, velestis eatquia comnit pres modipsam quistibus quiatempos aut pliquisi bero volupta sequi ut este pa sent. • Ota dunt voluptibus modipsandam, ut untiorat odiam doloratas quamusdae nimi, seque niae sam estiassum et volum que di qui dolorectotat ad qui blab idebisit laboreped modipsam est occum ex eum natqui quat faces evel modit minienis simustrunto te omnimin vellaceaque qui odi ipid magni doluptas as quia doluptae. Et quiati consed et ditianimus endendamus asi que pe lam il everovitio esciis as sectate enis eaquo iliasperum esectatur aut autem at fugitaqui corehent 28 English HELPFUL HINTS - Problems / Solutions If you are having problems with your HDTV, check this trouble shooting chart to find one or more possible solutions. Before returning your HDTV, please visit our website at http://www.sanyoctv.com or call us toll free at 1-800- 877-5032 We can Help! Problem: Check these Conditions: Try these Solutions: Page No. No picture, sound (Digital Picture) • Check the antenna / external connections. • There may be a station trouble, no signal broadcast. • MUTE function may be turned ON. • Adjust antenna. • Try a different channel. • Execute Channel Scan in the CHANNEL menu. (Set Signal Type to All) • Adjust Volume. 7, 11, 15 - 16 No Caption • Check if station is broadcasting a Closed - Caption signal. • Select another channel. • Press the CAPTION button to select captioning mode. 9, 23 Cannot display picture on a full screen • Press the PIX SHAPE button on the remote control to change settings. 9, 21 Poor Picture/ Sound (watching Analog) • Check if the program is in color. • Check the antenna / external connections. • Color or Tint may be misadjusted. • There may be a station trouble. • MUTE function may be turned ON. • Try a different channel. • Adjust the antenna. • Execute Reset Picture in the PICTURE menu. • Adjust the Volume and/or Image. 7,9 19 - 20 “No Signal” message appears on screen • Check the Audio / Video connections. • Check the external equipment connections. • Check the external equipment settings. • Check the antenna connection. • Press the INPUT button on the remote control. 7 - 13 Pixilation of Digital image • Press the INFO button and check signal strength. • Turn antenna, install signal booster. • Install outdoor Digital antenna. 7, 11 Cannot select or scan some channels • Channel may be removed from memory. • Check antenna connections. • No digital signal being broadcasted. • Weak Signal. • Selec Channel List to add channels or start channel scan in CHANNEL mode. • Turn antenna, install signal booster. 7, 11, 15 - 18 No Cable channels above number 13 • Check CHANNEL menu, Signal Source item should set to Cable. • Set Signal Source to Cable, Set Signal Type to All and execute Channel Scan to search for Cable channels in CHANNEL menu. 11, 15 Remote Control will not operate TV • Check batteries. • Check if the TV is Plugged in. • Replace batteries. • Aim remote control at front of TV. 7, 9 Cabinet makes popping sound • This is a normal condition during warm - up and cool down of the plastic cabinet parts. No USB Media message appears on screen • Check the external equipment connections. • Check the external equipment settings. • Press the INPUT button on the remote control. 29 English Maximum Visible Range (H)1209.6 x (V)680.4 mm (54.6" class /138.8 diagonal) Refresh Rate 120 Hz Picture Resolution Full HD 1920X1080 Viewing Angle Horizontal 178° & Vertical: 178° (Panel tentative) Brightness 450(Typical) cd/m2 (Panel tentative) Contrast Ratio 5000:1 (Typical) (Panel tentative) Voltage 120V AC 60Hz AC Power Consumption (average) 342 Watts Color System NTSC3.58 Sound System M Channel Coverage Low band: 54.00 to 144.00MHz Mid band: 145.00 to 424.00MHz High band: 425.00 to 861.25MHz Sound Output 10W+10W Dimensions (Including Stand) (W)1328 x (H)926 x (D)378 mm Net Weight (Including Stand) 31.3 kg Operating Environment Operating Temperature: 5°C to 35°C Operating Humidity: 0 % to 90 % Storage Temperature: 0°C to 40°C Storage Humidity: 0% to 90% (non-condensing) ■ Specifications are subject to change without notice. ■ The On-Screen Menu and figures in this manual may differ slightly from the product. Input terminals PC HDMI/DVI ANT Video 1 Video 2/3 USB VGA AUDIO JACK AV AV Audio YPbPr YPbPr Audio 1 1 3 1 1 1 2 2 1 SPECIFICATIONS 30 English Output terminals Digital Audio Output Audio Output 1 1 CONFIGURATIONS OF VGA TERMINALS VGA IN (D-SUB) TERMINAL Terminal : D-SUB15 PIN Connect video output terminal of LCD TV to this terminal with a VGA Cable (not supplied). When connecting Macintosh computer, the MAC Adapter (not supplied) is required. 1 Red Input 9 +5V 2 Green Input 10 NC 3 Blue Input 11 Sense 0 4 Reserved 12 DDC_SDA 5 Reserved 13 Horiz. sync. 6 GND 14 Vert. sync. 7 GND 15 DDC_SCL 8 GND PC / HDMI SIGNAL MODES This LCD TV can correspond to the signals below. After connecting with the computer, the TV can automatically recognize the signal from the connected PC (computer) / HDMI. PC SIGNAL MODE COLUMN (recommended)® SYSTEM MODE Resolution V-Freq.(Hz) H-Freq.(KHz) PIXELS CLOCK (MHz) VGA 640x480 59.94 31.47 25.18 SVGA 800x600 60 37.88 40 XGA 1024x768 60 48.36 65 WXGA 1360x768 60 47.712 85.5 WXGA 1280x768 60 47.78 79.5 SXGA 1280x1024 60 63.981 108 NOTE: ■ In principle, the TV can not display signal modes not described in the above column. However, it can sometimes display a signal very similar with one of the modes described. ■ It is not the trouble of the TV if interference appears on the picture while switching the signal mode. ■ The Dot Clock of the computer’s signal must be less than 108 MHz. ■ When the input signal from PC is out of the PC signal mode column, above, “No Support” caution message will display. But in some case, the LCD TV will still display the PC signal though the signal mode doesn’t exist on the list above. Under this condition, the display position may not correct and the quality may not be admitted also. When input signal is digital from HDMI terminal, refer to the chart below. SYSTEM MODE Resolution V-Freq.(Hz) H-Freq.(KHz) PIXELS CLOCK (MHz) 480I 720(1440)x480 59.94 15.73 27 480P 720x480 59.94 31.47 27 720P/60 1280x720 60 45 74.25 1080I/60 1920x1080 60 33.75 74.25 1080P/24 1920x1080 24 27 74.25 1080P/60 1920x1080 60 67.5 148.5
版权声明
1. 本站所有素材,仅限学习交流,仅展示部分内容,如需查看完整内容,请下载原文件。
2. 会员在本站下载的所有素材,只拥有使用权,著作权归原作者所有。
3. 所有素材,未经合法授权,请勿用于商业用途,会员不得以任何形式发布、传播、复制、转售该素材,否则一律封号处理。
4. 如果素材损害你的权益请联系客服QQ:77594475 处理。