三洋DP32242液晶彩电使用说明书
 "三洋DP32242液晶彩电使用说明书-0")
 "三洋DP32242液晶彩电使用说明书-1")
 "三洋DP32242液晶彩电使用说明书-2")
 "三洋DP32242液晶彩电使用说明书-3")
 "三洋DP32242液晶彩电使用说明书-4")
 "三洋DP32242液晶彩电使用说明书-5")
 "三洋DP32242液晶彩电使用说明书-6")
 "三洋DP32242液晶彩电使用说明书-7")
 "三洋DP32242液晶彩电使用说明书-8")
 "三洋DP32242液晶彩电使用说明书-9")
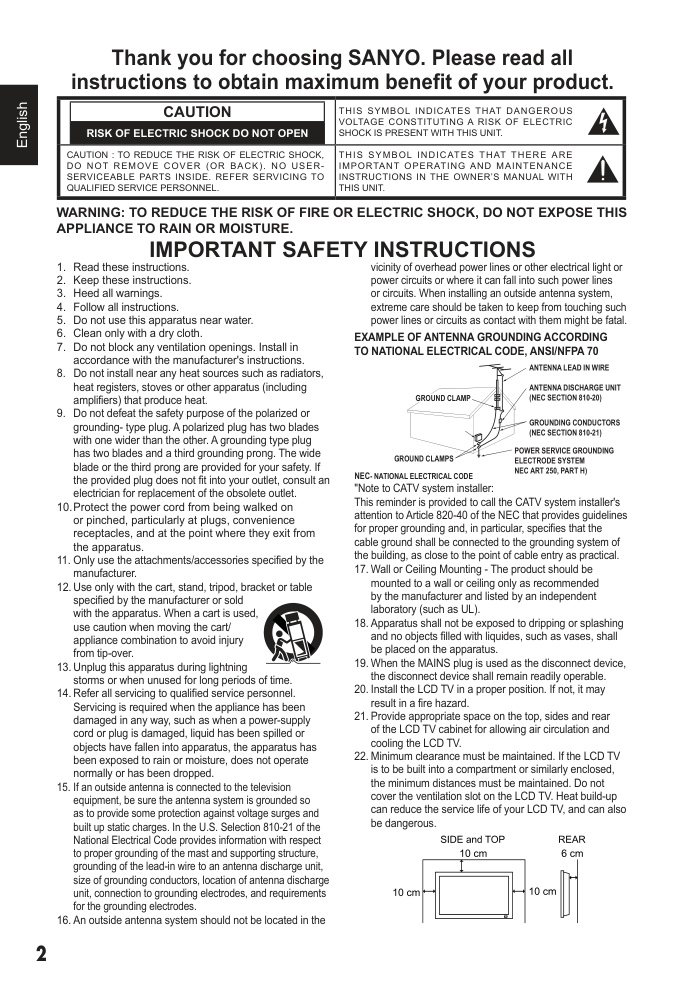
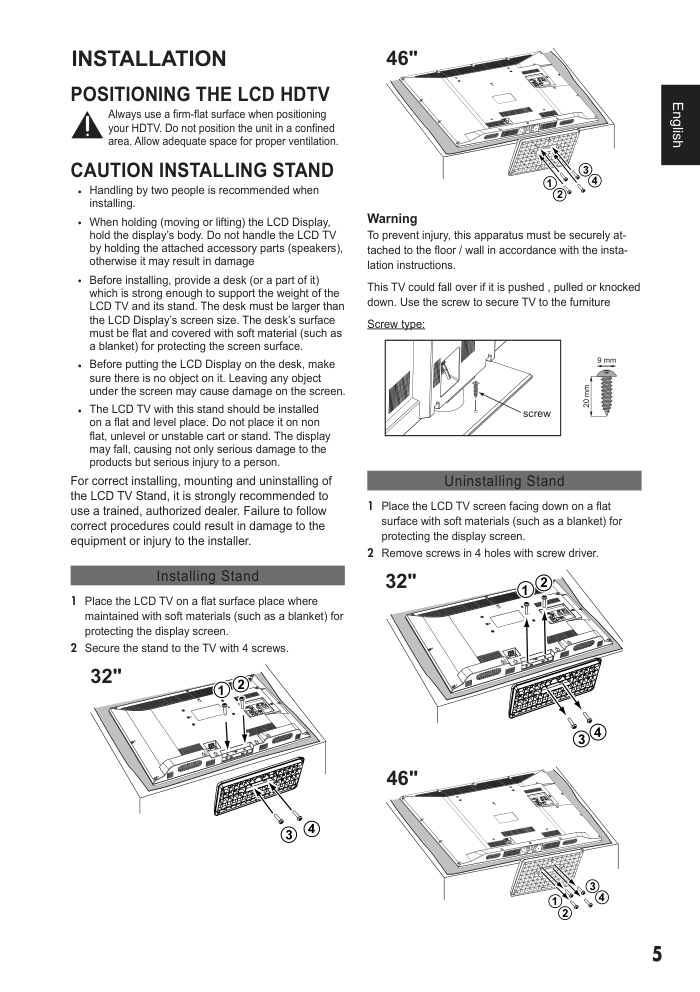
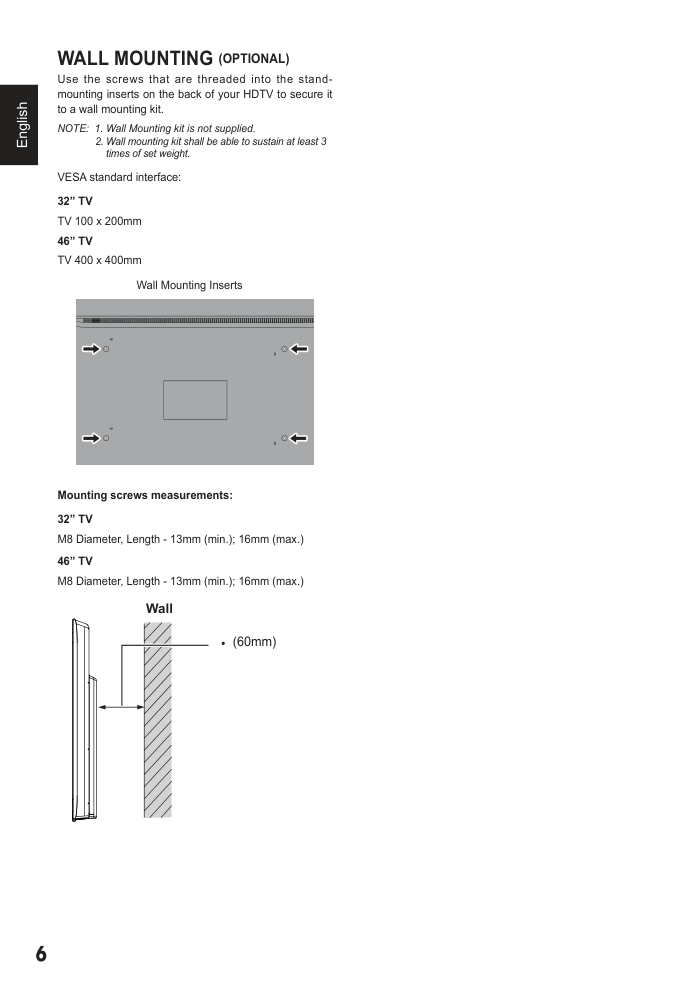
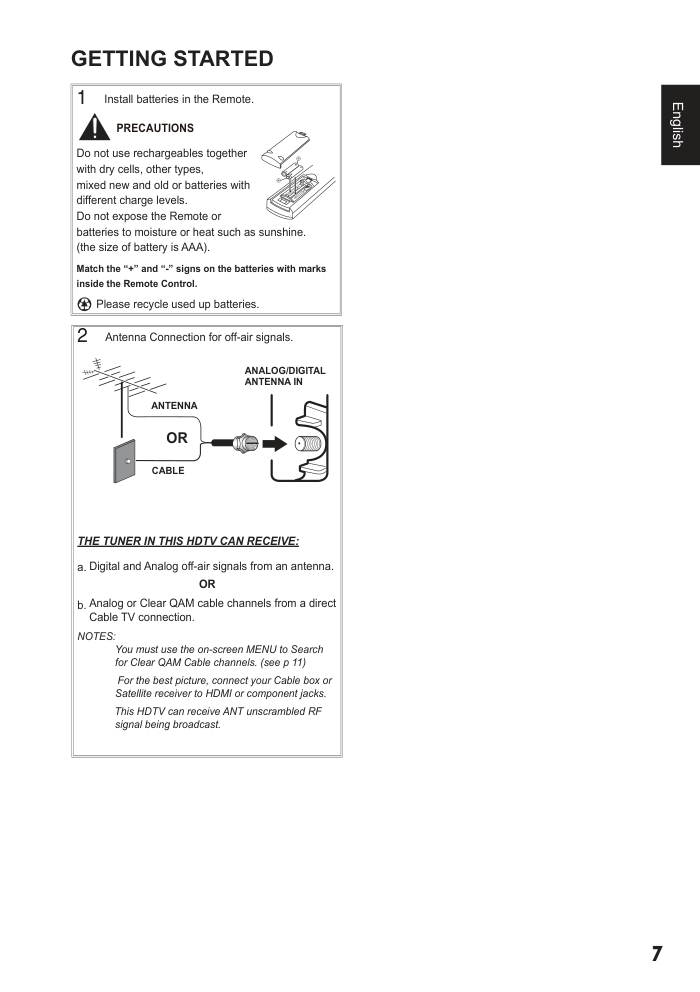
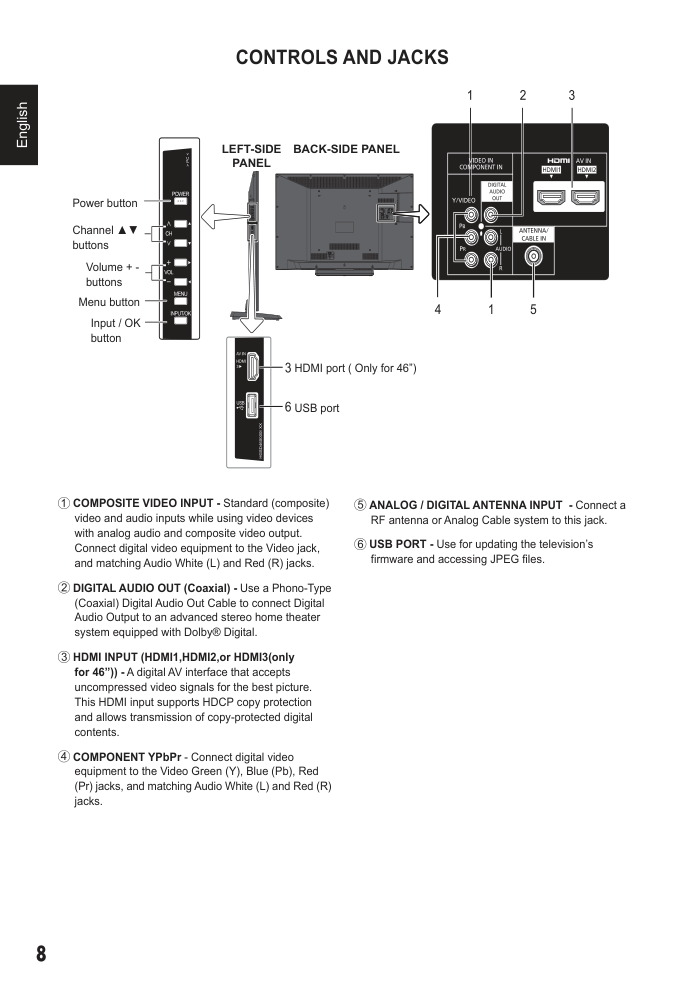
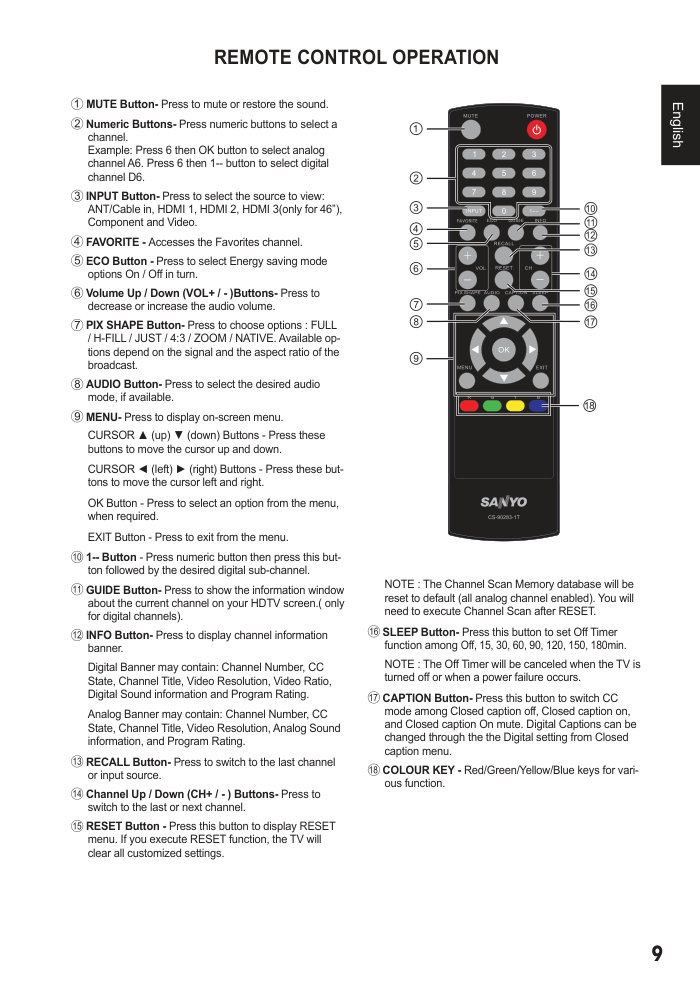
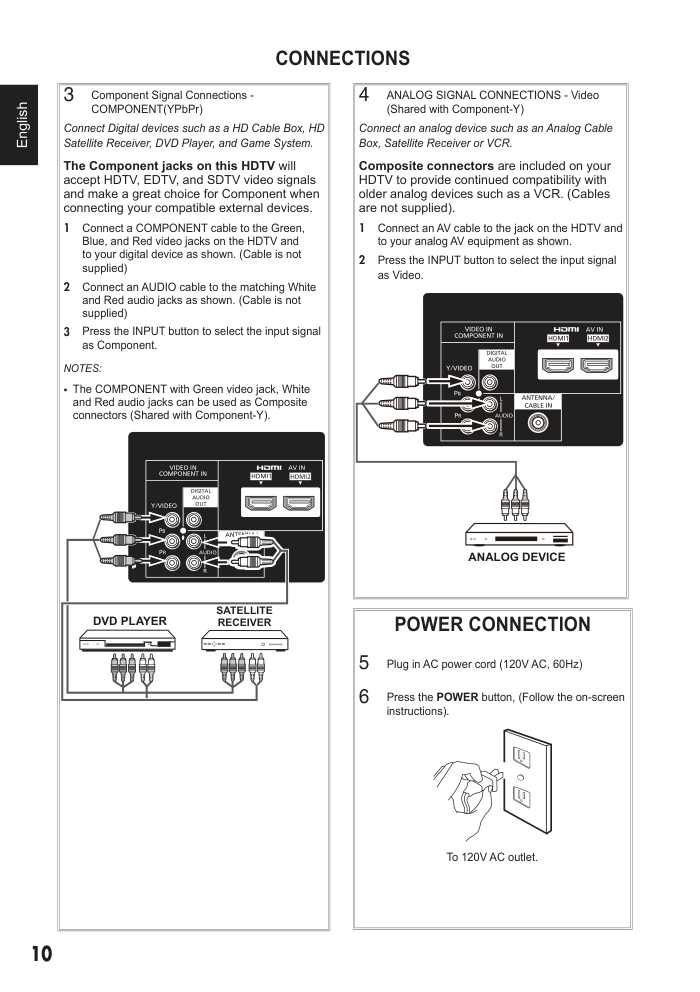
2 English CAUTION RISK OF ELECTRIC SHOCK DO NOT OPEN THIS SYMBOL INDICATES THAT DANGEROUS VOLTAGE CONSTITUTING A RISK OF ELECTRIC SHOCK IS PRESENT WITH THIS UNIT. CAUTION : TO REDUCE THE RISK OF ELECTRIC SHOCK, DO NOT REMOVE COVER (OR BACK). NO USER- SERVICEABLE PARTS INSIDE. REFER SERVICING TO QUALIFIED SERVICE PERSONNEL. THIS SYMBOL INDICATES THAT THERE ARE IMPORTANT OPERATING AND MAINTENANCE INSTRUCTIONS IN THE OWNER’S MANUAL WITH THIS UNIT. WARNING: TO REDUCE THE RISK OF FIRE OR ELECTRIC SHOCK, DO NOT EXPOSE THIS APPLIANCE TO RAIN OR MOISTURE. IMPORTANT SAFETY INSTRUCTIONS 1. Read these instructions. 2. Keep these instructions. 3. Heed all warnings. 4. Follow all instructions. 5. Do not use this apparatus near water. 6. Clean only with a dry cloth. 7. Do not block any ventilation openings. Install in accordance with the manufacturer's instructions. 8. Do not install near any heat sources such as radiators, heat registers, stoves or other apparatus (including amplifiers) that produce heat. 9. Do not defeat the safety purpose of the polarized or grounding- type plug. A polarized plug has two blades with one wider than the other. A grounding type plug has two blades and a third grounding prong. The wide blade or the third prong are provided for your safety. If the provided plug does not fit into your outlet, consult an electrician for replacement of the obsolete outlet. 10. Protect the power cord from being walked on or pinched, particularly at plugs, convenience receptacles, and at the point where they exit from the apparatus. 11. Only use the attachments/accessories specified by the manufacturer. 12. Use only with the cart, stand, tripod, bracket or table specified by the manufacturer or sold with the apparatus. When a cart is used, use caution when moving the cart/ appliance combination to avoid injury from tip-over. 13. Unplug this apparatus during lightning storms or when unused for long periods of time. 14. Refer all servicing to qualified service personnel. Servicing is required when the appliance has been damaged in any way, such as when a power-supply cord or plug is damaged, liquid has been spilled or objects have fallen into apparatus, the apparatus has been exposed to rain or moisture, does not operate normally or has been dropped. 15. If an outside antenna is connected to the television equipment, be sure the antenna system is grounded so as to provide some protection against voltage surges and built up static charges. In the U.S. Selection 810-21 of the National Electrical Code provides information with respect to proper grounding of the mast and supporting structure, grounding of the lead-in wire to an antenna discharge unit, size of grounding conductors, location of antenna discharge unit, connection to grounding electrodes, and requirements for the grounding electrodes. 16. An outside antenna system should not be located in the vicinity of overhead power lines or other electrical light or power circuits or where it can fall into such power lines or circuits. When installing an outside antenna system, extreme care should be taken to keep from touching such power lines or circuits as contact with them might be fatal. EXAMPLE OF ANTENNA GROUNDING ACCORDING TO NATIONAL ELECTRICAL CODE, ANSI/NFPA 70 "Note to CATV system installer: This reminder is provided to call the CATV system installer's attention to Article 820-40 of the NEC that provides guidelines for proper grounding and, in particular, specifies that the cable ground shall be connected to the grounding system of the building, as close to the point of cable entry as practical. 17. Wall or Ceiling Mounting - The product should be mounted to a wall or ceiling only as recommended by the manufacturer and listed by an independent laboratory (such as UL). 18. Apparatus shall not be exposed to dripping or splashing and no objects filled with liquides, such as vases, shall be placed on the apparatus. 19. When the MAINS plug is used as the disconnect device, the disconnect device shall remain readily operable. 20. Install the LCD TV in a proper position. If not, it may result in a fire hazard. 21. Provide appropriate space on the top, sides and rear of the LCD TV cabinet for allowing air circulation and cooling the LCD TV. 22. Minimum clearance must be maintained. If the LCD TV is to be built into a compartment or similarly enclosed, the minimum distances must be maintained. Do not cover the ventilation slot on the LCD TV. Heat build-up can reduce the service life of your LCD TV, and can also be dangerous. ANTENNA LEAD IN WIRE GROUND CLAMP ANTENNA DISCHARGE UNIT (NEC SECTION 810-20) GROUNDING CONDUCTORS (NEC SECTION 810-21) GROUND CLAMPS POWER SERVICE GROUNDING ELECTRODE SYSTEM NEC ART 250, PART H) NEC- NATIONAL ELECTRICAL CODE Thank you for choosing SANYO. Please read all instructions to obtain maximum benefit of your product. 3 English FCC INFORMATION This equipment has been tested and found to comply with the limits for a Class B digital device, pursuant to Part 15 of the FCC Rules. These limits are designed to provide reasonable protection against harmful interference in a residential installation. This equipment generates, uses and can radiate radio frequency energy and, if not installed and used in accordance with the instructions, may cause harmful interference to radio communications. However, there is no guarantee that interference will not occur in a particular installation. If this equipment does cause harmful interference to radio or television reception, which can be determined by turning the equipment off and on, the user is encouraged to try to correct the interference by one or more of the following measures: - Reorient or relocate the receiving antenna. - Increase the separation between the equipment and receiver. - Connect the equipment into an outlet on a circuit different from that to which the receiver is connected. - Consult the dealer or an experienced radio/TV technician for help. CAUTION: FCC Regulations state that improper modifications or unauthorized changes to this unit may void the user’s authority to operate the unit. ENERGY STAR® USER INFORMATION ENERGY STAR User Information Statement: the factory default settings of this television meet ENERGY STAR requirements. Changing Picture Settings may increase energy consumption, possibly beyond the limits required for ENERGY STAR qualification. To ensure your television is operating at an optimal energy efficiency, select default picture mode. TRADEMARKS Manufactured under license from Dolby Laboratories. Dolby and the double-D symbol are trademarks of Dolby Laboratories. HDMI, the HDMI logo and High-Definition Multimedia Interface are trademarks or registered trademarks of HDMI Licensing LLC in the United States and other countries. “As an Energy Star® Partner, Sanyo Electric co., Ltd. has determined that this product meets the Energy Star® guidelines for energy efficiency.” This symbol on the nameplate means the product is Listed by Intertek Testing Services Taiwan Ltd. It is designed and manufactured to meet rigid U.L. safety standards against risk of fire, casualty and electrical hazards. PROTECTING THE LCD SCREEN The screen can be damaged if it is not maintained properly. Do not use hard objects such as hard cloth or paper. Do not use excessive pressure when cleaning the screen; excessive pressure can cause permanent discoloration or dark spots. NEVER spray liquids on the screen. HANDLING PRECAUTIONS �� Handle by the cabinet only. Never touch the screen when handling. �� Excessive pressure on the screen can cause permanent discoloration or dark spots. �� Handling damage is not covered under warranty. 4 English CONTENTS IMPORTANT SAFETY INSTRUCTIONS ..2 FCC INFORMATION ..................................3 ENERGY STAR ® USER INFORMATION ..3 TRADEMARKS ..........................................3 PROTECTING THE LCD SCREEN .............3 HANDLING PRECAUTIONS .......................3 INSTALLATION ..........................................5 POSITIONING THE LCD HDTV ..................5 CAUTION INSTALLING STAND ..................5 WALL MOUNTING (OPTIONAL) .................6 GETTING STARTED ..................................7 PRECAUTIONS ............................................7 CONTROLS AND JACKS ............................8 REMOTE CONTROL OPERATION .............9 CONNECTIONS .........................................10 POWER CONNECTION ............................10 POWER CONNECTION/CHANNEL SEARCH ...............................................11 INITIAL SETUP ...........................................11 ADVANCED AV CONNECTIONS .......... 12 ADVANCED DIGITAL SIGNAL CONNECTIONS HDMI TO HDMI .......12 DVI TO HDMI ..............................................12 DIGITAL AUDIO ..........................................12 ON-SCREEN MENU OPERATION ........ 13 PICTURE / AUDIO / TIMER / LOCK / CLOSED CAPTION / SETUP .............13 USEFUL FUNCTIONS OPERATION .... 18 OTHER USEFUL OPERATIONS ...............18 WATCHING CONTENT FROM EXTERNAL DEVICES ..............................................19 EDITING AND SETTING CHANNELS ......22 DATA FORMAT FOR USB PHOTO VIEWER ...............................................24 HELPFUL HINTS - Problems / Solutions ............................ 25 SPECIFICATIONS .................................. 26 5 English POSITIONING THE LCD HDTV Always use a firm-flat surface when positioning your HDTV. Do not position the unit in a confined area. Allow adequate space for proper ventilation. CAUTION INSTALLING STAND �� Handling by two people is recommended when installing. �� When holding (moving or lifting) the LCD Display, hold the display’s body. Do not handle the LCD TV by holding the attached accessory parts (speakers), otherwise it may result in damage �� Before installing, provide a desk (or a part of it) which is strong enough to support the weight of the LCD TV and its stand. The desk must be larger than the LCD Display’s screen size. The desk’s surface must be flat and covered with soft material (such as a blanket) for protecting the screen surface. �� Before putting the LCD Display on the desk, make sure there is no object on it. Leaving any object under the screen may cause damage on the screen. �� The LCD TV with this stand should be installed on a flat and level place. Do not place it on non flat, unlevel or unstable cart or stand. The display may fall, causing not only serious damage to the products but serious injury to a person. For correct installing, mounting and uninstalling of the LCD TV Stand, it is strongly recommended to use a trained, authorized dealer. Failure to follow correct procedures could result in damage to the equipment or injury to the installer. Installing Stand 1� Place the LCD TV on a flat surface place where maintained with soft materials (such as a blanket) for protecting the display screen. 2� Secure the stand to the TV with 4 screws. 4 1 2 3 32" INSTALLATION 4 1 2 3 46" Warning To prevent injury, this apparatus must be securely at- tached to the floor / wall in accordance with the insta- lation instructions. This TV could fall over if it is pushed , pulled or knocked down. Use the screw to secure TV to the furniture Screw type: 20 screw Uninstalling Stand 1� Place the LCD TV screen facing down on a flat surface with soft materials (such as a blanket) for protecting the display screen. 2� Remove screws in 4 holes with screw driver. 4 1 2 1 2 3 32" 4 1 2 3 46" 6 English WALL MOUNTING (OPTIONAL) Use the screws that are threaded into the stand- mounting inserts on the back of your HDTV to secure it to a wall mounting kit. NOTE: 1. Wall Mounting kit is not supplied. 2. Wall mounting kit shall be able to sustain at least 3 times of set weight. VESA standard interface: 32” TV TV 100 x 200mm 46” TV TV 400 x 400mm Wall Mounting Inserts Mounting screws measurements: 32” TV M8 Diameter, Length - 13mm (min.); 16mm (max.) 46” TV M8 Diameter, Length - 13mm (min.); 16mm (max.) Wall �� (60mm) 7 English 1� Install batteries in the Remote. PRECAUTIONS Do not use rechargeables together with dry cells, other types, mixed new and old or batteries with different charge levels. Do not expose the Remote or batteries to moisture or heat such as sunshine. (the size of battery is AAA). Match the “+” and “-” signs on the batteries with marks inside the Remote Control. Please recycle used up batteries. 2� Antenna Connection for off-air signals. ANTENNA CABLE OR ANALOG/DIGITAL ANTENNA IN THE TUNER IN THIS HDTV CAN RECEIVE: a. Digital and Analog off-air signals from an antenna. OR b. Analog or Clear QAM cable channels from a direct Cable TV connection. NOTES: You must use the on-screen MENU to Search for Clear QAM Cable channels. (see p 11) For the best picture, connect your Cable box or Satellite receiver to HDMI or component jacks. This HDTV can receive ANT unscrambled RF signal being broadcast. GETTING STARTED 8 English COMPOSITE VIDEO INPUT - Standard (composite) video and audio inputs while using video devices with analog audio and composite video output. Connect digital video equipment to the Video jack, and matching Audio White (L) and Red (R) jacks. DIGITAL AUDIO OUT (Coaxial) - Use a Phono-Type (Coaxial) Digital Audio Out Cable to connect Digital Audio Output to an advanced stereo home theater system equipped with Dolby® Digital. HDMI INPUT (HDMI1,HDMI2,or HDMI3(only for 46”)) - A digital AV interface that accepts uncompressed video signals for the best picture. This HDMI input supports HDCP copy protection and allows transmission of copy-protected digital contents. COMPONENT YPbPr - Connect digital video equipment to the Video Green (Y), Blue (Pb), Red (Pr) jacks, and matching Audio White (L) and Red (R) jacks. CONTROLS AND JACKS LEFT-SIDE PANEL HDMI port ( Only for 46”) Power button ����������� buttons Volume + - buttons Menu button Input / OK button USB port BACK-SIDE PANEL ANALOG / DIGITAL ANTENNA INPUT - Connect a RF antenna or Analog Cable system to this jack. USB PORT - Use for updating the television’s firmware and accessing JPEG files. 9 English MUTE Button- Press to mute or restore the sound. Numeric Buttons- Press numeric buttons to select a channel. Example: Press 6 then OK button to select analog channel A6. Press 6 then 1-- button to select digital channel D6. INPUT Button- Press to select the source to view: ANT/Cable in, HDMI 1, HDMI 2, HDMI 3(only for 46”), Component and Video. FAVORITE - Accesses the Favorites channel. ECO Button - Press to select Energy saving mode options On / Off in turn. Volume Up / Down (VOL+ / - )Buttons- Press to decrease or increase the audio volume. PIX SHAPE Button- Press to choose options : FULL / H-FILL / JUST / 4:3 / ZOOM / NATIVE. Available op- tions depend on the signal and the aspect ratio of the broadcast. AUDIO Button- Press to select the desired audio mode, if available. MENU- Press to display on-screen menu. ��������������������������������������������� buttons to move the cursor up and down. ���������������������������������������������������- tons to move the cursor left and right. OK Button - Press to select an option from the menu, when required. EXIT Button - Press to exit from the menu. 1-- Button - Press numeric button then press this but- ton followed by the desired digital sub-channel. GUIDE Button- Press to show the information window about the current channel on your HDTV screen.( only for digital channels). INFO Button- Press to display channel information banner. Digital Banner may contain: Channel Number, CC State, Channel Title, Video Resolution, Video Ratio, Digital Sound information and Program Rating. Analog Banner may contain: Channel Number, CC State, Channel Title, Video Resolution, Analog Sound information, and Program Rating. RECALL Button- Press to switch to the last channel or input source. Channel Up / Down (CH+ / - ) Buttons- Press to switch to the last or next channel. RESET Button - Press this button to display RESET menu. If you execute RESET function, the TV will clear all customized settings. REMOTE CONTROL OPERATION NOTE : The Channel Scan Memory database will be reset to default (all analog channel enabled). You will need to execute Channel Scan after RESET. SLEEP Button- Press this button to set Off Timer function among Off, 15, 30, 60, 90, 120, 150, 180min. NOTE : The Off Timer will be canceled when the TV is turned off or when a power failure occurs. CAPTION Button- Press this button to switch CC mode among Closed caption off, Closed caption on, and Closed caption On mute. Digital Captions can be changed through the the Digital setting from Closed caption menu. COLOUR KEY - Red/Green/Yellow/Blue keys for vari- ous function. 18 10 English CONNECTIONS 3� Component Signal Connections - COMPONENT(YPbPr) Connect Digital devices such as a HD Cable Box, HD Satellite Receiver, DVD Player, and Game System. The Component jacks on this HDTV will accept HDTV, EDTV, and SDTV video signals and make a great choice for Component when connecting your compatible external devices. 1� Connect a COMPONENT cable to the Green, Blue, and Red video jacks on the HDTV and to your digital device as shown. (Cable is not supplied) 2� Connect an AUDIO cable to the matching White and Red audio jacks as shown. (Cable is not supplied) 3� Press the INPUT button to select the input signal as Component. NOTES: �� The COMPONENT with Green video jack, White and Red audio jacks can be used as Composite connectors (Shared with Component-Y). ANTENNA/ CABLE IN HDMI1 HDMI2 DIGITAL AUDIO OUT COMPONENT IN VIDEO IN Y/VIDEO PB PR L R AV IN AUDIO DVD PLAYER SATELLITE RECEIVER 4� ANALOG SIGNAL CONNECTIONS - Video (Shared with Component-Y) Connect an analog device such as an Analog Cable Box, Satellite Receiver or VCR. Composite connectors are included on your HDTV to provide continued compatibility with older analog devices such as a VCR. (Cables are not supplied). 1� Connect an AV cable to the jack on the HDTV and to your analog AV equipment as shown. 2� Press the INPUT button to select the input signal as Video. ANALOG DEVICE POWER CONNECTION 5� Plug in AC power cord (120V AC, 60Hz) 6� Press the POWER button, (Follow the on-screen instructions). To 120V AC outlet. 11 English POWER CONNECTION/CHANNEL SEARCH 5� TV will begin the scanning "Progress". If no channels found, TV will show below message. OK Skip No channels found. Please cjeck if Antenna or Cable signal is available. Select ‘Skip’ if Satellite or cable box is used to recevie channels. While doing scanning, pressing MENU or EXIT key will pop up below message. OK Enter Enter Move Quit auto program? Yes No 6� If "Skip" is selected, TV will display as below message. If you wish to perform a scan, select "Auto program" on ANT/Cable setup menu on Setup menu. Setup ANT in Cable Auto program Manual program Signal meter INITIAL SETUP 1� �������������������������������������������� preferred Language (English / Español / Français). Press the OK button. Language / Idioma / Langue Page 1/4 Move Enter OK English Español Français 2� �������������������������������������������� preferred viewing mode Store Demonstration or Home Use. Press the OK button. 3� �������������������������������������������� Cable settings (Cable/Antenna/Not used). Press the OK button. ANT / Cable setup Page 3/4 Select “Not used” when viewing TV via Satellite recelver or Cable box. Note : Select “Cable” when viewing via Cable DTA Box. Antenna Not used Cable ANTENNA Cable In 4� Use the CURSOR ������� buttons to set auto program Start or Skip. Press the OK button. Select "Start" 12 English ADVANCED DIGITAL SIGNAL CONNECTIONS HDMI TO HDMI Connect compatible Digital devices such as a HD Cable Box, HD Satellite Receiver, DVD Player, and Game System. HDMI-High-Definition Multimedia Interface. This is a digital AV interface that accepts uncompressed video signals for the best picture quality possible. It supports HDCP copy protection and allows transmission of copy-protected digital content. The signal can also include PCM audio, when available. 1� Connect the HDMI input and your external device with HDMI cable. NOTE : Press the INPUT button to select the input signal as HDMI1,HDMI2 or HDMI3(only for 46"). DVI TO HDMI (ONLY HDMI1 IS COMPATIBLE WITH THIS FUNCTION) 1� Use an adapter (not supplied) to connect a DVI device to a HDMI1 input jack. NOTE : HDMI Audio setting is necessary. Please see p14. ANTENNA/ CABLE IN HDMI1 HDMI2 DIGITAL AUDIO OUT COMPONENT IN VIDEO IN Y/VIDEO PB PR L R AV IN AUDIO BACK-SIDE VIEW OF HDTV SATELLITE RECEIVER PC DIGITAL AUDIO 1� Connect the Digital Audio output to a multichannel receiver as shown. NOTE: Dolby Digital audio signal is available from the Digital Audio output terminal only when receiving as part of a Digital input on the screen. ANTENNA/ CABLE IN HDMI1 HDMI2 DIGITAL AUDIO OUT COMPONENT IN VIDEO IN Y/VIDEO PB PR L R AV IN AUDIO (Coaxial) DIGITAL AUDIO CABLE (Not supplied) MULTICHANNEL RECEIVER BACK-SIDE VIEW OF HDTV ADVANCED AV CONNECTIONS 13 English ON-SCREEN MENU OPERATION PICTURE / AUDIO / TIMER / LOCK / CLOSED CAPTION / SETUP PICTURE ( Adjust the image or picture quality ) Function Items Description Picture mode Vivid Provides enhanced picture contrast and sharpness for viewing in a well-lit room. Standard Recommended for normal viewing conditions with subdued room lighting. Cinema For watching movies in a darkened room. It provides a soft, film-like picture. Custom Customize each item according to your taste. Back light Adjusts the luminance of the back light. Contrast, Brightness, Color, Tint, Sharpness Adjusts the color, brightness, etc. for each picture mode to suit your ���������������������������������������������������������������������� +50 Sharpness : 0 - 30 Game Mode Off/On Allows optimum picture settings for gaming. (Except TV) Color temp. Cool/Normal/Warm Selects a choice of Cool (blue), Normal, or Warm (red) color. A.I. picture Off/On Controls dark area Video NR Off/On Reduces noise, commonly called snow. Leave it off when receiving a strong signal. MPGE NR Off/On Reduces noise of specific digital signals of DVD, Cable box, etc. Pix shape FULL/H-FILL/ JUST/4.3/ZOOM/ NATIVE Changes the format (aspect ratio). Lets you choose the aspect depending on the format of received signal. Reset to defaults Resets all picture adjustments to factory default settings except for “Pix shape” 14 English AUDIO ( Adjust Audio quality ) Audio Bass Treble Balance Surround Volume leveler TV speskers HDMI 1 in Reset to defaults 0 0 0 Off 0 On Digital Function Items Description Bass Increases or decreases the bass response. Treble Increases or decreases the treble response. Balance Emphasizes the left / right speaker volume. Surround Off/On Enhances audio L/R response when listening to stereo. Volume leveler -7 ~ +7 Minimizes volume disparity after switching to external inputs. TV speakers Off/On Switches to “Off” when using external speakers. Off: “Surround” and “Volume leveler” do not work if “Off” is selected. HDMI 1 in Digital/Analog The default setting is “Digital” for the HDMI connection. (Digital input signal) Select audio input terminal when DVI cable is connected. (Use White and Red audio jacks as Analog audio input signal) Reset to defaults Resets Bass, Treble, and Balance adjustments to factory default settings. TIMER ( The TV can automatically turn On/Off at the designated date and time. ) Timer Clock setting Sleep Timer set Imput Channel Day On time Off time ANT/Cable in - - - - - - Off - - : - - - - - - : - - - - �� If the Timer settings are grayed out, first set the clock completely. Function Items Description Clock setting year/month/day/hour/minute Sleep Sleep(minutes) Off / 15 / 30 / 60 / 90 / 120 / 150 / 180 Select how long for the TV to automatically turn off. Timer set Enables or disables this timer. (Off/On) Inputs Sets the input to select when the TV turns on. Channel Sets the channel to select when the TV turns on. 15 English Day Sets the day when the TV turns on.[ SUN / MON / TUE / WED / THU / FRI/SAT(displays the nearest future date)MON-FRI/SAT-SUN / DAILY / Every SUN / Every MON / Every TUE / EveryWED / Every THU/ Every FRI / Every SAT ] On time Sets the time when the TV turns on. The TV will turn off after 90 minutes or as specified. Off time Sets the time when the TV turns off within 24 hours. LOCK ( Locks Specified Channels Or Shows To Prevent Children From Watching Objectionable Content. ) Lock Creat password Enter password. �� You will be asked to enter your password each time you display the Lock menu. �� For password setting/entering please see p18. �� Set “Custom” in “Mode” to specify “Channel”, “Game” and “Program” settings. Function Items Description Mode Off Unlocks all the Lock settings of “Channel”, “Game” and “Program”. All Locks all the inputs regardless of the Lock settings of “Channel”, “Game” and Program”. Custom Locks specified inputs of “Channel”, ”Game” and “Program”. Channel (These channels will be blocked regardless of the program rating.) Mode Set channel lock status. (Off/All/Custom) All: Locks all channelsOff: Unlocks all channels Custom: Locks specified channels. Set “Channel 1” - “Channel 7” Channel 1-7 Select a channel to lock. (Select up to 7 (1-7) channels to block.) Game On/Off Locks Channel 3, Channel 4, and external inputs. Program (To set a rating level) Mode Set program lock status. (Off/On) “V-chip” technology enables restricted shows to lock according to TV ratings. On: Set each rating level (MPAA, US.TV, C.E.L.R., C.F.L.R.) MPAA Select U.S. movie ratings to lock. U.S.TV U.S. TV program ratings. C.E.L.R. Canadian English ratings. C.F.L.R. Canadian French ratings. Change password Change the password. Input the new 4-digit password twice. �� This television is designed to support the “Downloadable U.S. Region Rating System” when available. (Available only in U.S.A.) �� The Off rating is independent of other ratings. �� When placing a lock on a specific-age-based-rating level, the Off rating and any other more restrictive ratings will also be blocked. �� It is downloaded and stored in memory and can be adjusted on the program lock menu page 2. ( Page 2 only appears while detecting RRT5 data.) 16 English CLOSED CAPTION ( Display closed caption. ) �� The television includes a built-in decoder that is capable of providing a text display of the audio. �� The program being viewed must be transmitting the Closed caption (CC) information. Function Items Description Mode On/Off/CC on mute On: To display Closed captions.CC on mute: To display Closed captions when the audio is muted.(When not using, select “Off”). Analog CC1-4/T1-4 Choose the Closed caption service of Analog broadcasting.CC1-4: Information related to pictures (Appears at the bottom of the screen) T1-4: Textual information (Appears over the entire screen) Digital Primary/Second./ Service 3/4/5/6 The Digital Closed caption menu lets you configure the way you choose to view the digital captioning. Digital setting (Set display setting digital program Size Text size Font Text font Style Text style (Raised, Depressed, etc.) Foreground Color of text Fore. opacity Opacity of text Background Color of text box Back. opacity Opacity of text box Outline Outline color of text (Identify the setting options on the screen.) Reset to defaults Yes / No Resets all Closed caption settings to factory default settings �� The settings in “Analog” or “Digital” depend on the broadcaster. 17 English SETUP ( Other function settings. ) Language ANT/Cable setup USB photo viewer Power saving First time setup About Reset to defaults Function Items Description Language English/Español/ Français Selects the screen menu language. ANT/Cable setup See p.22 for more detail The current channel settings can be changed according to your needs and reception conditions. USB photo viewer See p.19 for more detail You can enjoy photo contents stored in a USB storage device. Power saving No signal for 15 minutes(Stay on/ Power TV off) To conserve energy, the TV automatically turns off when NO SIGNAL and NO OPERATION continue for more than 15 minutes. �� “No signal for 15 minutes was activated” will be displayed for about 10 seconds when the TV is turned on for the first time after the power was turned off by “No signal for 15 minutes”. �� The on-screen display will flash 3, 2 and 1 to indicate the last three (3) remaining minutes prior to the shut-off. No activity for 4 hours(Stay on/ Power TV off) To conserve energy, the TV automatically turns off when no operation of remote and side panel key continues for more than 4 hours. �� No activity for 4 hours was activated” will be displayed for about 10 seconds when the TV is turned on for the first time after the power was turned off by “No activity for 4 hours”. �� The on-screen display will flash 3, 2 and 1 to indicate the last three (3) remaining minutes prior to the shut-off. First time setup Restarts the first time setup from “Language” setting. About Displays TV version. Reset to defaults Yes / No Performing Reset will clear all settings made with Setup, such as channel settings. �� Password setting/entering, please see p18. 18 English LISTEN WITH SECONDARY AUDIO PROGRAMMING � Select the Audio mode for watching TV Digital mode Press the AUDIO button to select all available audio service (if available). �� Audio information is displayed in banner for the first time. �� When pushing AUDIO key twice, audio information and actual output audio from speaker will change. Analog mode Press the AUDIO button to select Audio mode. Each press of AUDIO key will change the Audio mode. (Stereo / SAP / Mono) �� AUDIO is not available when watching TV with a Cable or Satellite box connected via HDMI. �� Contact your Cable or Satellite operator for instructions on enabling SAP with their box. CLOSED CAPTION � Switches the Closed Caption mode On or Off. Press the CAPTION button to select Closed Caption menu.(Closed caption Off / Closed caption on / Closed caption on mute) �� Closed Caption is not available when watching TV with a Cable or Satellite box connected via HDMI. �� Contact your Cable or Satellite operator for instructions on enabling CC with their box. GUIDE FEATURE When viewing the TV, press GUIDE button to display the information window about the current channel on your HDTV screen. �� This feature is only for digital channels. DISPLAYING INFORMATION � Displays and removes information. When watching programming via the Antenna/Cable input, shows the channel banner. USEFUL FUNCTIONS OPERATION CHANGE ASPECT RATIO AND ZOOM THE PICTURE Press the PIX SHAPE button to cycle through the aspect modes. �� ATV \ Video \ DTV \ HDMI \ Component (480i) : FULL / JUST/ 4:3/ ZOOM �� DTV \ Component (except 480i) : FULL/ H-FILL/ JUST / 4:3/ ZOOM �� HDMI (except 480i) : FULL/ H-FILL/ JUST / 4:3/ ZOOM / NATIVE �� HDMI (DVI) : FULL / 4:3 Use when the picture does not fill the whole screen (bars appear on either side of the image) or portions of the picture is trimmed. Note: �� Some content, such as film-based movies, are available in extra-wide format. Top and bottom bars are unavailable. �� Connected devices, such as Cable/Satellite box, DVD/ Blu-ray players and game consoles have their own aspect (format) settings. Adjust the device’s aspect settings. OTHER USEFUL OPERATIONS ENTERING CHARACTERS You can use the remote control keys to enter the alphanumeric characters. Switches input mode Press each number key to cycle through the alphanumeric character. PASSWORD SETTING/ENTERING You need to enter the password when you access locked channel or inputs. Press (0 - 9) Number button to input your 4-digit password. Lock Creat password Enter password. 19 English �� If it is your first time entering the password, enter the password twice in order to register it. �� Make a note of your password. Do not forget it. (If you have forgotten your password, consult your local dealer.) �� When you select a locked channel, a message will be displayed that allows you to view the channel after you input your password. CALL UP A FAVORITE CHANNEL Favorite Channel numbers registered in Favorite are displayed on the favorite tune screen. Select the desired broadcast station with the cursor or use the number buttons. 1� Press FAVORITE button to display menu. 2� ���������������������������������������� Number key to select your favorite channel. Press the OK button. To change the page �������������������� button to change pages (1/3, 2/3, 3/3). Note: �� Favorite channels cannot be set when using Cable or Satellite box. ENERGY SAVING MODE Press ECO button to select Energy saving mode options Off and On in turn. SLEEP TIMER Press SLEEP button to set Off Timer function among Off, 30 min, 60 min, 90 min, 120 min,150 min and 180 min. Note: ������������������������������������������������������� off or when a power failure occurs. USEFUL FUNCTIONS OPERATION (CONTINUED) RESET TO DEFAULT Press RESET button to enter password and display RESET menu. If you execute RESET function, the TV will clear all customized settings. Note: ���������������������������������������������������� default (all analog channel enabled). You will need to execute Auto program after RESET. WATCHING CONTENT FROM EXTERNAL DEVICES 1� Press the INPUT button to display input menu. 2� Press the corresponding (0-9)NUMBER buttons on the remote control to select the input of your choice. Or, press the INPUT button repeatedly to cycle through the available inputs. 3� Select the input of your choice, Press the OK button. Note: �� During the selection, if no action is taken for several seconds, the “Input select” menu disappears. USB PHOTO VIEWER There are two methods for starting the Photo Viewer. Automatically: Gently insert a supported USB storage device to the USB port on the rear side of the TV. A prompt will appear. 1� USE CURSOR ������� buttons to select Yes. Press the OK button then Photo Viewer menu will appear. When you select No, nothing happens. 20 English USEFUL FUNCTIONS OPERATION (CONTINUED) Note: �� The prompt will disappear after about 10 sec. �� If you repeatedly insert and remove the USB device, the prompt may not appear. Manually: 1� Firstly, insert the USB flash memory into USB Port. 2� Press MENU button on the remote control and use the CURSOR ������� buttons to select SETUP menu. Press the OK button. 3� �������������������������������������������� USB photo viewer function. Press the OK button. 4� The USB photo viewer will appear. Press OK button. When you do nothing, it will disappear after few seconds. Note: �� The viewer will also open even if there are no photo files. �� While the USB Photo Viewer is active, the main menu cannot be displayed. VIEWING PHOTOS There are three types of view modes. Multi View: This view allows you to search for photos in a grid format. These pictures are displayed using thumbnail data in each image file. 1� ������������������� to move the highlight in one window. If all of the photos will not fit in one screen, when pressing CURSOR � button at the top left thumbnail, the screen will move to the previous page. Conversely, when pressing CURSOR � button at the bottom right thumbnail, the screen will move to the next page. CH+ and CH- buttons can be used to page up/down the photo list when there are more photos than will fit onto one screen. Photos /USB/ Navigate 09110807538cdac9e6053c973b.jpg Date : 04-30-2006 14:39:55 1440X900 OK Select CH Page Back R 2� When you select a folder, press OK to move to the next layer. 3� When you select a photo. Press OK to view the selected photo in Single view mode. Single View: In this view mode, only files located in the selected directory shall be displayed. This view allows you to change the photo content manually. When moving from Multi View to the Single View, the currently selected photo shall be displayed. 1� Use CURSOR ��button to view the next photo. Use CURSOR ��button to view the previous photo. 2� Use CURSOR ��button to rotate the image 90° counterclockwise. Use CURSOR ��button to rotate the image 90° clockwise. Slideshow: This view allows you to watch a slideshow of the photos. In this mode, only files located in the selected directory will be played. 1� To start slideshow, press OK button in the Single View mode. You can see the state of Sildeshow is On or Off at the right bottom. Date : 10-22-2006 13:48:10 1440X900 Back R MENU Photos menu Slideshow off Date : 10-22-2006 13:48:10 1440X900 Back R MENU Photos menu Slideshow on 2� Use CURSOR ������� buttons to view the previous or next photo. To set Display interval and Repeat settings: Gently insert a supported USB storage device to the USB port on the rear side of the TV. A prompt will appear. 1� Press MENU button to open the Photos Menu. 2� Use CURSOR ������� buttons to select either Display interval or Repeat. 3� Use CURSOR ������� buttons to adjust the setting and press MENU button. To close the Photo Viewer: 1� Press EXIT button then television will return to the last viewed channel or external input. 21 English To adjust Back light: 1� Press MENU button on the remote control and use the CURSOR ������� buttons to select PICTURE menu. Press the OK button. 2� Use CURSOR ������� buttons to highlight Back light function. Press the OK button. Contents Description mark Photo Photo list (Multi view) See p. 20 Sorting To sort the folders and files 1� Press MENU button to open the Thumbnail menu from Multi View mode. 2� Press CURSOR ������� buttons to select Title, New or Old to set the sorting rule. Title File sorting rules:1 Unicode priority2 Numerical (0-9) ; Upper Case (A-Z); lowercase (a-z), Chinese3 Increasing order New From new to old according to the date and time when the picture was taken. Old From old to new according to the date and time when the picture was taken. See p. 20 �� Single View mode �� Slide Show mode �� Skip to previous/next photo �� Slide Show Repeat play �� Slide Show Display interval selection See p. 21 USEFUL FUNCTIONS OPERATION (CONTINUED) 22 English EDITING AND SETTING CHANNELS The current channel settings can be changed according to your needs and reception conditions. ANT/CABLE SETUP AND OPERATION 1� Press MENU button on the remote control and use the CURSOR ������� buttons to select SETUP menu. Press the OK button. 2� Use CURSOR ������� buttons to highlight ANT/ Cable setup function. Press the OK button. Auto program (Set automatically) Automatically searches and adds available channels to the memory. 1� Use CURSOR ������� buttons to select (Cable / Antenna / Not used). Press the OK button. 2� Use CURSOR ������� buttons to select Auto Program mode. Press the OK button. 3� Use CURSOR ������� buttons to select scanning mode function. Press the OK button. Note: �� After the scanning is completed, select Apply. �� All previously saved channels are erased. Manual program Add or remove channels from memory, edit channel caption and set favorite channels. 1� Use CURSOR ������� buttons to select Manual Program mode. Press the OK button. 2� Press Edit item. Use CURSOR ������� buttons to select the setting you want to adjust and press the OK button. 3� Use CURSOR ������� buttons to select the item to edit (Caption / Favorite / Add). Press the OK button. 23 English �� Caption: Changes the station identifier. �� Favorite: Registers channels to the Favorite List �� Add: Adds or skips channels CAPTION FUNCTION: ���������������������������������������������� change caption. Press the OK button. �� Select or edit the station identifier. (maximum 8 characters available) FAVORITE FUNCTION: ����������������������������������������������OK button. �� Select the number ADD FUNCTION: Press OK button to select Yes(add) or No(skip) to set favorite. �� Select the number Move the cursor to a channel number ������������������������������������������������ OK button to tune to the channel. Select Apply ����������������������������������������OK button. To cancel the Edit 1� ����������������������������������������OK button. 2� ���������������������������������������������� the OK button to return to ANT/Cable setup mode. Signal meter (Check signal strength) Check the signal strength if interference is found or freezing occurs on a digital image. 1� Press MENU button on the remote control and use the CURSOR ������� buttons to select Setup menu. Press the OK button. 2� Use CURSOR ������� buttons to select ANT/ Cable setup menu. Press OK button. 3� Use CURSOR ������� buttons to highlight Signal meter item. Press OK button. If the signal is weak, check the antenna. If no problem is found, consult your local dealer. Note: �� Not available if “Cable” is selected in “ANT in”. �� Available only for digital antenna channels. 24 English DATA FORMAT FOR USB PHOTO VIEWER Photo JPEG Data format JPEG Exif ver2.1C Max. number of files 500 / folder Image resolution 4096 x 4096 pixels ; 920 x 1080 pixels Max. number of files 500 / folder *Supported file system: FAT32 Caution: �� USB photo viewer only supports USB Mass storage class devices. �� A JPEG image modified with a PC may not be displayed. �� Partly degraded files might be displayed at a reduced resolution. �� Support is not guaranteed for all devices. �� Do not use a USB Hub. �� Do not support multi-partition USB. NOTES: �� Folder structure viewed in PC �� The folder and file names may be different depending on the digital camera used. �� Support USB 2.0 Type A connector (DV5V MAX500mA) 25 English HELPFUL HINTS - Problems / Solutions If you are having problems with your HDTV, check this trouble shooting chart to find one or more possible solutions. Before returning your HDTV, please visit our website at http://www.sanyoctv.com or call us toll free at 1-800- 877-5032 We can Help! Problem: Check these Conditions: Try these Solutions: Page No. No picture, sound (Digital Picture) �� Check the antenna / external connections. �� There may be a station trouble, no signal broadcast. �� MUTE function may be turned ON. �� Adjust antenna. �� Try a different channel. �� Execute Auto program in the ANT/ Cable setup menu. �� Adjust Volume. 7-9, 11 No Caption �� Check if station is broadcasting a Closed - Caption signal. �� Select another channel. �� Press the CAPTION button to select captioning mode. 9, 16, 18 Cannot display picture on a full screen �� Press the PIX SHAPE button on the remote control to change settings. 9, 13, 18 Poor Picture/ Sound (watching Analog) �� Check if the program is in color. �� Check the antenna / external connections. �� Color or Tint may be misadjusted. �� There may be a station trouble. �� MUTE function may be turned ON. �� Try a different channel. �� Execute Reset to defaults in the Picture or Audio menu. �� Execute Reset to defaults in the PICTURE menu. �� Adjust the Volume or Image. 7 - 9 13 - 14 “No Signal” message appears on screen �� Check the Audio / Video connections. �� Check the external equipment connections. �� Check the external equipment settings. �� Check the antenna connection. �� Press the INPUT button on the remote control. 7 - 12, 19 22 - 23 Pixilation of Digital image �� Execute Signal meter in the ANT/ Cable setup menu to check the signal strength. �� Turn antenna, install signal booster. �� Install outdoor Digital antenna. 7, 22 - 23 Cannot select or scan some channels �� Channel may be removed from memory. �� Check antenna connections. �� No digital signal being broadcasted. �� Weak Signal. �� Select Manual program to add channels or start Auto program in ANT/Cable setup menu. �� Turn antenna, install signal booster. 7, 22 - 23 No Cable channels above number 13 �� Check ANT/Cable setup menu, ANT in item should set to Cable. �� Set ANT in item to Cable, Select All channels and press OK button to search for Cable channels in ANT/Cable setup menu. 22 - 23 Remote Control will not operate TV �� Check batteries. �� Check if the TV is Plugged in. �� Replace batteries. �� Aim remote control at front of TV. 7, 9 Cabinet makes popping sound �� This is a normal condition during warm - up and cool down of the plastic cabinet parts. 26 English Maximum Visible Range 32” : 697.6845(H) x 392.256(V) 46” : 1018.08(H)× 572.67(V) Refresh Rate 60 Hz Picture Resolution 32” : WXGA (1360X768) 46” : Full HD (1920X1080) Viewing Angle Horizontal 178° & Vertical: 178° (Panel tentative) Brightness 32” : 320(Typical) cd/m2 (Panel tentative) 46” : 350(Typical) cd/m2 (Panel tentative) Contrast Ratio 32” : 4000:1 (Typical) (Panel tentative) 46” : 3000:1 (Typical) (Panel tentative) Voltage 120V AC 60Hz AC Power Consumption (average) 32” : 56 Watts 46” : 110 Watts Color System NTSC3.58 Sound System M Channel Coverage Low band: 55.25 to 144.00MHz Mid band: 145.00 to 424.00MHz High band: 425.00 to 861.00MHz Sound Output 32” : 5W + 5W 46” : 8W + 8W Dimensions (Including Stand) 32” : 768 mm × 512 mm × 178 mm 46” : 1081mm × 694 mm × 280 mm Net Weight (Including Stand) 32” : 8.5 kg 46” : 17.8 kg SPECIFICATIONS 27 English Operating Environment 32" Operating Temperature: 0°C to 50°C Operating Humidity: 20 % to 90 % Storage Temperature: 0°C to 60°C Storage Humidity: 5% to 90% (non-condensing) 46" Operating Temperature: 0°C to 50°C Operating Humidity: 20 % to 90 % Storage Temperature: 0°C to 60°C Storage Humidity: 10% to 90% (non-condensing) �� Specifications are subject to change without notice. �� The On-Screen Menu and figures in this manual may differ slightly from the product. Input terminals ANT/Cable in HDMI/DVI Component / Video USB 32” 46” Y/Video Pb Pr Audio-L Audio-R 1 2 3 1 1 1 1 1 1 Output terminals Digital Audio Output 1 28 English Input signal that can be displayed * Mark: Applicable input signal for Component (Y, PB, PR), HDMI. FORMAT HORIZONTAL FREQUENCY (KHZ) VERTICAL FREQUENCY (HZ) COMPONENT HDMI 525 (480i) / 60i 15.734 59.940 * * 525 (480p) /60p 31.469 59.940 * * 750 (720p) /60p 45.000 60.000 * * 1,125 (1,080i) /60i 33.750 60.000 * * 1,125 (1,080p)/60p 67.500 60.000 * * 1,125(1,080p)/24p 27.000 24.000 * 640 × 480 @60 31.469 59.940 * 800 × 600 @60 37.879 60.317 * 1,024 × 768 @60 48.363 60.000 * 1,280 × 768 @60 47.776 59.870 * 1,280 × 1,024 @60 (only for 46”) 63.981 60.020 * 1,360 × 768 @60 47.712 60.015 * NOTE: �� Signals other than above may not be displayed properly or no support. �� The above signals are reformatted for optimal viewing on your display.
版权声明
1. 本站所有素材,仅限学习交流,仅展示部分内容,如需查看完整内容,请下载原文件。
2. 会员在本站下载的所有素材,只拥有使用权,著作权归原作者所有。
3. 所有素材,未经合法授权,请勿用于商业用途,会员不得以任何形式发布、传播、复制、转售该素材,否则一律封号处理。
4. 如果素材损害你的权益请联系客服QQ:77594475 处理。