飞利浦32PF7320 液晶彩电使用说明书
 "飞利浦32PF7320 液晶彩电使用说明书-0")
 "飞利浦32PF7320 液晶彩电使用说明书-1")
 "飞利浦32PF7320 液晶彩电使用说明书-2")
 "飞利浦32PF7320 液晶彩电使用说明书-3")
 "飞利浦32PF7320 液晶彩电使用说明书-4")
 "飞利浦32PF7320 液晶彩电使用说明书-5")
 "飞利浦32PF7320 液晶彩电使用说明书-6")
 "飞利浦32PF7320 液晶彩电使用说明书-7")
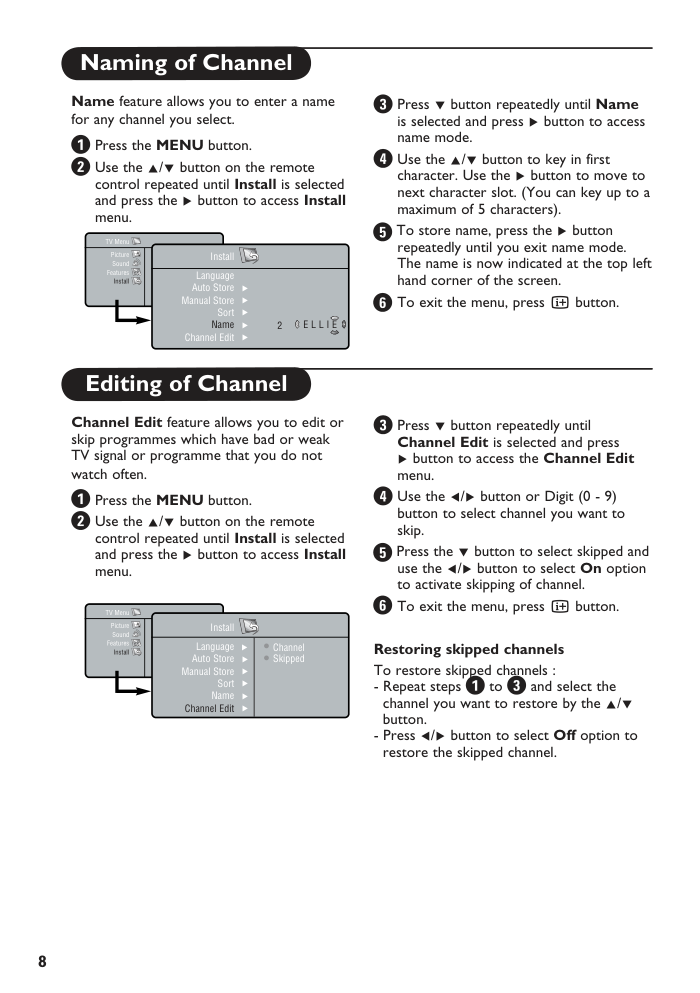 "飞利浦32PF7320 液晶彩电使用说明书-8")
 "飞利浦32PF7320 液晶彩电使用说明书-9")
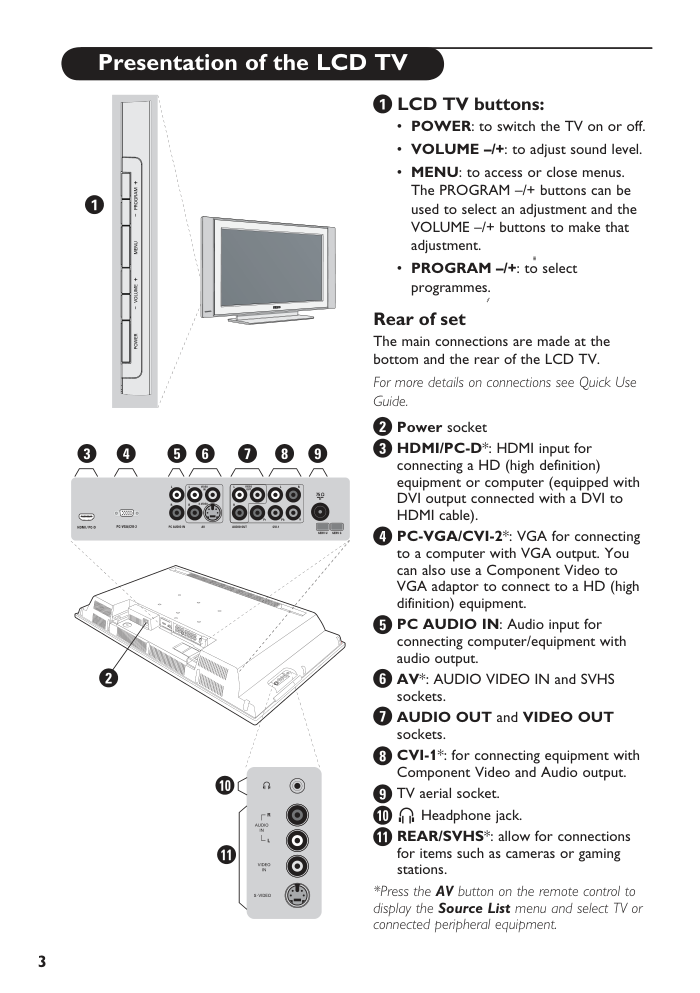
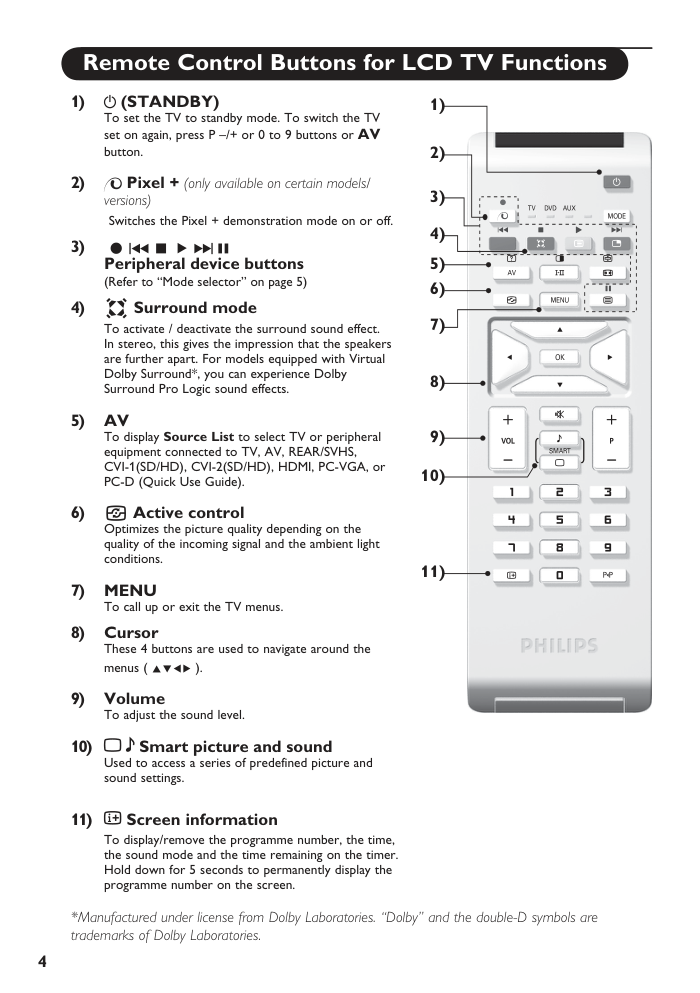
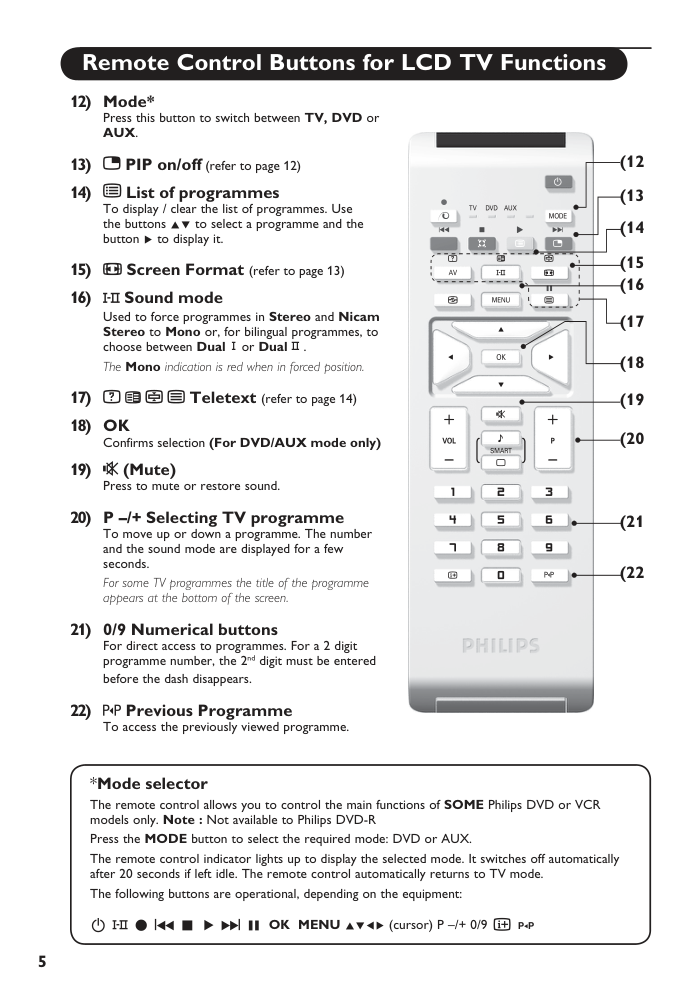
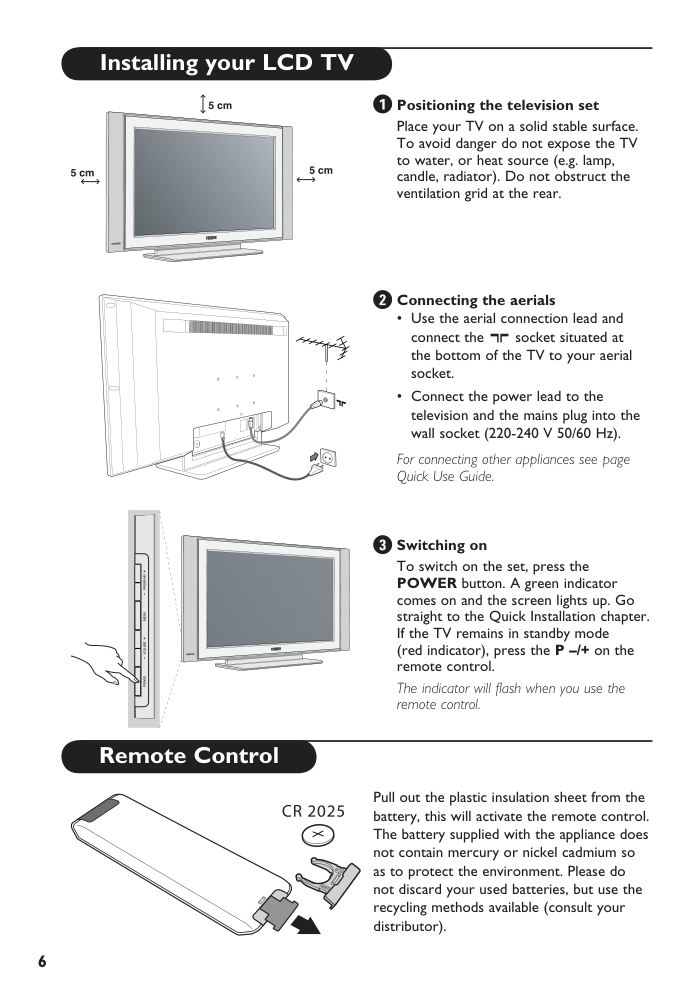
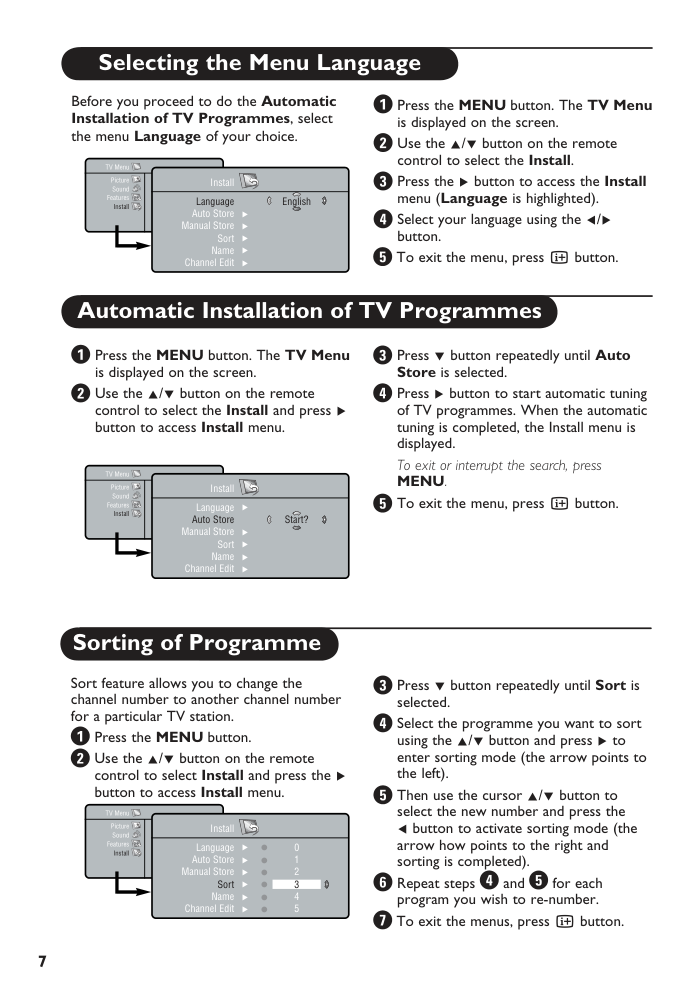
LCD TV 26PF5320 32PF5320 32PF7320 1 Contents Thank you for purchasing this television set. This handbook has been designed to help you install and operate your TV set. We would strongly recommend that you read it thoroughly. Table of Contents Important information Safety Information . . . . . . . . . . . . . . . . . . . . . . . . . . . . . . . . . . . . . . . . . . . . . . . . . . . . . . . . . . . . .2 Installation Presentation of the LCD TV . . . . . . . . . . . . . . . . . . . . . . . . . . . . . . . . . . . . . . . . . . . . . . . . . . . .3 Remote Contol Buttons for LCD TV Functions . . . . . . . . . . . . . . . . . . . . . . . . . . . . . . . . . . 4-5 Installing your LCD TV . . . . . . . . . . . . . . . . . . . . . . . . . . . . . . . . . . . . . . . . . . . . . . . . . . . . . . . .6 Remote Contol . . . . . . . . . . . . . . . . . . . . . . . . . . . . . . . . . . . . . . . . . . . . . . . . . . . . . . . . . . . . . .6 Selecting the Menu Language . . . . . . . . . . . . . . . . . . . . . . . . . . . . . . . . . . . . . . . . . . . . . . . . . . . .7 Automatic Installation of TV programmes . . . . . . . . . . . . . . . . . . . . . . . . . . . . . . . . . . . . . . . . .7 Sorting of Programme . . . . . . . . . . . . . . . . . . . . . . . . . . . . . . . . . . . . . . . . . . . . . . . . . . . . . . . . .7 Naming of Channel . . . . . . . . . . . . . . . . . . . . . . . . . . . . . . . . . . . . . . . . . . . . . . . . . . . . . . . . . . . .8 Editing of Channel . . . . . . . . . . . . . . . . . . . . . . . . . . . . . . . . . . . . . . . . . . . . . . . . . . . . . . . . . . . . .8 Manual Store . . . . . . . . . . . . . . . . . . . . . . . . . . . . . . . . . . . . . . . . . . . . . . . . . . . . . . . . . . . . . . . . .9 Operation Picture Settings . . . . . . . . . . . . . . . . . . . . . . . . . . . . . . . . . . . . . . . . . . . . . . . . . . . . . . . . . . . . . .10 Sound Adjustments . . . . . . . . . . . . . . . . . . . . . . . . . . . . . . . . . . . . . . . . . . . . . . . . . . . . . . . . . . .10 Feature Settings . . . . . . . . . . . . . . . . . . . . . . . . . . . . . . . . . . . . . . . . . . . . . . . . . . . . . . . . . . . . .10 Timer Feature . . . . . . . . . . . . . . . . . . . . . . . . . . . . . . . . . . . . . . . . . . . . . . . . . . . . . . . . . . . . . . .11 Child Lock Feature . . . . . . . . . . . . . . . . . . . . . . . . . . . . . . . . . . . . . . . . . . . . . . . . . . . . . . . . . . .11 Using the Active Control Feature . . . . . . . . . . . . . . . . . . . . . . . . . . . . . . . . . . . . . . . . . . . . . . .12 PIP Feature . . . . . . . . . . . . . . . . . . . . . . . . . . . . . . . . . . . . . . . . . . . . . . . . . . . . . . . . . . . . . . . . .12 Screen Formats . . . . . . . . . . . . . . . . . . . . . . . . . . . . . . . . . . . . . . . . . . . . . . . . . . . . . . . . . . . . . .13 Using the Teletext . . . . . . . . . . . . . . . . . . . . . . . . . . . . . . . . . . . . . . . . . . . . . . . . . . . . . . . . . . .14 Smart Picture and Sound Feature . . . . . . . . . . . . . . . . . . . . . . . . . . . . . . . . . . . . . . . . . . . . . . .16 Using the TV as a PC Monitor . . . . . . . . . . . . . . . . . . . . . . . . . . . . . . . . . . . . . . . . . . . . . . . . .17 Using in HD (High Definition) Mode . . . . . . . . . . . . . . . . . . . . . . . . . . . . . . . . . . . . . . . . . . . . .18 Practical information Tips . . . . . . . . . . . . . . . . . . . . . . . . . . . . . . . . . . . . . . . . . . . . . . . . . . . . . . . . . . . . . . . . . . . . . . .19 Specifications . . . . . . . . . . . . . . . . . . . . . . . . . . . . . . . . . . . . . . . . . . . . . . . . . . . . . . . . . . . . . . . .20 2 Safety Information • Disconnect mains plug when: – the red light below the TV screen is flashing continuously. – cleaning the TV screen. Never use abrasive cleaning agents. – there is a lightning storm. – the set is left unattended for a prolonged period of time. • No naked flame sources, such as lighted candles, should be placed on top of the TV or in the vicinity. • Do not place your TV set under direct sunlight or heat. • Leave at least 5 cm around each side of TV set to allow for proper ventilation. • Avoid placing your set (e.g. near the window) where it is likely to be exposed to rain or water. • No objects (such as vases) filled with liquids should be placed on top the TV so as to avoid dripping or splashing of liquids on the set. • Do not shift or move the set around when it is switched on. • Do not touch, push or rub the surface with hard object. • When the surface becomes dusty, wipe gently with absorbent cotton or other soft materials like chamois. Do not use acetone, toluene and acohol as it causes chemical damage to the polarizer. • Wipe off saliva or water droplets as soon as possible. Long time contact with polarizar causes deformations and colour fading. • Be careful of condensation at sudden temperature change. Condensation does damage to polarizar or electrical contact parts. After condensation fades, smear or spot will occur. • Installation of the LCD TV on the wall should be carried out by qualified servicemen. Improper and incorrect installation may render the set unsafe, Recycling The materials used in your set are either reusable or can be recycled. To minimise environmental waste, specialist companies collect used appliances and dismantle them after retrieving any materials that can be used again (ask your dealer for further details). 3 Presentation of the LCD TV LCD TV buttons: • POWER: to switch the TV on or off. • VOLUME –/+: to adjust sound level. • MENU: to access or close menus. The PROGRAM –/+ buttons can be used to select an adjustment and the VOLUME –/+ buttons to make that adjustment. • PROGRAM –/+: to select programmes. Rear of set The main connections are made at the bottom and the rear of the LCD TV. For more details on connections see Quick Use Guide. Power socket HDMI/PC-D*: HDMI input for connecting a HD (high definition) equipment or computer (equipped with DVI output connected with a DVI to HDMI cable). PC-VGA/CVI-2*: VGA for connecting to a computer with VGA output. You can also use a Component Video to VGA adaptor to connect to a HD (high difinition) equipment. PC AUDIO IN: Audio input for connecting computer/equipment with audio output. AV*: AUDIO VIDEO IN and SVHS sockets. AUDIO OUT and VIDEO OUT sockets. CVI-1*: for connecting equipment with Component Video and Audio output. TV aerial socket. L Headphone jack. REAR/SVHS*: allow for connections for items such as cameras or gaming stations. *Press the AV button on the remote control to display the Source List menu and select TV or connected peripheral equipment. 4 Remote Control Buttons for LCD TV Functions 1) (STANDBY) To set the TV to standby mode. To switch the TV set on again, press P –/+ or 0 to 9 buttons or AV button. 2) Pixel + (only available on certain models/ versions) Switches the Pixel + demonstration mode on or off. 3) ® IÒ ‡ π †I º Peripheral device buttons (Refer to “Mode selector” on page 5) 4) Q Surround mode To activate / deactivate the surround sound effect. In stereo, this gives the impression that the speakers are further apart. For models equipped with Virtual Dolby Surround*, you can experience Dolby Surround Pro Logic sound effects. 5) AV To display Source List to select TV or peripheral equipment connected to TV, AV, REAR/SVHS, CVI-1(SD/HD), CVI-2(SD/HD), HDMI, PC-VGA, or PC-D (Quick Use Guide). 6) h Active control Optimizes the picture quality depending on the quality of the incoming signal and the ambient light conditions. 7) MENU To call up or exit the TV menus. 8) Cursor These 4 buttons are used to navigate around the menus ( ÎïÍÆ ). 9) Volume To adjust the sound level. 10) Smart picture and sound Used to access a series of predefined picture and sound settings. 11) Screen information To display/remove the programme number, the time, the sound mode and the time remaining on the timer. Hold down for 5 seconds to permanently display the programme number on the screen. *Manufactured under license from Dolby Laboratories. “Dolby” and the double-D symbols are trademarks of Dolby Laboratories. 1) 2) 3) 4) 5) 6) 7) 8) 9) 10) 11) 5 Remote Control Buttons for LCD TV Functions 12) Mode* Press this button to switch between TV, DVD or AUX. 13) PIP on/off (refer to page 12) 14) List of programmes To display / clear the list of programmes. Use the buttons Îï to select a programme and the button Æ to display it. 15) Screen Format (refer to page 13) 16) Sound mode Used to force programmes in Stereo and Nicam Stereo to Mono or, for bilingual programmes, to choose between Dual5or Dual6. The Mono indication is red when in forced position. 17) Teletext (refer to page 14) 18) OK Confirms selection (For DVD/AUX mode only) 19) (Mute) Press to mute or restore sound. 20) P –/+ Selecting TV programme To move up or down a programme. The number and the sound mode are displayed for a few seconds. For some TV programmes the title of the programme appears at the bottom of the screen. 21) 0/9 Numerical buttons For direct access to programmes. For a 2 digit programme number, the 2nd digit must be entered before the dash disappears. 22) Previous Programme To access the previously viewed programme. *Mode selector The remote control allows you to control the main functions of SOME Philips DVD or VCR models only. Note : Not available to Philips DVD-R Press the MODE button to select the required mode: DVD or AUX. The remote control indicator lights up to display the selected mode. It switches off automatically after 20 seconds if left idle. The remote control automatically returns to TV mode. The following buttons are operational, depending on the equipment: B X ® IÒ ‡ π †I º OK MENU ÎïÍÆ (cursor) P –/+ 0/9 Ë Á (12 (13 (14 (15 (16 (17 (18 (19 (20 (21 (22 6 Installing your LCD TV Positioning the television set Place your TV on a solid stable surface. To avoid danger do not expose the TV to water, or heat source (e.g. lamp, candle, radiator). Do not obstruct the ventilation grid at the rear. Connecting the aerials • Use the aerial connection lead and connect the : socket situated at the bottom of the TV to your aerial socket. • Connect the power lead to the television and the mains plug into the wall socket (220-240 V 50/60 Hz). For connecting other appliances see page Quick Use Guide. Switching on To switch on the set, press the POWER button. A green indicator comes on and the screen lights up. Go straight to the Quick Installation chapter. If the TV remains in standby mode (red indicator), press the P –/+ on the remote control. The indicator will flash when you use the remote control. Remote Control Pull out the plastic insulation sheet from the battery, this will activate the remote control. The battery supplied with the appliance does not contain mercury or nickel cadmium so as to protect the environment. Please do not discard your used batteries, but use the recycling methods available (consult your distributor). 7 Sorting of Programme Sort feature allows you to change the channel number to another channel number for a particular TV station. Press the MENU button. Use the Î/ï button on the remote control to select Install and press the Æ button to access Install menu. Before you proceed to do the Automatic Installation of TV Programmes, select the menu Language of your choice. Press the MENU button. The TV Menu is displayed on the screen. Use the Î/ï button on the remote control to select the Install. Press the Æ button to access the Install menu (Language is highlighted). Select your language using the Í/Æ button. To exit the menu, press Ë button. TV Menu Picture Sound Features Install Install Language Auto Store Manual Store Sort Name Channel Edit 0 1 2 4 5 Æ Æ Æ Æ Æ Æ · · · · · · 3 TV Menu Picture Sound Features Install Install Language Auto Store Manual Store Sort Name Channel Edit English Æ Æ Æ Æ Æ TV Menu Picture Sound Features Install Install Language Auto Store Manual Store Sort Name Channel Edit Start? Æ Æ Æ Æ Æ Selecting the Menu Language Press the MENU button. The TV Menu is displayed on the screen. Use the Î/ï button on the remote control to select the Install and press Æ button to access Install menu. Press ï button repeatedly until Auto Store is selected. Press Æ button to start automatic tuning of TV programmes. When the automatic tuning is completed, the Install menu is displayed. To exit or interrupt the search, press MENU. To exit the menu, press Ë button. Automatic Installation of TV Programmes Press ï button repeatedly until Sort is selected. Select the programme you want to sort using the Î/ï button and press Æ to enter sorting mode (the arrow points to the left). Then use the cursor Î/ï button to select the new number and press the Í button to activate sorting mode (the arrow how points to the right and sorting is completed). Repeat steps and for each program you wish to re-number. To exit the menus, press Ë button. 8 Name feature allows you to enter a name for any channel you select. Press the MENU button. Use the Î/ï button on the remote control repeated until Install is selected and press the Æ button to access Install menu. Press ï button repeatedly until Name is selected and press Æ button to access name mode. Use the Î/ï button to key in first character. Use the Æ button to move to next character slot. (You can key up to a maximum of 5 characters). To store name, press the Æ button repeatedly until you exit name mode. The name is now indicated at the top left hand corner of the screen. To exit the menu, press Ë button. TV Menu Picture Sound Features Install Install Language Auto Store Manual Store Sort Name Channel Edit E L L I E Æ Æ Æ Æ Æ 2 Naming of Channel Channel Edit feature allows you to edit or skip programmes which have bad or weak TV signal or programme that you do not watch often. Press the MENU button. Use the Î/ï button on the remote control repeated until Install is selected and press the Æ button to access Install menu. Press ï button repeatedly until Channel Edit is selected and press Æ button to access the Channel Edit menu. Use the Í/Æ button or Digit (0 - 9) button to select channel you want to skip. Press the ï button to select skipped and use the Í/Æ button to select On option to activate skipping of channel. To exit the menu, press Ë button. Restoring skipped channels To restore skipped channels : - Repeat steps to and select the channel you want to restore by the Î/ï button. - Press Í/Æ button to select Off option to restore the skipped channel. Editing of Channel TV Menu Picture Sound Features Install Install Language Auto Store Manual Store Sort Name Channel Edit Æ Æ Æ Æ Æ Æ Channel · Skipped · 9 Manual Store Manual Store feature allows you to store the programmes one at a time. Press the MENU button. Use the Î/ï button repeatedly until Install is selected and press Æ button to access Install menu. - Colour System: use the Í/Æ button to select Auto (automatic detection), PAL, NTSC 3.58, NTSC 4.43 or SECAM. - Sound System: use the Í/Æ button to select Auto (automatic detection), BG, I, DK or M. - Search: press Æ button to start manual search. Searching stops once a transmitting channel is found. If you know the frequency of the required channel, you can key in directlythe frequency using the Digit (0 to 9) buttons. - Channel: enter the required number with the Í/Æ or 0 to 9 buttons. - Fine Tune: if the reception is not satisfactory, adjust using the Í/Æ button. - Store: press Æ button to store channel. To exit the menus, press Ë button. Press ï button repeatedly until Manual Store is selected and press Æ button to enter Manual Store menu. Use the Î/ï button to select a setting: TV Menu Picture Sound Features Install · Language · Auto Store · Manual Store · Sort · Name Manual Store Colour System Sound System Search Channel Fine Tune Store Auto Æ Æ Æ Æ Æ Install Language Auto Store Manual Store Sort Name Channel Edit Æ Æ Æ Æ Æ Æ · Colour System · Sound System · Search · Programme · Fine Tune 10 Picture Settings Press the MENU button. The TV Menu is displayed on the screen (Picture is highlighted). Press Æ button to access Picture menu. Use the Î/ï button to select a setting and the Í/Æ button to adjust. To exit the menu, press Ë button. Description of the adjustments: • Brightness: this changes picture brilliance. • Colour: this changes the intensity of the colour. • Contrast: this changes the difference between the light and dark tones. • Sharpness: this changes the picture definition. • Hue (available for NTSC programmes only): to increase or decrease colour intensity. • ColourTemp.: this changes the colour rendering: Cool (more blue), Normal (balanced) or Warm (more red). Sound Adjustments Press the MENU button. Press ï button repeatedly until Sound is selected and press Æ button to access the Sound menu. Use the Î/ï button to select a setting and the Í/Æ button to adjust. To exit the menu, press Ë button. Description of the settings: • Equalizer: to adjust the sound tone (from bass: 120 Hz to treble: 10 kHz). • Balance: this balances the sound on the left and right speakers. • AVL (Automatic Volume Leveller): this is used to limit increases in sound, especially on program change or advertising slots. This is not available when Dolby Virtual is activated. • Dolby Virtual: to activate / deactivate the surround sound effect. You can also access these settings with the button k. Feature Settings Press the MENU button. Press ï button repeatedly until Features is selected and press Æ button to access Features menu. Timer: allows you to set the timer to switch to another programme at a specified time. (refer to page 11). Child Lock: allows you to lock programmes. (refer to page 11). Contrast+: automatic adjustment of the picture contrast which permanently sets the darkest part of the picture to black. NR: attenuates picture noise (snow) in difficult reception conditions. PIP: to adjust the size and position of the PIP screen. To exit the menus, press Ë. TV Menu Picture Sound Features Install Sound Equalizer Balance AVL Dolby Virtual Æ 120 Hz · Æ 500 Hz · Æ 1500 Hz · Æ 10 KHz · · 5 KHz TV Menu Picture Sound Features Install Picture Brightness Colour Contrast Sharpness Hue ColourTemp. Æ Æ Æ Æ 39 TV Menu Picture Sound Features Install Features Timer Child Lock Contrast+ NR PIP Æ Time · Æ Start Time · Æ Stop Time · Æ Æ Activate · · Channel 11 Timer Feature The Timer feature allows you to set the timer to switch to another programme at a specified time when you are watching another programme or from standby mode. For the timer to function, the set must not be switched off. Once the set is switched off, the timer is disabled. Press MENU, select Features (ï) and press Æ. The Timer menu is displayed. Time: enter the current time. Start Time: enter the start time. Stop Time: enter the standby time. Channel: enter the channel number that you want to switch to by the Timer. Activate: the settings include: • Once for one time activation, • Daily for each day, • Off to deactivate Timer. Display: to activate / deactivate the current time display on screen. To exit the menu, press Ë button. Press . to put the TV set in standby mode. It will automatically come on at the time set. If you leave the TV set on, it will just change programme at the time entered (and will go to standby mode at the Stop Time). Timer Time Start Time Stop Time Channel Activate Display - - : - - Æ Æ Æ Æ Æ TV Menu Picture Sound Features Install · Timer · Child Lock · Contrast+ · NR · PIP Features Timer Child Lock Contrast+ NR PIP Æ Æ Æ Æ Æ · · · · · Time Start Time Stop Time Channel Activate Child Lock Feature The Child Lock feature allows you to lock programmes to prevent your children from watching programmes you deem undesirable. Press the MENU button. With the cursor, select the Feature menu then Child Lock menu. Enter the access code 0711. A message Incorrect will appear. Enter the access code 0711 again. It will prompt you to Change Code. Enter your own four-digit code using the 0-9 buttons and confirm the new code. Once the new code is confirmed, the Child Lock menu will appear. Use the Î/ï button to select a setting and the Í/Æ button to adjust. To exit the menu, press Ë button. Description of the settings: • Lock Channel: to lock individual programme. A keylock symbol + appears beside the locked programme number or the symbol ? for an unlocked programme. • Change Code: enter your new four-digit code using the 0-9 buttons and confirm by entering the new four-digit again. • Clear All: allows you to unlock all locked programmes. • Lock All: allows you to lock all programmes. Child Lock Lock Channel Change Code Clear All Lock All Æ + 5 Æ Æ Æ TV Menu Picture Sound Features Install · Timer · Child Lock · Contrast+ · NR · PIP Features Timer Child Lock Contrast+ NR PIP Æ Æ Æ Æ Æ Access Code - - - - 12 This feature allows you to call up a PIP (Picture-in-Picture) window on the screen. For the PIP to function, the HDMI input of the TV must be connected to digital output of AV device, e.g. PC / DVD-R (See Quick Guide for connection). Press the MENU button. Press the ï button repeatedly until Features is selected and press Æ button to access Features menu. Press the ï button repeatedly until PIP is selected and press Æ button to access PIP menu. (PIP Size is highlighted). Press Í/Æ button to select your desired PIP size options. If you want to move the PIP window horizontally or vertically, press ï button to select horizontal or vertical. Press Í/Æ button to move PIP window horizontally or vertically. To exit PIP window from screen, press Î button until PIP size is selected. Press Í/Æ button repeatedly until Off option is selected. Note: you can also access the PIP window directly via the (PIP) button on the remote control. • Press the button to display the PIP window. • Press the button repeatedly to toggle through the various PIP window sizes and select your desired size. • Use the P -/+ buttons to change the programme on the PIP screen. PIP Feature TV Menu Picture Sound Features Install · Timer · Child Lock · Contrast+ · NR · PIP Features Timer Child Lock Contrast+ NR PIP Æ Æ Æ Æ Æ · · · · · Time Start Time Stop Time Channel Activate PIP PIP Size Horizontal Vertical Off Æ Æ This feature automatically adjust the picture setting for optimal picture quality continuously under any signal conditions. You can select the Active Control On mode or the Active Control ON With Sensor mode. If Control On With Sensor mode is selected, the sensor will sense and adjust picture setting according to the lighting conditions of the room. You can also select to Active Control Off mode to switch off Active control function. Press h button repeatedly to cycle through the various Active Control modes and select your desired mode. To exit the menu, press Ë. Using the Active Control Feature Active Control ON With Sensor OR OR Active Control Off Active Control On 13 Screen Formats The pictures you receive may be transmitted in 16:9 format (wide screen) or 4:3 format (conventional screen). 4:3 pictures sometimes have a black band at the top and bottom of the screen (letterbox format). This function allows you to optimise the picture display on screen. Press the ∏ button or Í/Æ button to select the different modes: This TV set is also equipped with automatic switching which will select the correct-screen format, provided the specific signals are transmitted with the programmes. 4:3 The picture is reproduced in 4:3 format and a black band is displayed on either side of the picture. Movie Expand 14:9 The picture is enlarged to 14:9 format, a thin black band remains on both sides of the picture. Movie Expand 16:9 The picture is enlarged to 16:9 format. This mode is recommended when displaying pictures which have black bands at the top and bottom (letterbox format). Subtitle Zoom This mode is used to display 4:3 pictures using the full surface of the screen leaving the sub-titles visible. Super Zoom This mode is used to display 4:3 pictures using the full surface of the screen by enlarging the sides of the picture. Widescreen This mode restores the correct proportions of images transmitted in 16:9. Note: If you display a 4:3 picture in this mode, it will be enlarged horizontally. 14 Using the Teletext If a TV channel broadcast contains teletext information, each channel that broadcasts teletext transmits a page (index page) with information on how to use the teletext system, usually on page 100. The system transmitted is indicated in the option line at the bottom of the screen. On/Off teletext and Superimpose teletext page over TV programme Press the button once to switch on teletext display. (Select a channel in which teletext is being transmitted). Press the button the second time to superimpose the teletext page over the TV programme. Press the button the third time to exit teletext mode. Key in the required teletext page (3digits). The page number is displayed at the top left hand corner of the screen. When the teletext page is located, the counter stops searching. If the counter keeps searching, it means that the page is not available for selection. If you make a mistake in keying the page number, you have to complete keying the 3-digit number before re-keying the correct page number. Selecting a teletext page Press the P + button to display the next page and the P – button to display the previous page. Accessing a teletext page The 4-colour buttons allow you to access directly an item or corresponding pages. Direct Access to an item or corresponding pages Press the button to return to the main index page. Main Index Press button to display or exit dual page text mode. The active page is displayed on the left and the following page is displayed on the right. Press ( Hold) button if you want to hold a page (contents page). The active page is now displayed onthe right. To return to normal mode, press ( Dual page / 4) button. Dual Page Text 15 Using the Teletext When a dual page is displayed, use this button to toggle between the dual page. Once an active page is selected, the other page will be on hold mode. If the page has sub-pages, use the Cursor Right or Left button to access the next or previous page. Hold Press the button once to reveal hidden information (solutions to puzzles, riddles, etc). Press the button the second time to conceal information. This button is applicable only to teletext page with puzzles, riddles, etc.) Reveal/Conceal How to select your favourite page This feature allows you select 4 of your favourite or most commonly viewed page and stored them in the favourite page selection. You can then access directly your favourite page by the colour buttons without having to key in the page number. 1. Press the (Teletext On/Off) button to enter teletext mode. 2. Press the MENU button to enter favourite page selection. Note : The colour alphabets at the bottom of the screen is now changed to page numbers. 3. Key in your favourite page by the (Digit 0 -9) buttons. 4. Press the (OSD/Index) button followed by your desired colour button to store your favourite page. 5. Repeat step 3 to 4 to select and store other favourite pages. 6. To exit Favourite page mode, press MENU button. 7. Press the (Teletext On/Off) button twice to exit teletext mode. 16 Smart Picture and Sound Feature Smart Picture feature offers you a choice of 5 picture settings, namely, Rich, Natural, Soft, DVD/VCD and Personal. Smart Sound feature offers you a choice of 4 sound settings namely, Theatre, Music, Voice and Personal. Press or button repeatedly to cycle through the settings to select your desired mode. Defintion of Picture Settings Personal : Picture settings are set to your preference. Rich : Emphasize very vibrant colours. (Suitable for AV mode in brightly-lit room) Natural : Emphasize original colours. Soft : Emphasize “ warm” colours. (Suitable for dimly-lit room condition and gives cinema-like effect when light is switched off). DVD/VCD : Emphasize “soft” colours. (Suitable for playing computer games, surfing, etc.) Defintion of Sound Settings Personal : Sound settings are set to your preference. Theatre : Emphasize sensation to action. (Bass and Treble boosted) Music : Emphasize low tone. (Bass boosted) Voice : Emphasize high tone. (Treble boosted) Personal Rich Natural Soft DVD/VCD OR OR OR OR Personal Theatre Music Voice OR OR OR Note : The Personal setting is the setting that you set up using the Picture menu in the main menu. This is the only setting in the Smart Picture settings that can be changed. All the other settings are pre-set at the factory. 17 Using the TV as a PC Monitor Choosing PC-VGA mode Press the AV button on the remote control to display the Source List. Use the Î/ï button to select PC-VGA and then press the Æ button to switch the TV to PC-VGA mode. To return to TV mode, press the AV button, select TV and confirm with Æ button. Choosing PC-D mode Press the AV button on the remote control to display the Source List. Use the Î/ï button to select PC-D and then press the Æ button to switch the TV to PC-D mode. To return to TV mode, press the AV button, select TV and confirm with Æ button. Using the PC menus Press the MENU button to display the PC Menu. Use the Î/ï/Í/Æ button to select, adjust or activate PC Menu items namely: Picture, Audio Selection, Features, Reset to Factory. • Picture Menu: – Brightness / Contrast: to adjust the brightness and contrast. – Horizontal / Vertical*: to adjust the horizontal and vertical placing of the image. – Colour Temp: to adjust the colours (cool, normal or warm). • Audio Selection: to choose the sound reproduced on the TV (PC/HD or TV). • Feature Menu: – Phase/Clock*: eliminates the horizontal (Phase) and vertical (Clock) interfering lines. – Format: to choose between Widescreen or Native format of the PC screens. – PIP: to adjust the size and position of the PIP screen. – Auto Adjust*: position is set automatically. • Reset To Factory Setting: to return to the factory settings (default settings). *These adjustments are not available in PC-D mode. NOTE – When using the LCD TV as a PC monitor, slight diagonal interference lines may be observed when it is operated under electromagnetic interference environment but will not affect the performance of this product. – For better performance, good quality HDMI/DVI/VGA cable with good noise isolation filter is recommended. Here is a list of different display resolutions available on your TV. 640 x 480, 60 Hz 800 x 600, 56 Hz 1024 x 768, 60 Hz 640 x 480, 67 Hz 800 x 600, 60 Hz 1024 x 768, 70 Hz 640 x 480, 72 Hz 800 x 600, 72 Hz 1024 x 768, 75 Hz 640 x 480, 75 Hz 800 x 600, 75 Hz 18 Using in HD (High Definition) Mode HD Mode The HD (High Definition) mode allows you to enjoy clearer and sharper pictures through the CVI-1, CVI-2 or HDMI input if you are using a HD receiver/equipment that can transmit high definition programming. You must connect the HD equipment (see Quick Use Guide). Choosing HD mode Press the AV button on the remote control to display the Source List. Depending on the connections, use the cursor Î/ï button to select CVI-1 (SD/HD)*, CVI-2(SD/HD)* or HDMI and then press the cursor Æ button to switch the TV to the selected mode. To return to TV mode, press the AV button, select TV and press Æ button to enter selected mode. *SD - Standard Definition *HD - High Definition Using the HD menus Press the MENU button to access the HD menu. Use Î/ï/Í/Æ button to selesct, adjust or activate menu items (the settings are automatically saved): • Picture/Sound Menus: The HD Picture/Sound setting are the same as the TV Picture/Sound settings and function exactly the same way as in the TV Picture/Sound menu. • Features Menu: – PIP: to adjust the size and position of the PIP screen. – Horizontal Shift: to adjust the horizontal placing of the image. – Vertical Shift: to adjust the vertical placing of the image. 19 Tips No power Poor reception No picture Good picture but no sound Good sound but poor colour or no picture Snowish picture and noise Horizontal dotted line Double images or “Ghost” images TV not responding to remote control handset Incorrect Display position (PC mode) No Video Input (PC Mode) Vertical flicker appears (PC Mode) Horizontal flicker appears (PC Mode) Screen too bright or dark (PC Mode) • Check the TV’s AC power cord is plugged into the mains socket. If there is still no power, disconnect plug. Wait for 60 seconds and re-insert plug. Switch on the TV again. • The proximity of mountains or high buildings may be responsible for ghost pictures, echoing or shadows. In this case, try manually adjusting your picture: refer to “Fine Tune” on page 9 or modify the orientation of the outside aerial. If you are using an indoor aerial, reception may be difficult in certain conditions.You can improve reception by rotating the aerial. If the reception remains poor, you will need to use an external aerial. • Check the antenna connection at the rear of the TV. • Try another programme to confirm whether it is a particular TV station problem or otherwise. • Try increasing the volume. • Check that the sound is not muted. If it is muted, press the Mute button on the remote control to restore sound. • Try increasing the contrast and brightness setting. • Check antenna connection at the rear of the TV. • Possible electrical interference e.g. hairdryer, vacuum cleaner, etc. Switch off appliances. • Possible poor positioning of antenna. Using a highly directional antenna may improve reception. • Aim remote control handset directly at remote control sensor lens on the TV. • If there is no response, check whether plastic insulation sheet is removed and the battery is placed correctly (words on battery should be facing you). • Try changing the battery. • If the set receives no signal for 15 mins, it automatically goes into standby mode. • Adjust the image position using the Horizontal Position and/or Vertical Position in the PC Mains Controls menu. • Make sure the monitor cable is properly connected to the PC input (VGA/DVI) at the bottom of the TV. • Check whether the monitor cable has bent pins. • Try eliminating the vertical bars by using the Clock Adjustment of Video Noise in the Main PC Menu. • Try eliminating the horizontal bars by using the Phase. Adjustment of Video Noise in the Main PC Menu. • Try adjusting the contrast and brightness in the Main Menu. 20 Tips PC and PIP modes don’t work? Standby • Check that you have configured the computer on a compatible display resolution (refer to page 15). • If the set receives no signal for 15 minutes, it automatically goes into standby mode. To save power, your set is fitted with components that give it a very low power consumption when in standby mode (less than 1 W). • Only use a clean, soft and lint-free cloth to clean the screen and the casing of your set. Do not use alcohol-based or solvent-based products. • Disconnect the mains plug of the TV for 30 seconds then reconnect it. • If your TV set breaks down, never attempt to repair it yourself: contact your dealer’s after-sales service. 26PF5320 32PF5320 32PF7320 Visible screen size 660 mm 800 mm 800 mm Audio Output : 2 x 5 W RMS 2 x 15 W 2 x 15 W TV System NTSC M (3.58 – 4.5) NTSC (4.43 – 5.5) PAL B/G PAL D/K PAL I SECAM B/G SECAM D/K SECAM K1 Playback System NTSC 3.58, NTSC 4.43, PAL 60 Set Dimensions with stand: Width 804.5 mm 924 mm 924 mm Depth 222 mm 222 mm 222 mm Height 477 mm 550 mm 550 mm Net Weight of set with 16 kg 18.2 kg 18.2 kg stand (approximate ) Note For Operating Voltage, Frequency, Power Consumption and Version Number, refer to the type number at the rear of the set. Specifications Cleaning the set Still no results? 液晶电视机 26PF5320 32PF5320 32PF7320 1 目录 感谢您选购飞利浦电视机。 该使用说明书能帮助您安装与操作液晶电视机。 我们强烈推荐您仔细阅读本使用说明书。 目录 重要信息 安全信息 . . . . . . . . . . . . . . . . . . . . . . . . . . . . . . . . . . . . . . . . . . . . . . . . . . . . . . . . . . . . . . . . . . .2 安装 液晶电视机介绍 . . . . . . . . . . . . . . . . . . . . . . . . . . . . . . . . . . . . . . . . . . . . . . . . . . . . . . . . . . . . .3 液晶电视机的遥控器功能 . . . . . . . . . . . . . . . . . . . . . . . . . . . . . . . . . . . . . . . . . . . . . . . . . . . 4-5 安装您的液晶电视机 . . . . . . . . . . . . . . . . . . . . . . . . . . . . . . . . . . . . . . . . . . . . . . . . . . . . . . . . .6 遥控器 . . . . . . . . . . . . . . . . . . . . . . . . . . . . . . . . . . . . . . . . . . . . . . . . . . . . . . . . . . . . . . . . . . . . .6 选择菜单语言 . . . . . . . . . . . . . . . . . . . . . . . . . . . . . . . . . . . . . . . . . . . . . . . . . . . . . . . . . . . . . . .7 电视节目自动设定 . . . . . . . . . . . . . . . . . . . . . . . . . . . . . . . . . . . . . . . . . . . . . . . . . . . . . . . . . . .7 液晶电视频道互换 . . . . . . . . . . . . . . . . . . . . . . . . . . . . . . . . . . . . . . . . . . . . . . . . . . . . . . . . . . .7 液晶电视频道命名 . . . . . . . . . . . . . . . . . . . . . . . . . . . . . . . . . . . . . . . . . . . . . . . . . . . . . . . . . . .8 液晶电视频道编辑 . . . . . . . . . . . . . . . . . . . . . . . . . . . . . . . . . . . . . . . . . . . . . . . . . . . . . . . . . . .8 人工调谐 . . . . . . . . . . . . . . . . . . . . . . . . . . . . . . . . . . . . . . . . . . . . . . . . . . . . . . . . . . . . . . . . . . .9 操作 画面设定 . . . . . . . . . . . . . . . . . . . . . . . . . . . . . . . . . . . . . . . . . . . . . . . . . . . . . . . . . . . . . . . . . .10 声音调整 . . . . . . . . . . . . . . . . . . . . . . . . . . . . . . . . . . . . . . . . . . . . . . . . . . . . . . . . . . . . . . . . . .10 功能设定 . . . . . . . . . . . . . . . . . . . . . . . . . . . . . . . . . . . . . . . . . . . . . . . . . . . . . . . . . . . . . . . . . .10 定时器功能 . . . . . . . . . . . . . . . . . . . . . . . . . . . . . . . . . . . . . . . . . . . . . . . . . . . . . . . . . . . . . . . .11 儿童锁功能 . . . . . . . . . . . . . . . . . . . . . . . . . . . . . . . . . . . . . . . . . . . . . . . . . . . . . . . . . . . . . . . .11 使用动态监控功能 . . . . . . . . . . . . . . . . . . . . . . . . . . . . . . . . . . . . . . . . . . . . . . . . . . . . . . . . . .12 画中画功能 . . . . . . . . . . . . . . . . . . . . . . . . . . . . . . . . . . . . . . . . . . . . . . . . . . . . . . . . . . . . . . . .12 屏幕格式 . . . . . . . . . . . . . . . . . . . . . . . . . . . . . . . . . . . . . . . . . . . . . . . . . . . . . . . . . . . . . . . . . .13 使用图文电视 . . . . . . . . . . . . . . . . . . . . . . . . . . . . . . . . . . . . . . . . . . . . . . . . . . . . . . . . . . . 14-15 使用灵智画面与灵智声音功能 . . . . . . . . . . . . . . . . . . . . . . . . . . . . . . . . . . . . . . . . . . . . . . . .16 将液晶电视机设置为PC显示器 . . . . . . . . . . . . . . . . . . . . . . . . . . . . . . . . . . . . . . . . . . . . . . .17 使用HD(高清晰度)模式 . . . . . . . . . . . . . . . . . . . . . . . . . . . . . . . . . . . . . . . . . . . . . . . . . . . . . .18 实用信息 提示 . . . . . . . . . . . . . . . . . . . . . . . . . . . . . . . . . . . . . . . . . . . . . . . . . . . . . . . . . . . . . . . . . . . 19-20 技术规格 . . . . . . . . . . . . . . . . . . . . . . . . . . . . . . . . . . . . . . . . . . . . . . . . . . . . . . . . . . . . . . . . . .20 2 安全信息 • 在下列情况下拔掉主电源插头: – 液晶电视机屏幕下面的红灯持续闪烁。 – 在清洁液晶电视机屏幕时, 千万不要使用腐蚀性的清洁剂。 – 有雷雨天气时。 – 在较长时间内不使用液晶电视机时。 • 不要在液晶电视机顶部或附近放置明火, 例如点燃的蜡烛等。 • 不要将液晶电视机放置在阳光直射的地方或靠近其它热源附近。 • 在液晶电视机周围至少要留出5厘米的空隙以便充份通风。 • 不要将液晶电视机放在容易受到雨淋或水溅的地方(如靠近窗户处)。 • 不要将装有液体的容器(如花瓶)放在液晶电视机顶上, 以免液体滴落到液晶电视机内。 • 液晶电视机通电时不要移动它。 • 不要用硬物接触、推动或磨擦液晶电视机表面。 • 当液晶电视机表面变脏时, 用吸水的棉布或其它柔软的材料如鹿皮, 浸湿石油苯后轻 轻地擦抹。不要使用丙酮、甲苯和酒精, 因为它们会对偏振器产生化学损伤。 • 尽快擦去唾液或水滴。它们与偏振器长期接触会引起画面变与色彩衰减。 • 当心温度突然变化引起水汽凝结。凝结的水汽会损坏偏振器或电气接触零件。在凝结 水汽消失后, 会发生电视画面模糊或斑点。 • 务必请专业的技术人员将液晶电视机安装到墙面。不正确的安装会使电视机放置不安 全。 回收指示 为减少对境造成污染,随电视机一起供应的电池不含重金属汞或镍镉。 如可能,使用您所能采用的回收方法来处理废电池。您的电视机所使用 的材料是可以再次使用的或者是可以回收的。为了减少环境污染,不要 随意丢弃,请让回收公司回收(请向您的电视机经销商咨询)。 3 液晶电视机按键 LCD TV buttons: • 电源键: 开启或是关闭电视机。 • 音量键-/+: 调整音量大小。 • 菜单: 进入或是关闭菜单。使用 PROGRAM-/+键选择某一调整, 使 用VOLUME-/+键进行调整。 • PROGRAM-/+键: 选择节目。 电视机后面 主要连接在液晶电视机的底部与后面。 更多连接方面的细节请参阅快捷使用指南。 电源插座 HDMI/PC-D*: HDMI输入端子用于连 接某一HD(高清晰)设备或是电脑(配有 已连接到DVI to HDMI 电缆的DVI输 出端子)。 PC-VGA/CVI-2*: VGA用于连接配有 VGA 输出端子的电脑。您也可以使用 组合视频至VGA适配器连接HD(高清晰 度)设备。 电脑音频输入: 音频输入连接配有音频 输出端子的电脑/设备。 AV*: 音频视频输入与SVHS插座。 音频输出与音频输出插座。 CVI-1*: 用于连接配有组合视频与音频 输出端子的设备。 电视天线插座 L 耳机插座 REAR/SVHS*: 用于连接如照相机或是 游戏机的设备。 *按遥控器上的AV键显示信源列单菜单, 选择电 视或是已连接的外部设备。 4 液晶电视遥控器功能 1) (暂停键) 电视机设定为暂停状态。要从暂停状态打开电视 机, 可按频道键P+/-, 数字键(0-9)或是AV键。 2) Pixel + (只使用特定的型号与版本) 开启或是关闭Pixel+演示模式。 3) ® IÒ ‡ π †I º 外部设备键 (请参考第5页的“模式选择器”) 4) Q 环绕声模式 启动/关闭环绕效果。在立体声效果下, 能给人扬 声器更远的感觉。配有杜比虚拟环绕声的型号, 您 可体验杜比环绕声定向逻辑声的效果。 5) AV频道键 显示信源列单选择电视或是已连接到TV, AV, REAR/SVHS,CVI-1(SD/HD), CVI-2(SD/HD), HDMI, PC-VGA, 或是PC-D的外部设备 (快捷使用 指南)。 6) h 动态监控 依据输入信号的质量与背景光的情况优化画质。 7) 菜单 启动或是退出电视菜单。 8) 光标键 使用4个键浏览各菜单项。 ( ÎïÍÆ ). 9) 音量键 调整声音大小。 10) 灵智画面与灵智声音 使用该键进入一系列预设的画面与声音设定。 11) 屏幕信息 显示/退出节目号码, 声音模式, 定时器剩余时间等 等。按键并保持5秒, 在屏幕上永久显示节目号码。 * 获得杜比实验室许可下制造。“杜比”与双-D标识是杜比实验室的商标。 1) 2) 3) 4) 5) 6) 7) 8) 9) 10) 11) 5 液晶电视遥控器功能 12) 模式键* 按该键在TV, DVD 或是AUX中切换。 13) PIP开启/关闭(请参阅第12页。) 14) 节目单 显示/清除节目单。使用 Îï 键选择某一节目, 使用 Æ 键显示。 15) 屏幕格式 (请参阅第13页。) 16) 声音模式键 使用该键将立体声, 丽音立体声下的节目切换为 单声道或是在双语节目时, 在双语I或是双语II中 进行选择。 17) 图文电视 (请参阅第13至14页。) 18) OK 键 确定选择(只适用DVD/AUX模式) 19) (静音键) 按键静音或是恢复声音。 20) P –/+ 选择电视节目 向上或是向下方向浏览节目。电视节目的数字 与声音模式只显示几秒。 有些电视节目的标题会在屏幕底部显示。 21) 0/9 数字键 直接进入节目。如是2位数的节目号码, 在光标 消失前必须键入第2个数字。 22) 前一节目 进入以前观看过的节目。 *模式选择器 遥控器允许您可以控制某些飞利浦DVD或是VCR型号的主要功能。注意:不适用飞利浦DVD-R。 按模式键选择需要的模式: DVD或是AUX. 遥控器指示灯亮起,显示被选择的模式。如果无其它操作, 20秒后自动关闭。遥控器自动回到电 视模式。 根据设备的不同, 以下各键可进行操作: B X ® IÒ ‡ π †I º OK MENU ÎïÍÆ (光标键) P –/+ 0/9 Ë Á (12 (13 (14 (15 (16 (17 (18 (19 (20 (21 (22 6 安装液晶电视机 放置电视机 将电视机放置在一个坚固的, 足以承受 电视机重量的地方。为避免危险, 不要 将电视机暴露在水源或是热源(比如电 灯, 蜡烛, 取暖器), 不要阻塞电视机后 面的通风口。 连接天线 • 使用天线连接引入线连接电视机后面 的 : 插座与您的天线插座。 • 将电源线连接到电视机, 将电源插头 插入墙面插座。(220-240 V 50/60 Hz)。 要连接其它设备, 请参阅快捷使用指南。 开启电视机 按电源键开启电视机。绿色指示灯开 启, 屏幕亮起。直接进入快捷安装的介 绍。如果电视机仍处于暂停模式(红色 指示灯亮起), 按遥控器上的P-/+键。 当您使用遥控器时, 指示灯闪烁。 遥控器 移去电池上的塑料隔离纸, 启动遥控器。 随机提供的电池不含汞或是镍镉以保护环 境。请不要丢弃您使用过的电池, 参照再 利用方法处理电池(请向您的供应商咨询)。 7 频道互换 使用频道互换功能可以将某一频道号码切 换为其它电视台的另一频道号码。 按菜单键。 使用遥控器上的 Î/ï 键选择设定项, 按 Æ 键进入设定菜单。 在对电视节目进行自动设定前, 选择您喜 好的菜单语言。 按菜单键。电视菜单在屏幕上显示。 使用遥控器上的 Î/ï 键选择设定。 按 Æ 键进入设定菜单(语言项高显亮)。 使用 Í/Æ 键选择您喜好的语言。 按 Ë 键退出菜单。 电视菜单 画面 声音 功能 设定 设定 语言 自动搜寻 人工搜寻 频道互换 命名 频道编辑 0 1 2 4 5 Æ Æ Æ Æ Æ Æ · · · · · · 3 电视菜单 画面 声音 功能 设定 设定 语言 自动搜寻 人工搜寻 频道互换 命名 频道编辑 English Æ Æ Æ Æ Æ 电视菜单 画面 声音 功能 设定 设定 语言 自动搜寻 人工搜寻 频道互换 命名 频道编辑 开始? Æ Æ Æ Æ Æ 选择菜单语言 按菜单键。电视菜单显示在屏幕上。 使用遥控器上的 Î/ï 键选择设定项, 按 Æ 键进入设定菜单。 连续按 ï 键直到选中自动搜寻。 按 Æ 键开始电视节目的自动调谐。自 动调谐结束后,设定菜单显示。 按菜单键,退出或是中止搜寻。 按 Ë 键退出菜单。 电视节目自动设定 连续按 ï 键直到选中频道互换。 使用 Î/ï 键选择您希望互换的频道, 按 Æ 键进入互换模式(箭头指向左 边)。 使用光标 Î/ï 键选择新号码,按 Í 键 启动互换模式(箭头指向右边,互换结 束)。 对其它您希望重新编号码的频道,重复 步骤 与 。 按 Ë 键退出菜单。 8 使用频道命名功能可以为您选择的频道进 行命名。 按菜单键。 使用遥控器上的 Î/ï 键选择设定项, 按 Æ 键进入设定菜单。 连续按 ï 键直到选中频道命名。按 Æ 键进入命名模式。 使用 Î/ï 键键入第1个字符。使用 Æ 键移入另一字符库。(您可以键入最多 5个字符。) 如要储存命名结果,连续按 Æ 键直到 您退出命名模式。 按 Ë 键退出菜单。 电视菜单 画面 声音 功能 设定 设定 语言 自动搜寻 人工搜寻 频道互换 命名 频道编辑 删除 Æ Æ Æ Æ Æ 2 液晶电视频道命名 频道编辑功能允许您编辑频道或者跳过那 些您不常看的或信号弱的频道。 按菜单键。 连续使用遥控器上的 Î/ï 键选择设定 项,按 Æ 键进入设定菜单。 连续按 ï 键直到选中频道编辑。按 Æ 键进入频道编辑菜单。 使用 Í/Æ 键或是数字键(0-9)选择 您希望跳过的频道。 按 ï 键选择已跳过的频道,使用 Í/Æ 键选择开启项启动频道跳过。 按 Ë 键退出菜单。 添加已跳过的频道 如要添加已跳过的频道: - 重复第 步至第 步,使用光标 Î/ï 键选择您希望添加的频道。 - 按 Í/Æ 键选择关闭项添加已跳过的频道。 液晶电视频道编辑 电视菜单 画面 声音 功能 设定 设定 语言 自动搜寻 人工搜寻 频道互换 命名 频道编辑 Æ Æ Æ Æ Æ Æ 频道 · 已跳过 · 9 液晶电视人工搜寻 人工搜寻功能允许您一次搜寻电视频道。 按菜单键。 连续使用遥控器上的 Î/ï 键选择设定 项,按 Æ 键进入设定菜单。 - 彩色制式: 使用 Í/Æ 键选择自动(自动删除), PAL, NTSC3.58, NTSC 4.43, 或是 SECAM。 - 声音制式: 使用 Í/Æ 键选择自动(自动删除)BG, I, DK或是M。 - 搜寻: 按 Æ 键开始人工搜寻。一旦传送频道被 找到,搜寻停止。如果您知道需要的频 道的频率,您可直接使用数字键0-9键 入频率。 - 频道: 使用 Í/Æ 键或是数字键0-9键入需要的 频道号码。 - 微调: 如果接收效果不佳,使用 Í/Æ 键调整。 - 储存: 按 Æ 键储存频道。 按 Ë 键退出菜单。 连续按 ï 键选择人工搜寻项,按 Æ 键 进入人工搜寻菜单。 使用 Î/ï 键选择某一设定: 电视菜单 画面 声音 功能 设定 · 语言 · 自动搜寻 · 人工搜寻 · 频道互换 · 命名 人工搜寻 彩色制式 声音制式 搜寻 频道 微调 储存 自动 Æ Æ Æ Æ Æ 设定 语言 自动搜寻 人工搜寻 频道互换 命名 频道编辑 Æ Æ Æ Æ Æ Æ · 彩色制式 · 声音制式 · 搜寻 · 频道 · 微调 10 画面设定 按菜单键。电视菜单显示在屏幕上(画 面高显亮)。 按 Æ 键进入画面菜单。 使用 Î/ï 键选择某一设定,按 Í/Æ 键 调整。 按 Ë 键退出菜单。 设定项介绍: • 亮度:该项调节画面的亮度。 • 彩色:调节画面的色彩饱和度。 • 对比度:调节画面的浅色调与深色调的 差别。 • 对比度:调节画面的浅色调与深色调的 差别。 • 色调:(只适用于NTSC节目)调节色彩表 层基调。 • 色温:调节色彩底色:冷色调(更 蓝),普通(平衡)或是暖色调(更 红)。 声音设定 按菜单键。 连续按 ï 键选择声音项,按 Æ 键进入 声音菜单。 使用 Î/ï 键选择某一设定,按 Í/Æ 键 调整。 按 Ë 键退出菜单。 设定项介绍: • 均衡器:调整声音音量(从低音120Hz 到高音10KHz)。 • 平衡器:平衡左右扬声器的声音。 • AVL(自动音量调衡):使用该项限制 声音增强,特别是节目更换或是广告插 播时。 如果启动杜比虚拟项,AVL不适用。 • 杜比虚拟:启动/取消环绕声效果。 您也可以使用 k键进入这些设定。 功能设定 按菜单键。 连续按 ï 键选择功能项,按 Æ 键进入 功能菜单。 定时器:允许您设定某一特定时间,切 换至另一节目。(请参阅第11页)。 儿童锁:允许您锁定电视节目。(请参 阅第11页)。 对比度加强:自动调整画面对比度,该 对比度将画面的最暗部分永久设定为黑 色。 噪音抑制:在接收条件不佳的情况下, 削弱画面噪音(雪花)。 画中画:调整画中画屏幕的大小与位 置。 按 Ë键退出菜单。 电视菜单 画面 声音 功能 设定 声音 均衡器 平衡器 AVL 杜比虚拟 Æ 120 Hz · Æ 500 Hz · Æ 1500 Hz · Æ 10 KHz · · 5 KHz 电视菜单 画面 声音 功能 设定 画面 亮度 彩色 对比度 清晰度 色调 色温 Æ Æ Æ Æ 39 电视菜单 画面 声音 功能 设定 功能 定时器 儿童锁 对比度加强 噪音抑制 画中画 Æ 时间 · Æ 开始时间 · Æ 终止时间 · Æ Æ 启动 · · 频道 11 定时器功能 当您在观看一个频道时,定时器功能允许 您设定定时器使其在一个规定的时间将电 视切换到另一个频道。要使定时器工作, 不能关闭电视机。一旦关闭电视机,定时 器就失效。 按菜单键,使用 (ï) 键选择功能项 Æ, 定时器菜单显示。 时间:键入当前时间。 开始时间:键入开始时间。 终止时间:键入暂停时间。 频道:键入您希望通过定时器切换的频 道号码。 启动:该设定项包括: • 一次启动时间 • 每天启动 • 关闭定时器 时间显示:启动/取消在屏幕上显示的 当前时间。 按 Ë 键退出菜单。 按 . 键将电视机设置为暂停状态 。 时间到时会自动开启电视机。如果您 使电视机处于开启状态,在键入的时 间到时更换节目(在终止时间时切换 为暂停状态)。 定时器 时间 开始时间 终止时间 频道 启动 时间显示 - - : - - Æ Æ Æ Æ Æ 电视菜单 画面 声音 功能 设定 · Timer · Child Lock · Contrast+ · NR · PIP 功能 定时器 儿童锁 对比度加强 噪音抑制 画中画 Æ Æ Æ Æ Æ · · · · · 定时器 开始时间 终止时间 频道 启动 儿童锁功能 儿童锁功能允许您锁定您认为不适宜您的 孩子观看的电视节目。 按菜单键。 使用光标键,选择功能菜单,然后选择 儿童锁菜单。 进入密码0711。屏幕上会出现错误信 息。再次键入0711。 您可快速进入更换密码模式,使用数字 键0-9键入您的4位数密码,确定新密 码。 一旦确定新密码,儿童锁菜单出现。 使用 Î/ï 键选择某一设定项,使用 Í/Æ 键进行调整。 按 Ë 键退出菜单。 设定项介绍: • 频道锁定:锁定单个节目。锁定标志 + 出现在被锁定的节目号码旁边, 解锁标 志 ? 会出现在被解除锁定的节目号码 旁边。 • 更换密码:使用数字键0-9键入您新的 4位数密码,再次键入新的4位数密码进 行确定。 • 全部清除:您可对所有锁定的频道进行 解锁。 • 全部锁定:您可锁定所有的频道。 儿童锁 锁定频道 更换密码 全部清除 全部锁定 Æ + 5 Æ Æ Æ 电视菜单 画面 声音 功能 设定 · Timer · Child Lock · Contrast+ · NR · PIP 功能 定时器 儿童锁 对比度加强 噪音抑制 画中画 Æ Æ Æ Æ Æ 进入密码 - - - - 12 该功能使您在PC中调出PIP(画中画)窗 口。要启动画中画功能,液晶电视机的 HDMI输入端子必须连接到AV设备如电 脑/DVD-R的数码输出端子上。(请参阅 连接的有关说明)。 按菜单键。 连续按 ï 键选择功能项,按 Æ 键进入 功能菜单。 连续按 ï 键选择画中画项,按 Æ 键 进入画中画菜单。(画中画大小高显 亮)。 按 Í/Æ 键选择您喜好的画中画大小。 如果您希望水平方向或是垂直方向移动 画中画窗口,按 ï 键选择水平方向或 是垂直方向。 按 Í/Æ 键水平方向或是垂直方向移动 画中画窗口。 要从屏幕退出画中画窗口,按 Î 键选 择画中画大小。连续按 Í/Æ 键选择关 闭项。 注意:您可直接通过遥控器上的 (画中 画)键进入画中画窗口。 • 按 键显示画中画窗口。 • 连续按 键在不同的画中画窗口中进入 浏览,选择您喜好的大小。 • 使用 P -/+ 键更换在画中画屏幕上的节 目。 PIP(画中画)功能 电视菜单 画面 声音 功能 设定 · Timer · Child Lock · Contrast+ · NR · PIP 功能 定时器 儿童锁 对比度加强 噪音抑制 画中画 Æ Æ Æ Æ Æ · · · · · 定时器 开始时间 终止时间 频道 启动 画中画 画中画大小 水平方向 垂直方向 关闭 Æ Æ 该功能自动调整画面设定,不论任何信号 情况连续优化画质。您可选择动态监控开 模式或是带传感器的动态监控开模式。 如果选择带传感器的动态监控开,传感器 会根据房间的照明情况感应并调整画面设 定。 您也可选择动态监控关闭模式关闭动态监 控功能。 连续按 h 键在不同的动态监控模式 中进行浏览,选择您喜好的模式。 按 Ë键退出菜单。 使用动态监控功能 带传感器的动态监控 开 或是 或是 动态监控 关闭 动态监控 开 13 使用屏幕格式 您接收的的画面可能是以16:9格式(宽屏幕)或是4:3格式(传统屏幕)。4:3格式有时在 屏幕的顶部与底部出现黑色条(信箱格式)。该功能能使您在屏幕上优化画面显示。 按 ∏ 键或是 Í/Æ 键选择不同的模式: 该电视机也配有自动切换功能,能自动选择正确的屏幕格式,只要节目是以特 定的信号传送。 4:3模式 画面以4:3格式复制, 在画面两侧会出现黑色条。 14:9电影扩展模式 画面扩展至14:9模式, 在画面两侧仍有一细黑色条。 16:9电影扩展模式 画面扩展为16:9格式。如果画面在顶部与底部均有黑色条(信箱格式), 建议使用该模式。 字幕缩放格式 使用该模式显示4:3画面, 除字幕区, 整个屏幕表面显示画面。 超级缩放 使用该模式显示4:3画面, 通过扩展画面两侧, 使用整个屏幕表明显示 画面。 宽屏幕模式 该模式全屏幕显示以16:9格式传送的画面, 回复其正确的画面比例。 注意: 如果您在该模式下显示4:3画面, 画面会水平方向扩展。 14 如果电视频道播放图文电视信息,该频道播放的信息中,会有页面(索引页面),通 常是页面100,提供如何使用图文电视系统的信息。在电视机屏幕的底部会有选择线 指示被传送的图文电视系统。 使用图文电视 打开/关 闭图文 电视,并在电视 节目上重叠图文 页面 选择某一图文 页面 进入该图文页面 直接进入某一项 或是相应页面 主索引页面 双页图文 按图文电视键一次打开图文显示(要选 择有图文传输的频道)。第二次按此键 将图文页面叠放在电视节目上。 第三次按此键退出图文系统。 输入喜好的图文电视页面(3 位 数)。页面编码会在屏幕左上方显 示。一旦页面编码找到,搜索将停 止,如果搜索继续,表明该页面无 法显示。如果您键入时出现错误, 您仍需键入3 位数后,再次键入正确 的页面编码。 按CHANNEL(频道)+键以显示下 一页面,CHANNEL(频道)-键显 示前一页面. 使用四种不同的色彩键直接进入 某一项或相应的页面。 按该键返回主索引页面。 按此键显示或是退出双页面模式。 当前页面显示在左侧,下一页面显 示在右侧。如果您希望定住某一页 面(包含页面),按 (定位) 键。当前页面显示在右侧。要返回 正常模式,按 键。 15 使用图文电视 当显示双页图文时按此键在双页 之间浏览。一旦选好观看页,另 一页就处于暂停状态。如果该页 面有子页面,使用光标右移/左移 键进入子页面或是下一页面。 第一次按此键可以显示隐蔽的 信息(智力测验或谜语的答案 等)。第二次按此键删除此信 息。此键只用于带有智力测验、 谜语等的图文页面。 定位 显示/隐藏 16 使用电视灵智画面与灵智声音功能 灵智画面功能使您可以在5种画面设定中进行选择:鲜艳、自然、柔和、DVD/VCD与个 人设定。 灵智声音功能使您可以在4种声音设定中进行选择:剧场、音乐、对白和个人设定。 反复地按 (灵智画面)与 (灵智声音)键,使各种设定滚动显示以选择您需要 的模式。 画面设定定义 个人设定: 画面设定成您喜欢的样式。 鲜艳: 强调非常明亮的色彩(适合AV状态光 线充足的房间)。 自然: 强调原色。 柔和: 强调“暖”(适合于光线微暗的房 间并在关灯后给房间以电影院的效 果)。 DVD/VCD: 强调“柔和”色彩(适于玩电 脑游戏、网上冲浪等)。 声音设定定义 个人设定: 声音按您的喜好而定。 剧场: 强调动感(低音和高音提升)。 音乐: 强调低音(低音提升)。 对白: 强调高音(高音提升)。 个人设定 鲜艳 自然 柔软 DVD/VCD 或是 或是 或是 或是 个人设定 剧场 音乐 对白 或是 或是 或是 注意: 个人设定是您使用主菜单中的画面菜单设定的一种设定, 只能用于灵智画面设定, 该设定是可以更换的。所有其它设定均在工厂中预先设定。 17 将液晶电视机设置为PC显示器 选择PC-VGA模式 按遥控器上的AV键显示信源列单。 使用 Î/ï 键选择PC-VGA, 再按 Æ 键 将电视模式切换为PC-VGA模式。 如要返回电视模式, 按AV键, 选择电视 项, 再按 Æ 键确定。 选择PC-D模式 按遥控器上的AV键显示信源列单。 使用 Î/ï 键选择PC-D, 再按 Æ 键将 电视模式切换为PC-VGA模式。 如要返回电视模式, 按AV键, 选择电视 项, 再按 Æ 键确定。 使用PC菜单 按菜单键显示PC菜单。 使用 Î/ï/Í/Æ 键选择, 调整或是启动 电脑菜单项: 画面, 音频选择, 功能, 恢 复出厂预设。 • 画面菜单: – 亮度/对比度: 调整亮度与对比度。 – 水平方向/垂直方向*: 调整画面水平 方向与垂直方向的移动。 – 色温: 调整色彩 (冷色, 普通, 或是暖 色)。 • 音频选择: 选择在电视上复制的声音 (PC/HD或是TV)。 • 功能菜单: – 相位/时钟*: 消除水平方向(相位)与 垂直方向(时钟)的干扰线。 – 格式: 在电脑屏幕的宽屏幕或是自然 格式中进行选择。 – 画中画: 调整画中画屏幕的大小与位 置。 – 自动调整*: 位置可自动调整。 • 恢复出厂预设: 返还出厂设定(缺省设 定) *在PC-D模式下, 这些调整项不适用。 注意 – 本液晶电视机也可作为电脑显示器使用。在电磁干扰环境下可能会出现轻微的对角干扰 线。但这不影响电视机的质量。 – 为获得更好的画质, 推荐使用配有优质噪音隔离滤波器的高质量HDMI/DVI/VGA电缆。 下述为适用于您电视机的不同的显示分辨率。 640 x 480, 60 Hz 800 x 600, 56 Hz 1024 x 768, 60 Hz 640 x 480, 67 Hz 800 x 600, 60 Hz 1024 x 768, 70 Hz 640 x 480, 72 Hz 800 x 600, 72 Hz 1024 x 768, 75 Hz 640 x 480, 75 Hz 800 x 600, 75 Hz 18 使用HD(高清晰度)模式 HD模式 如果您使用能传送高清晰度节目的HD 接收器/设备, HD (高清晰度)模式允许 您通过使用CVI-1, CVI-2或是HDMI输 入端子, 欣赏更清晰的画面。 您必须连接HD设备(请参阅快捷使用指南)。 选择HD模式 按遥控器上的AV键显示信源列单。 根据连接情况, 使用 Î/ï 光标键选择 CVI-1(SD/HD)*, CVI-2(SD/HD)* 或是HDMI, 再按光标 Æ 键将电视切换 至被选择的模式。 要返回电视模式, 按AV键, 选电视项, 再按 Æ 键, 进入被选择的模式。 *SD - 标准清晰度 *HD - 高清晰度 使用HD菜单 按菜单键进入HD菜单。 使用 Î/ï/Í/Æ 键选择, 调整或是启动 菜单项(设定项自动储存): • 画面/声音菜单: HD画面/声音设定与电视画面/声音设 定一致, 其功能与电视画面/声音菜单 一致。 • 功能菜单: – PIP: 调整画中画屏幕的大小与位置。 – 水平移动: 水平方向调整画面位置。 – 垂直移动: 垂直方向调整画面位置。 19 提示 没电 接收不佳 无画面 画面清晰但无声音 声音好但色彩差或无 画面 雪花画面和噪声 水平虚线 双影或“幻影” 液晶电视机不响应遥 控器 错误的显示位置(PC模 式) 无视频输入(PC模式) 出现垂直闪烁(PC模 式) 出现水平闪烁(PC模 式) 屏幕太亮或是太暗 (PC模式) • 检查液晶电视机的交流电源线是否插入电源插座。如果仍没电, 拔掉 电源插头等60秒钟后重新插入, 再开启液晶电视机。 • 周围有高建筑物或高山会导致重影或幻影, 您可手动调整画面质量: 参阅第9页的“微调”部分的介绍或是改变外部的天线方向。如果您 使用的是室内天线, 在某些情况下, 接收可能比较困难。您可通过改 变天线方向来改善画质。如果接收效果仍没有改善, 您需使用外部天 线。 • 检查液晶电视机背后的天线连接。 • 试试其它频道, 是否是电视台的问题。 • 增大音量。 • 检查液晶电视机是否处于静音, 按遥控器上的静音键以恢复声音。 • 增大对比度与亮度。 • 检查液晶电视机背面的天线连接。 • 可能有电器干扰如吹风机、真空吸尘器等, 关掉这些电器设备。 • 可能是天线位置不佳。使用高的定向天线会改善画面。 • 将遥控器对准液晶电视机上的遥控传感器。 • 如果仍没有反应, 检查塑料隔离纸是否去除, 电视是否放置正确(电池 上的字样应面向您)。 • 更换电池。 • If 如果电视机15分钟内没有接收到信号, 自动切换为暂停状态。 • 使用PC主控制菜单中的水平方向/垂直方向调整画面位置。 • 确保显示器电缆正确连接到电视机底部的PC输入端子(VGA/DVI)。 • 检查显示器电缆是否有弯针。 • 使用PC主菜单中的视频噪音的时钟调整消除垂直线条。 • 使用PC主菜单中的视频噪音的相位调整消除水平线条。 • 在主菜单中调整对比度与亮度。 20 提示 PC与画中画功能无 反应? 暂停状态 • 在兼容的显示分辨率下检查您对电脑的设置(请参阅第15页)。 • 如果电视机在15分钟内没有接收到任何信息, 自动转为暂停模式。为 了节能, 您的电视机在暂停模式下耗能极低(低于1瓦) • 只能使用干净, 柔软, 非棉软布清洗电视机的屏幕与机盒。不要使用 酒精类或是溶剂类的产品。 • 将电源插座拔掉, 等待30秒, 再连接。 • 如果您的电视机出了故障, 不要自己修理电视机: 与您的供应商的售 后服务部门联系。 26PF5320 32PF5320 32PF7320 画面显像管尺寸 660毫米 800毫米 800毫米 音频输出: 2X5瓦 RMS 2X15瓦 2X15瓦 电视系统 NTSC M (3.58-4.5) NTSC (4.43-5.5) PAL B/G PAL D/K PAL I SECAM B/G SECAM D/K SECAM K1 回放系统 NTSC 3.58, NTSC 4.43, PAL 60 带底座的电视机尺寸: 宽 804.5毫米 924毫米 924毫米 高 222 毫米 222毫米 222毫米 深 477 毫米 550毫米 550毫米 带底座的净重(约) 16公斤 18.2公斤 18.2公斤 注意 获得工作电压, 频率, 功耗与版本号的信息, 请参阅电视机后面的铭牌。 技术规格 清洁电视机 仍旧无结果? Specifications are subject to change without notice. Trademarks are the property of Koninklijke Philips Electronics N.V. or their respective owners. 2005 © Koninklijke Philips Electronics N.V. All rights reserved. www.philips.com 3141 045 33711
版权声明
1. 本站所有素材,仅限学习交流,仅展示部分内容,如需查看完整内容,请下载原文件。
2. 会员在本站下载的所有素材,只拥有使用权,著作权归原作者所有。
3. 所有素材,未经合法授权,请勿用于商业用途,会员不得以任何形式发布、传播、复制、转售该素材,否则一律封号处理。
4. 如果素材损害你的权益请联系客服QQ:77594475 处理。