飞利浦32HFL3330液晶彩电话使用说明书
 "飞利浦32HFL3330液晶彩电话使用说明书-0")
 "飞利浦32HFL3330液晶彩电话使用说明书-1")
 "飞利浦32HFL3330液晶彩电话使用说明书-2")
 "飞利浦32HFL3330液晶彩电话使用说明书-3")
 "飞利浦32HFL3330液晶彩电话使用说明书-4")
 "飞利浦32HFL3330液晶彩电话使用说明书-5")
 "飞利浦32HFL3330液晶彩电话使用说明书-6")
 "飞利浦32HFL3330液晶彩电话使用说明书-7")
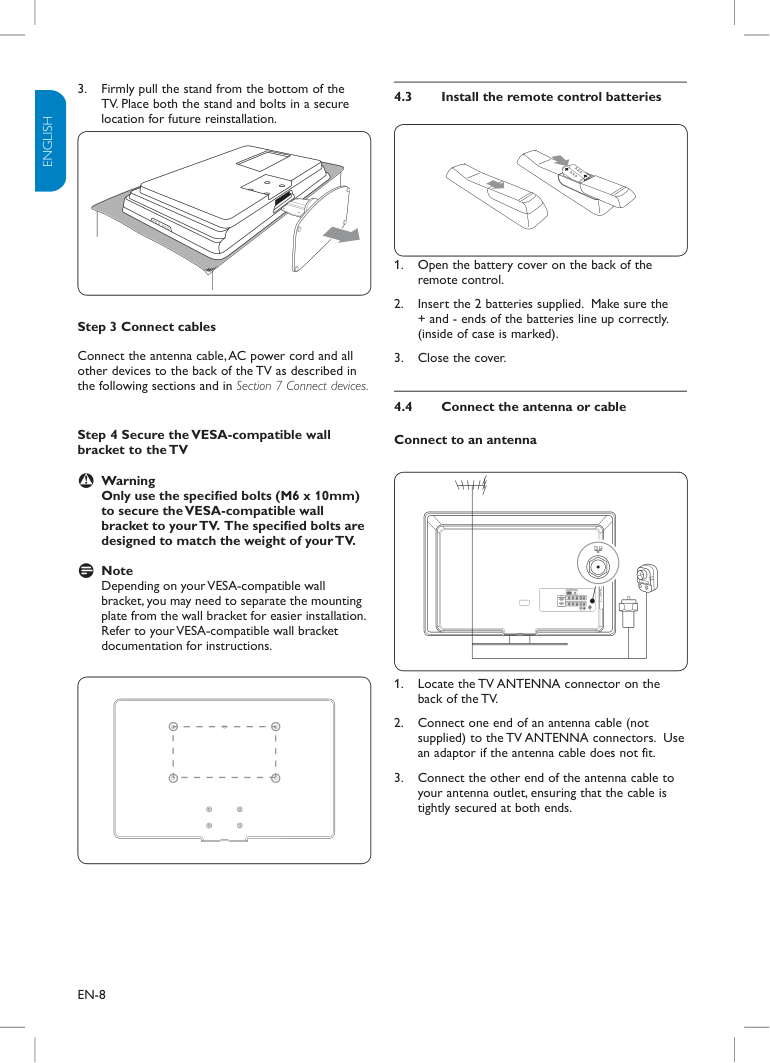 "飞利浦32HFL3330液晶彩电话使用说明书-8")
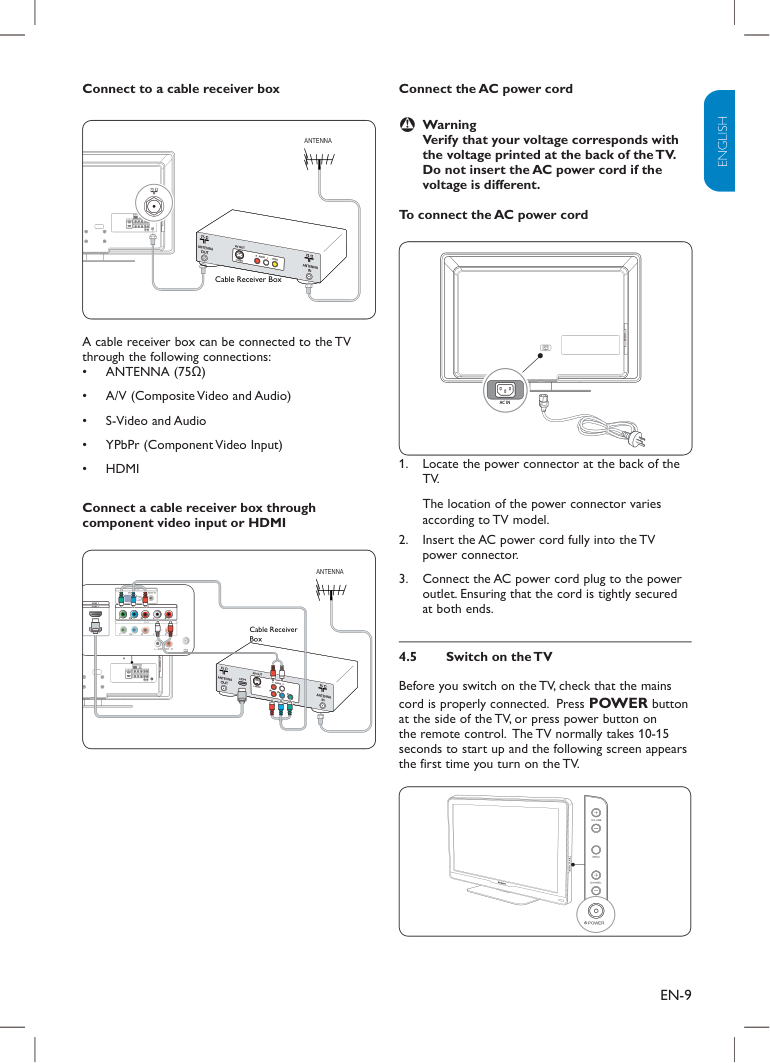 "飞利浦32HFL3330液晶彩电话使用说明书-9")
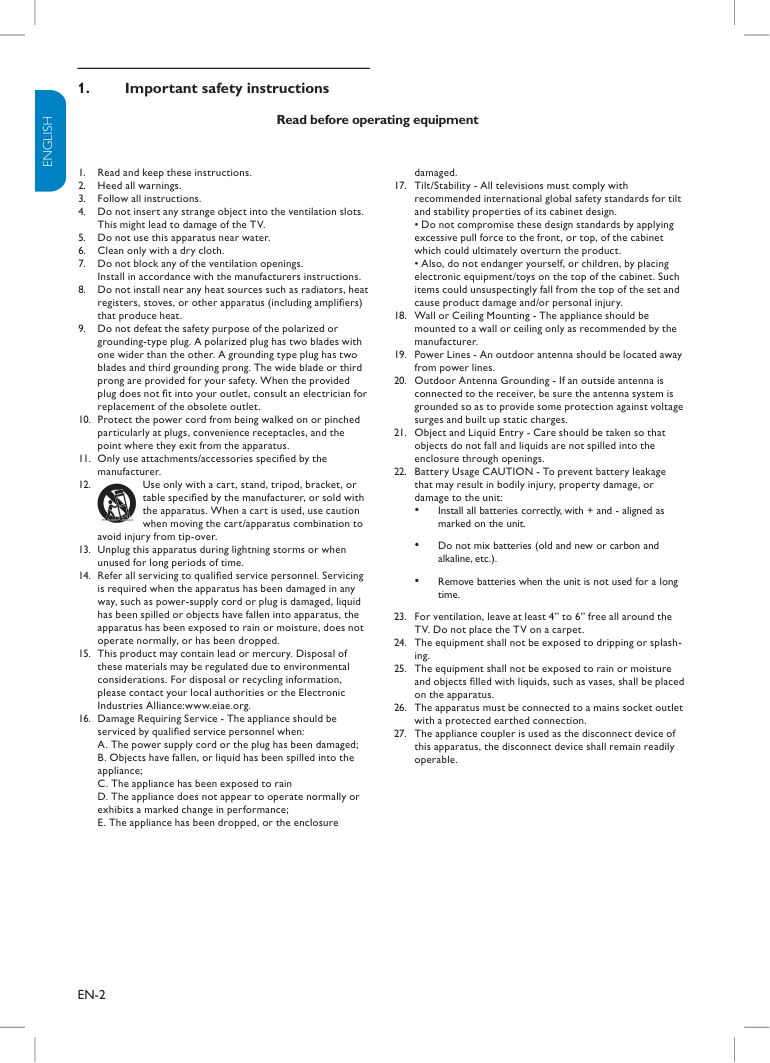
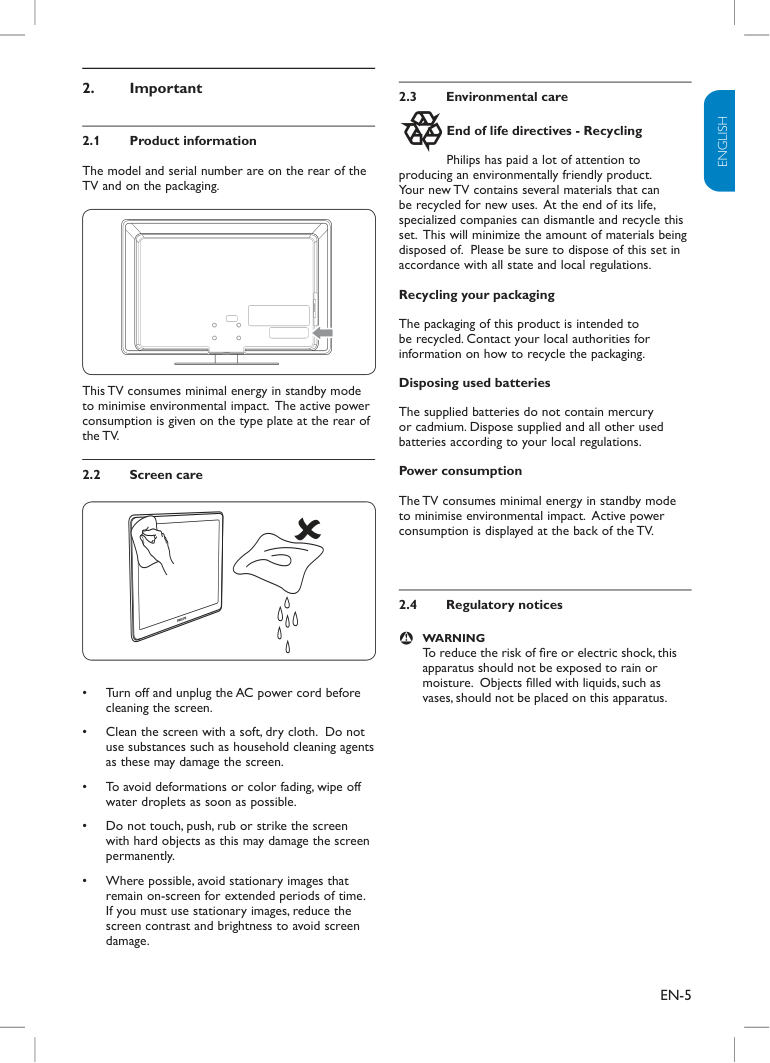
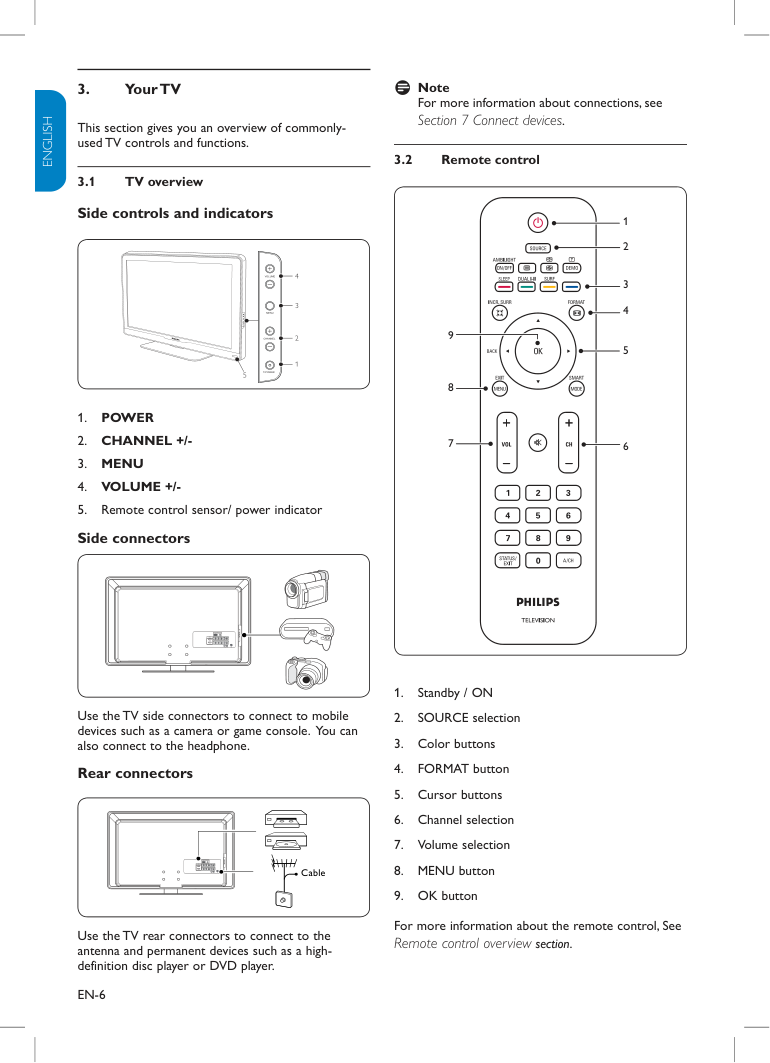
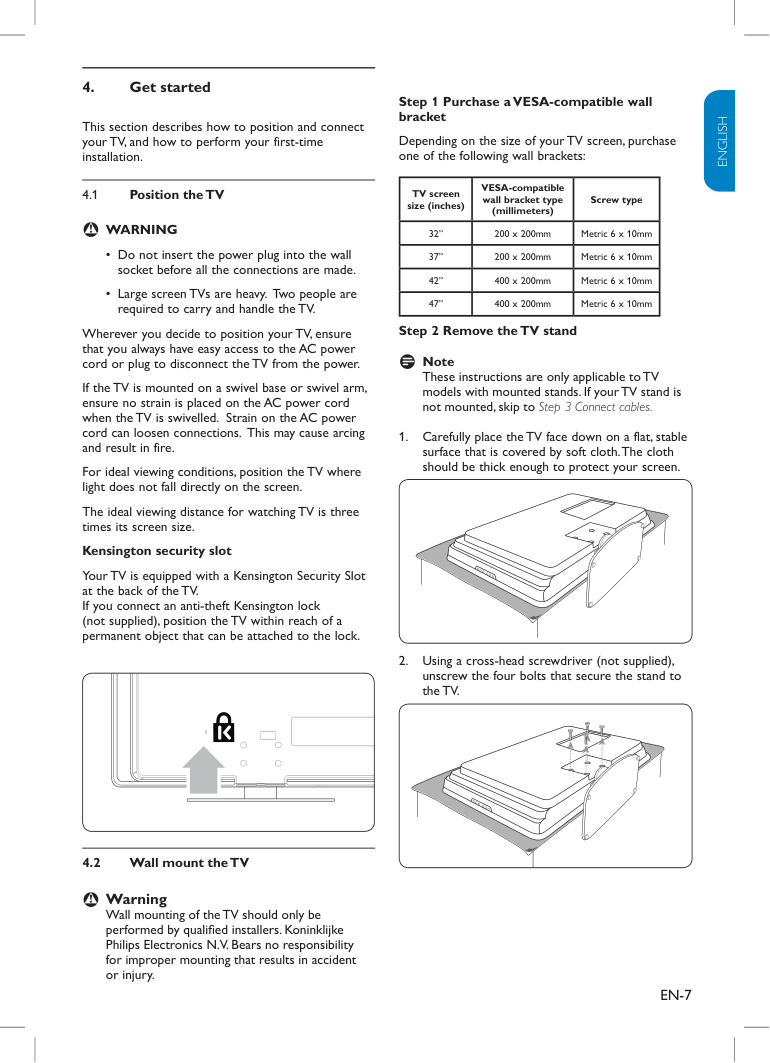
Register your product and get support at www.philips.com/welcome EN USER MANUAL ZH 用户手册 32PFL3403 37PFL3403 42PFL3403 47PFL3403 32HFL3330 37HFL3330 EN-1 ENGLISH FRANÇAISE ESPAÑOL Know these safety symbols This “bolt of lightning” indicates uninsulated material within your unit may cause an electrical shock. For the safety of everyone in your household, please do not remove product covering. The “exclamation point” calls attention to features for which you should read the enclosed literature closely to prevent operating and maintenance problems. WARNING: To reduce the risk of fire or electric shock, this apparatus should not be exposed to rain or moisture and objects filled with liquids, such as vases, should not be placed on this apparatus. CAUTION: To prevent electric shock, match wide blade of plug to wide slot, fully insert. For Customer Use Enter below the Serial No. which is located on the rear of the cabinet. Retain this information for future reference. Model No._______________________ Serial No. _______________________ Congratulations on your purchase, and welcome to the “family!” Dear PHILIPS product owner: Thank you for your confidence in PHILIPS. We’ll do everything in our power to keep you happy with your purchase for many years to come. CAUTION RISK OF ELECTRIC SHOCK DO NOT OPEN CAUTION: TO REDUCE THE RISK OF ELECTRIC SHOCK, DO NOT REMOVE COVER (OR BACK). NO USER-SERVICEABLE PARTS INSIDE. REFER SERVICING TO QUALIFIED SERVICE PERSONNEL. Welcome EN-2 ENGLISH FRANÇAISE ESPAÑOL Important safety instructions 1. Read before operating equipment Read and keep these instructions. Heed all warnings. Follow all instructions. Do not insert any strange object into the ventilation slots. This might lead to damage of the TV. Do not use this apparatus near water. Clean only with a dry cloth. Do not block any of the ventilation openings. Install in accordance with the manufacturers instructions. Do not install near any heat sources such as radiators, heat registers, stoves, or other apparatus (including amplifiers) that produce heat. Do not defeat the safety purpose of the polarized or grounding-type plug. A polarized plug has two blades with one wider than the other. A grounding type plug has two blades and third grounding prong. The wide blade or third prong are provided for your safety. When the provided plug does not fit into your outlet, consult an electrician for replacement of the obsolete outlet. Protect the power cord from being walked on or pinched particularly at plugs, convenience receptacles, and the point where they exit from the apparatus. Only use attachments/accessories specified by the manufacturer. Use only with a cart, stand, tripod, bracket, or table specified by the manufacturer, or sold with the apparatus. When a cart is used, use caution when moving the cart/apparatus combination to avoid injury from tip-over. Unplug this apparatus during lightning storms or when unused for long periods of time. Refer all servicing to qualified service personnel. Servicing is required when the apparatus has been damaged in any way, such as power-supply cord or plug is damaged, liquid has been spilled or objects have fallen into apparatus, the apparatus has been exposed to rain or moisture, does not operate normally, or has been dropped. This product may contain lead or mercury. Disposal of these materials may be regulated due to environmental considerations. For disposal or recycling information, please contact your local authorities or the Electronic Industries Alliance:www.eiae.org. Damage Requiring Service - The appliance should be serviced by qualified service personnel when: A. The power supply cord or the plug has been damaged; B. Objects have fallen, or liquid has been spilled into the appliance; C. The appliance has been exposed to rain D. The appliance does not appear to operate normally or exhibits a marked change in performance; E. The appliance has been dropped, or the enclosure damaged. Tilt/Stability - All televisions must comply with recommended international global safety standards for tilt and stability properties of its cabinet design. • Do not compromise these design standards by applying excessive pull force to the front, or top, of the cabinet which could ultimately overturn the product. • Also, do not endanger yourself, or children, by placing electronic equipment/toys on the top of the cabinet. Such items could unsuspectingly fall from the top of the set and cause product damage and/or personal injury. Wall or Ceiling Mounting - The appliance should be mounted to a wall or ceiling only as recommended by the manufacturer. Power Lines - An outdoor antenna should be located away from power lines. Outdoor Antenna Grounding - If an outside antenna is connected to the receiver, be sure the antenna system is grounded so as to provide some protection against voltage surges and built up static charges. Object and Liquid Entry - Care should be taken so that objects do not fall and liquids are not spilled into the enclosure through openings. Battery Usage CAUTION - To prevent battery leakage that may result in bodily injury, property damage, or damage to the unit: Install all batteries correctly, with + and - aligned as • marked on the unit. Do not mix batteries (old and new or carbon and • alkaline, etc.). Remove batteries when the unit is not used for a long • time. For ventilation, leave at least 4” to 6” free all around the TV. Do not place the TV on a carpet. The equipment shall not be exposed to dripping or splash- ing. The equipment shall not be exposed to rain or moisture and objects filled with liquids, such as vases, shall be placed on the apparatus. The apparatus must be connected to a mains socket outlet with a protected earthed connection. The appliance coupler is used as the disconnect device of this apparatus, the disconnect device shall remain readily operable. 1. 2. 3. 4. 5. 6. 7. 8. 9. 10. 11. 12. 13. 14. 15. 16. 17. 18. 19. 20. 21. 22. 23. 24. 25. 26. 27. EN-3 2008 © Koninklijke Philips Electronics N.V. All rights reserved. Specifications are subject to change without notice. Trademarks are the property of Koninklijke Philips Electronics N.V. or their respective owners. Philips reserves the right to change products at any time without being obliged to adjust earlier supplies accordingly. The material in this manual is believed adequate for the intended use of the system. If the product, or its individual modules or procedures, are used for purposes other than those specified herein, confirmation of their validity and suitability must be obtained. Philips warrants that the material itself does not infringe any United States patents. No further warranty is expressed or implied. Philips can’t be held responsible neither for any errors in the content of this document nor for any problems as a result of the content in this document. Errors reported to Philips will be adapted and published on the Philips support website as soon as possible. Pixel characteristics The LCD panel has a high number of colour pixels. Although it has effective pixels of 99.999% or more. Black dots or bright points of light (red, green or blue) may appear constantly on the screen. This is a structural property of display (within common industrial standard ) and is not a malfunction. This does not affect the performance of the product. Safety symbols Know these safety symbols: CAUTION RISK OF ELECTRIC SHOCK DO NOT OPEN CAUTION: TO REDUCE THE RISK OF ELECTRIC SHOCK, DO NOT REMOVE COVER (OR BACK). NO USER-SERVICEABLE PARTS INSIDE. REFER SERVICING TO QUALIFIED SERVICE PERSONNEL. This “bolt of lightning” indicates uninsulated material within your unit may cause an electrical shock. For the safety of everyone in your household, please do not remove product covering. The “exclamation point” calls attention to features for which you should read the enclosed literature closely to prevent operating and maintenance problems. If the TV is mounted on a swivel base or swivel arm, ensure no strain is placed on the power cord when the TV is swivelled. Strain on the power cord can loosen connections. This may cause arcing and result in fire. EN-4 ENGLISH FRANÇAISE ESPAÑOL Table of contents 1. Important safety instructions . . . . . . . . . 2 2. Important . . . . . . . . . . . . . . . . . . . . . . . . . 5 2.1 Product information. . . . . . . . . . . . . . . . . . . . . . . 5 2.2 Screen care. . . . . . . . . . . . . . . . . . . . . . . . . . . . . . 5 2.3 Environmental care. . . . . . . . . . . . . . . . . . . . . . . . 5 2.4 Regulatory notices . . . . . . . . . . . . . . . . . . . . . . . . 5 3. Your TV . . . . . . . . . . . . . . . . . . . . . . . . . . . 6 3.1 TV overview. . . . . . . . . . . . . . . . . . . . . . . . . . . . . 6 3.2 Remote control . . . . . . . . . . . . . . . . . . . . . . . . . . 6 4. Get started . . . . . . . . . . . . . . . . . . . . . . . . 7 4.1 Position the TV. . . . . . . . . . . . . . . . . . . . . . . . . . . 7 4.2 Wall mount the TV. . . . . . . . . . . . . . . . . . . . . . . . 7 4.3 Install the remote control batteries . . . . . . . . . . 8 4.4 Connect the antenna or cable. . . . . . . . . . . . . . . 8 4.5 Switch on the TV . . . . . . . . . . . . . . . . . . . . . . . . . 9 5. Use your TV . . . . . . . . . . . . . . . . . . . . . . 10 5.1 Switch your TV on/off or to standby. . . . . . . . . 10 5.2 Watch TV . . . . . . . . . . . . . . . . . . . . . . . . . . . . . . 10 5.3 Watch channels from a cable receiver box. . . . 11 5.4 Watch a DVD. . . . . . . . . . . . . . . . . . . . . . . . . . . 11 6. Use more of your TV . . . . . . . . . . . . . . . 12 6.1 Remote control overview . . . . . . . . . . . . . . . . . 12 6.2 Use teletext of the remote control. . . . . . . . . . 12 6.3 Use install menu. . . . . . . . . . . . . . . . . . . . . . . . . 13 6.4 Change picture and sound settings . . . . . . . . . . 14 6.5 Use Smart mode . . . . . . . . . . . . . . . . . . . . . . . . 14 6.6 Set the clock . . . . . . . . . . . . . . . . . . . . . . . . . . . 16 6.7 Set the sleeptimer . . . . . . . . . . . . . . . . . . . . . . . 16 6.8 Reduce the NR. . . . . . . . . . . . . . . . . . . . . . . . . . 17 6.9 Adjust the skin tone. . . . . . . . . . . . . . . . . . . . . . 17 6.10 Use auto lock. . . . . . . . . . . . . . . . . . . . . . . . . . . 17 6.11 Use your TV as a PC monitor . . . . . . . . . . . . . . 18 6.12 Select your TV in PC mode . . . . . . . . . . . . . . . . 18 7. Connect devices . . . . . . . . . . . . . . . . . . . 19 7.1 Connection overview. . . . . . . . . . . . . . . . . . . . . 19 7.2 Select connection quality. . . . . . . . . . . . . . . . . . 20 7.3 Connect devices. . . . . . . . . . . . . . . . . . . . . . . . . 21 8. Glossary. . . . . . . . . . . . . . . . . . . . . . . . . . 23 9. Troubleshooting . . . . . . . . . . . . . . . . . . . 24 9.1 Technical specifications . . . . . . . . . . . . . . . . . . . 25 10. Index . . . . . . . . . . . . . . . . . . . . . . . . . . . . 26 EN-5 ENGLISH FRANÇAISE ESPAÑOL Important 2. Product information 2.1 The model and serial number are on the rear of the TV and on the packaging. This TV consumes minimal energy in standby mode to minimise environmental impact. The active power consumption is given on the type plate at the rear of the TV. Screen care 2.2 Turn off and unplug the AC power cord before • cleaning the screen. Clean the screen with a soft, dry cloth. Do not • use substances such as household cleaning agents as these may damage the screen. To avoid deformations or color fading, wipe off • water droplets as soon as possible. Do not touch, push, rub or strike the screen • with hard objects as this may damage the screen permanently. Where possible, avoid stationary images that • remain on-screen for extended periods of time. If you must use stationary images, reduce the screen contrast and brightness to avoid screen damage. Environmental care 2.3 End of life directives - Recycling Philips has paid a lot of attention to producing an environmentally friendly product. Your new TV contains several materials that can be recycled for new uses. At the end of its life, specialized companies can dismantle and recycle this set. This will minimize the amount of materials being disposed of. Please be sure to dispose of this set in accordance with all state and local regulations. Recycling your packaging The packaging of this product is intended to be recycled. Contact your local authorities for information on how to recycle the packaging. Disposing used batteries The supplied batteries do not contain mercury or cadmium. Dispose supplied and all other used batteries according to your local regulations. Power consumption The TV consumes minimal energy in standby mode to minimise environmental impact. Active power consumption is displayed at the back of the TV. Regulatory notices 2.4 WARNING B To reduce the risk of fire or electric shock, this apparatus should not be exposed to rain or moisture. Objects filled with liquids, such as vases, should not be placed on this apparatus. EN-6 ENGLISH FRANÇAISE ESPAÑOL Your 3. TV This section gives you an overview of commonly- used TV controls and functions. TV overview 3.1 Side controls and indicators POWER CHANNEL MENU VOLUME 1 2 4 3 POWER CHANNEL MENU VOLUME 5 POWER POWER 1. CHANNEL +/- 2. MENU 3. VOLUME +/- 4. Remote control sensor/ power indicator 5. Side connectors HDMI 2 HDMI 1 CVI 1 CVI 2 AUDIO IN VGA PC IN 75 Ω L-AUDIO OUT-R Use the TV side connectors to connect to mobile devices such as a camera or game console. You can also connect to the headphone. Rear connectors HDMI 2 HDMI 1 CVI 1 CVI 2 AUDIO IN VGA PC IN 75 Ω L-AUDIO OUT-R Cable Use the TV rear connectors to connect to the antenna and permanent devices such as a high- definition disc player or DVD player. Note D For more information about connections, see Section 7 Connect devices. 3.2 Remote control 1 2 3 4 5 6 7 8 9 Standby / ON 1. SOURCE 2. selection C 3. olor buttons FORMAT 4. button C 5. ursor buttons Channel selection 6. Volume selection 7. MENU button 8. OK button 9. For more information about the remote control, See Remote control overview section. EN-7 ENGLISH FRANÇAISE ESPAÑOL Get started 4. This section describes how to position and connect your TV, and how to perform your first-time installation. 4.1 Position the TV WARNING B Do not insert the power plug into the wall • socket before all the connections are made. Large screen TVs are heavy. Two people are • required to carry and handle the TV. Wherever you decide to position your TV, ensure that you always have easy access to the AC power cord or plug to disconnect the TV from the power. If the TV is mounted on a swivel base or swivel arm, ensure no strain is placed on the AC power cord when the TV is swivelled. Strain on the AC power cord can loosen connections. This may cause arcing and result in fire. For ideal viewing conditions, position the TV where light does not fall directly on the screen. The ideal viewing distance for watching TV is three times its screen size. Kensington security slot Your TV is equipped with a Kensington Security Slot at the back of the TV. If you connect an anti-theft Kensington lock (not supplied), position the TV within reach of a permanent object that can be attached to the lock. 4.2 Wall mount the TV Warning B Wall mounting of the TV should only be performed by qualified installers. Koninklijke Philips Electronics N.V. Bears no responsibility for improper mounting that results in accident or injury. Step 1 Purchase a VESA-compatible wall bracket Depending on the size of your TV screen, purchase one of the following wall brackets: TV screen size (inches) VESA-compatible wall bracket type (millimeters) Screw type 32” 200 x 200mm Metric 6 x 10mm 37” 200 x 200mm Metric 6 x 10mm 42” 400 x 200mm Metric 6 x 10mm 47” 400 x 200mm Metric 6 x 10mm Step 2 Remove the TV stand Note D These instructions are only applicable to TV models with mounted stands. If your TV stand is not mounted, skip to Step 3 Connect cables. Carefully place the TV face down on a flat, stable 1. surface that is covered by soft cloth. The cloth should be thick enough to protect your screen. Using a cross-head screwdriver (not supplied), 2. unscrew the four bolts that secure the stand to the TV. EN-8 ENGLISH FRANÇAISE ESPAÑOL Install the remote control 4.3 batteries A A A A A A Open the battery cover on the back of the 1. remote control. Insert the 2 batteries supplied. Make sure the 2. + and - ends of the batteries line up correctly. (inside of case is marked). Close the cover. 3. Connect the antenna or cable 4.4 Connect to an antenna HDMI 2 HDMI 1 CVI 1 CVI 2 AUDIO IN VGA PC IN 75 Ω L-AUDIO OUT-R Locate the TV ANTENNA connector on the 1. back of the TV. Connect one end of an antenna cable (not 2. supplied) to the TV ANTENNA connectors. Use an adaptor if the antenna cable does not fit. Connect the other end of the antenna cable to 3. your antenna outlet, ensuring that the cable is tightly secured at both ends. Firmly pull the stand from the bottom of the 3. TV. Place both the stand and bolts in a secure location for future reinstallation. Step 3 Connect cables Connect the antenna cable, AC power cord and all other devices to the back of the TV as described in the following sections and in Section 7 Connect devices. Step 4 Secure the VESA-compatible wall bracket to the TV Warning B Only use the specified bolts (M6 x 10mm) to secure the VESA-compatible wall bracket to your TV. The specified bolts are designed to match the weight of your TV. Note D Depending on your VESA-compatible wall bracket, you may need to separate the mounting plate from the wall bracket for easier installation. Refer to your VESA-compatible wall bracket documentation for instructions. EN-9 ENGLISH FRANÇAISE ESPAÑOL Connect to a cable receiver box HDMI 2 HDMI 1 CVI 1 CVI 2 AUDIO IN VGA PC IN 75 Ω L-AUDIO OUT-R HDMI 2 HDMI 1 CVI 1 CVI 2 AUDIO IN VGA PC IN 75 Ω L-AUDIO OUT-R Cable Receiver Box ANTENNA Cable Receiver Box ANTENNA HDMI 1 HDMI 2 AUDIO IN PC IN VGA CVI 1 Pb Pr L R Y Pb Pr L R Y CVI 2 75 Ω L - AUDIO OUT - R A cable receiver box can be connected to the TV through the following connections: ANTENNA (75 • Ω) A/V (Composite Video and Audio) • S-Video and Audio • YPbPr (Component Video Input) • HDMI • Connect a cable receiver box through component video input or HDMI HDMI 2 HDMI 1 CVI 1 CVI 2 AUDIO IN VGA PC IN 75 Ω L-AUDIO OUT-R HDMI 2 HDMI 1 CVI 1 CVI 2 AUDIO IN VGA PC IN 75 Ω L-AUDIO OUT-R Cable Receiver Box ANTENNA Cable Receiver Box ANTENNA HDMI 1 HDMI 2 AUDIO IN PC IN VGA CVI 1 Pb Pr L R Y Pb Pr L R Y CVI 2 75 Ω L - AUDIO OUT - R Connect the AC power cord Warning B Verify that your voltage corresponds with the voltage printed at the back of the TV. Do not insert the AC power cord if the voltage is different. To connect the AC power cord AC IN AC IN HDMI 1 HDMI 2 Locate the power connector at the back of the 1. TV. The location of the power connector varies according to TV model. Insert the AC power cord fully into the TV 2. power connector. Connect the AC power cord plug to the power 3. outlet. Ensuring that the cord is tightly secured at both ends. 4.5 Switch on the TV Before you switch on the TV, check that the mains cord is properly connected. Press POWER button at the side of the TV, or press power button on the remote control. The TV normally takes 10-15 seconds to start up and the following screen appears the first time you turn on the TV. POWER CHANNEL MENU VOLUME 1 2 4 3 POWER CHANNEL MENU VOLUME 5 POWER EN-10 ENGLISH FRANÇAISE ESPAÑOL Use your TV 5. This section helps you perform basic TV operations. Switch your TV on/off or to standby 5.1 To Switch the TV on If the standby indicator is off, press • . POWER at the side of the TV. If the standby indicator is on, press • . on the remote control. POWER CHANNEL MENU VOLUME 1 2 POWER CHANNEL 5 POWER To Switch to standby Press • . on the remote control. To switch on from standby without the remote control. Press • . POWER at the side of the TV to switch the TV off. Press • . POWER again to switch the TV on. To switch off Press • . POWER at the side of the TV. 5.2 Watch TV Switch channels Press a number (1 to 9) or press • CH +/- on your remote control. Press • A/CH to return to the previously viewed TV channel. Note D You can also switch channels by pressing CHANNEL +/- at the side of the TV. Adjust volume Press • VOL+/- on your remote control. Press • MUTE on your remote control to mute the sound. Press MUTE again or press VOL+/- to restore the sound. Note D You can also switch volume by pressing VOLUME +/- at the side of the TV. EN-11 ENGLISH FRANÇAISE ESPAÑOL Watch channels from a cable receiver 5.3 box Switch on the cable receiver box. 1. The picture from your cable receiver box might appear automatically on your screen. Use the remote control of your cable receiver 2. box to select channels. If the picture does not appear Press 1. SOURCE repeatedly to select the connected cable receiver box and wait a few seconds for the picture to appear. Press 2. OK. Use the remote control of your cable receiver 3. box to select channels. Watch a DVD 5.4 Insert a DVD disc in your player. 1. Press 2. Play > on the remote control of your player. The picture from the player might appear automatically on your screen. If the picture does not appear Press 1. SOURCE repeatedly to select the correct source and wait a few seconds for the picture to appear. Press 2. OK. EN-12 ENGLISH FRANÇAISE ESPAÑOL Use more of your TV 6. This section describes the advanced features of your TV. Remote control 6.1 overview 1 16 15 14 13 12 11 10 2 3 4 5 6 7 8 9 . 1. POWER Switches the TV on from standby or back to standby. SOURCE 2. Selects connected devices. DUALI-II 3. Selects Mono, Stereo, Dual I, Dual II, Nicam Mono, Nicam Stereo, Nicam Dual I, Nicam Dual II. Note D The sound mode selections depend on TV program and broadcast TV channel of that region. FORMAT 4. Selects a picture format. See Change Picture format section. CURSOR BUTTONS 5. Î ï Í Æ To navigate through the menus. SMART MODE 6. Selects a picture setting. CH +/- 7. Switches to the next or previous channel. NUMBER BUTTONS 8. Selects a channel, page or setting. A/CH 9. Returns to the previously-viewed channel. STATUS/EXIT 10. Displays programme information, if available. VOL +/- 11. Increases or decreases volume. MUTE 12. Mutes or restores sound. MENU 13. Toggles the menu on or off. OK 14. Press to activate a setting. INCR. SURR 15. Adds greater depth and dimension to the TV sound. SLEEP 16. Sets the TV to turn itself off within a certain time. Use teletext of the remote control 6.2 1. Teletext on/off 2. Teletext hold Freezes the teletext page. 3. Teletext reveal/conceal Toggles between conceal and reveal mode. 4. Teletext enlarge Enlarges context to two times larger. 5. These four color buttons allow you to access the item or the page indicated by corresponding color in teletext. Note D Teletext is only available in some of the Asia Pacific TV systems. EN-13 ENGLISH FRANÇAISE ESPAÑOL Use install menu 6.3 This section describe how to set the language and store the channel of the TV. Press 1. MENU on the remote control to display the main menu. Press 2. Î or ï to select Install and press Æ to enter it. Press 3. Î or ï to highlight the item you want to adjust and press Æ to confirm the change. Press 4. MENU to exit. Main control Install Auto store Manual store Channel setting Factory reset Sound Features Picture Language Install Summary of install settings Language • - Select a language of your interface. Auto store • - Automatically sets up the TV for the broadcast or cable channels available in your area. Note D Immediately after unpacking and plugging in your new television, run the auto store function to set up the TV for the broadcast or cable channels available in your area. If you do not run the auto store function to set up the channels, your television may not operate properly. After you have run auto store, check out the results. Press CH +/- on the remote control and see which channels you can select. Remember, an antenna or cable TV signal must first be connected to your TV. Manual store • - Manual store: • Activates auto search channel frequency or press number keys to show your desired channel frequency. Prog. no: • Use Î or ï to adjust the channel number in the manual store menu. Finetune: • Manually fine tunes analogue channels when reception is poor. Store: • Stores or sets the setting of manual store menu. Channel setting • - Channel edit: • Sets up a favorite list of your own with preferred TV channels. Channel swap: • Exchange the channel. Toggle between From, To, and Exchange. Name edit: • Assigns or changes a channel name to a channel for which a name has not yet been used. Press 1. Î or ï to edit name and press Æ to move to the next character. Press 2. Í to confirm the first character and press Æ to confirm the last character. Press 3. Æ to confirm the name. Channel sort: • Sorts or groups channels. Factory reset • - Allows you to reset most of the picture and sound settings to their default factory levels. Select No or Yes. Note D If you reset the TV to the factory settings, all your present setting on picture, sound, and other feature settings will be erased and replaced by the manufacture’s default settings. However, your auto lock access code will not be erased. EN-14 ENGLISH FRANÇAISE ESPAÑOL Change picture and sound settings 6.4 Change picture settings This section describes how to adjust your picture settings. Press 1. MENU on the remote control. Press 2. ï or Æ to select the Picture menu. Press 3. Î or ï to select the one of the picture settings, and press Æ to enter the setting. Press 4. Î or ï to adjust the setting, and press OK to confirm the change. Press 5. Menu to exit. Main control Picture Sound Features Install Brightness Color Sharpness Tint Color temp Picture format Contrast Picture Smart mode Summary of picture settings The following picture settings can be configured. Depending on the format of the picture source, some picture settings might not be available. Smart mode • - Displays a list of predefined picture and sound setting. Contrast • - Sets the level of white in the picture. • Brightness - Sets the brightness of the picture. Color • - Sets the level of saturation. Sharpness • - Sets the sharpness of fine details. Tint • - Adjusts the color balance between red and green. Color temp • - Sets the color temperature to normal, warm or cool. Picture format • - Changes the format of the picture. Use 6.5 Smart mode Press 1. SMART MODE on the remote control to set your TV to a predefined picture and sound setting. Press 2. Î or ï to select one of the following settings: Personal • - The customized settings you defined by using the Picture menu. Vivid • - Vivid picture settings and clear sound for high action. Standard • - For normal TV viewing. Movie • - Brilliant picture settings for a cinematic experience. Game • - Optimized for PCs, games consoles and play stations. Power saver • - Eco friendly settings for lower power consumption. EN-15 ENGLISH FRANÇAISE ESPAÑOL Change picture format Press 1. FORMAT on the remote control to enter the Picture format menu. Press 2. Î or ï to select a picture format. Super zoom • Removes the black bars on the side of 4:3 broadcasts with minimal distortion. 4:3 • Displays the classic 4:3 format. Movie expand 14:9 • Scales the classic 4:3 format to 14:9. Movie expand 16:9 • Scales the classic 4:3 format to 16:9. 16:9 subtitle • Display 4:3 pictures using the full surface of the screen leaving the subtitles visible. Wide screen • Stretches the classic 4:3 format to 16:9. Note D Any adjustment of brightness, color, contrast • of sharpness will be stored into personal at smart mode section. For 720p/1080i/1080p, the default picture • format will be Wide screen at HD and HDMI modes. And the picture format function will not be accessible. For PC mode, the default picture format will • be Full screen and picture format function can be accessible 4:3 and Full screen. EN-16 ENGLISH FRANÇAISE ESPAÑOL Adjust sound settings This section describes how to adjust sound settings. Press 1. MENU on the remote control and press ï to select Sound. Main control Sound Incredible surround AVL Features Install Picture Equalizer Sound Press 2. Æ to enter the list. Press 3. Î or ï to select one of the following settings: Summary of sound settings Equalizer - • Changes the audio frequencies with different central frequencies to create a completely new and different sound depending on your favorite. Incredible surround • - Allows you to select the modes for more spatial or surround sound reproduction dependent on the broadcasted signals or signals from external inputs received. Select On or Off. AVL (Automatic volume leveling) • - Reduces sudden volume changes, for example, during commercials or when switching from one channel to another. Select On or Off. Set the clock 6.6 This section describes how to set the time. Press 1. MENU on the remote control and select Features > Clock. Clock Main control I Features Timer Start time Stop time Sleep timer Clock : AM -- -- Press 2. Æ to enter the list. Press 3. Î or ï to set the time. (hour/minute/AM or PM) Press 4. OK to confirm. Set the 6.7 sleeptimer Sleeptimer switches the TV to standby after a defined period of time. Press 1. MENU on the remote control and select Features > Sleeptimer. Sleeptimer Main control I Features Timer Start time Stop time Clock Sleep timer Press 2. Æ to enter the Sleeptimer bar. Press 3. Î or ï to set the sleep time from zero to 180 minutes. If set to zero minute, the Sleeptimer is switched off. Press 4. OK to activate the Sleeptimer or press sleep button on the remote control. EN-17 ENGLISH FRANÇAISE ESPAÑOL Reduce the 6.8 NR This section describes how to filter out and reduce the image noise and improves picture quality when receiving weak video signals. Press 1. MENU on the remote control and select Features > NR. Main control Features Timer Source list On Off Auto lock Skin tone NR NR Press 2. Æ to enter the list. Press 3. Î or ï to select on or off. Press 4. MENU to exit. Adjust the skin tone 6.9 This section describes how to adjust the complexion. Press 1. MENU on the remote control and select Features > Skin tone. Main control Features Timer NR Source list Bright Normal Rich Auto lock Skin tone Skin tone Press 2. Æ to enter the list. Press 3. Î or ï to select bright, normal or rich. Press 4. MENU to exit. Use 6.10 auto lock Lock TV channels and prevent your children from watching unsuitable content of programmes. Set or change your PIN Press 1. MENU on the remote control and select Features > Auto lock. Auto lock Change code Clear all Main control Features Lock program Main control Features Timer NR Source list Access code Auto lock Skin tone Timer NR Source list Auto lock Skin tone Press 2. Æ to enter. Enter a 4-digit PIN with the number buttons on 3. the remote control. If you have a PIN, enter your current PIN. • If you do not have a PIN, enter the default • code 0000. If you have lost your PIN, enter master code • 0711. Press 4. MENU to exit. EN-18 ENGLISH FRANÇAISE ESPAÑOL To lock program After your personal access code has been set, you are ready to select the channels or inputs you want to block out or censor. Press 1. MENU on the remote control and select Features > Auto lock > Lock program. Auto lock Change code Clear all Main control Features Lock program Main control Features Timer NR Source list Access code Auto lock Skin tone Timer NR Source list Auto lock Skin tone Press 2. Æ to enter. Use the number buttons to enter the channel 3. which you are going to block or press Î or ï to block the current channel. Press 4. MENU to exit. Note D You can block additional channels by using the 1. number buttons to jump to another channel. Remember that 0000 is the default auto lock 2. code. If your access code has been changed by someone other than you (a child, for example) or you have forgotten the code, you can always get in by inputting the default code. Use your TV as a PC monitor 6.11 Using a VGA cable connects a PC to your TV as a PC monitor. Caution B Before you connect your PC, set the PC monitor refresh rate to 60Hz. Supported 6.11.1. screen resolutions The following screen resolutions are supported in PC mode: Resolution Refresh rate 640 x 480 800 x 600 1024 x 768 1280 x 720 1280 x 768 1360 x 768 1280 x 1024 60Hz 60Hz 60Hz 60Hz 60Hz 60Hz 60Hz Tip E 1360 x 768 is recommended resolution. Select your TV in PC mode 6.12 Press 1. MENU on the remote control and select Features > Source list. Select 2. PC and press OK to confirm your choice. If necessary, adjust the picture settings as 3. described in Change picture settings section. Press 4. MENU to exit. Tip E Set the picture format to Full screen or 4:3 in PC mode. EN-19 ENGLISH FRANÇAISE ESPAÑOL Connect devices 7. 7.1 Connection overview HDMI 1 HDMI 2 AUDIO IN PC IN VGA AV 1 Y Pr L R Pb AV 2 Y Pr L R Pb 75 Ω L - AUDIO OUT - R VIDEO IN S-VIDEO L - AUDIO - R HDMI 1 HDMI 2 AUDIO IN PC IN VGA CVI 1 Pb Pr L R Y Pb Pr L R Y CVI 2 75 Ω L - AUDIO OUT - R VIDEO IN S-VIDEO L - AUDIO - R SIDE AV 1 2 3 4 6 7 8 9 5 Rear connectors HDMI 1/HDMI 2 1. HDMI input connectors for DVD players, digital receivers, game consoles and other high- definition devices. PC IN 2. VGA, Audio connectors for PC. CVI 1/CVI 2 3. Component video input (Y Pb Pr) and Audio L/R connectors for DVD, digital receiver or game console, etc. AUDIO OUT L/R 4. Sound output cinch connectors for home theatre or other audio systems. Antenna input / 75 5. Ω Side connectors Headphones 6. Stereo Mini Jack. AUDIO L/R 7. Audio L/R input connectors for composite and S-Video devices. VIDEO IN 8. Video input cinch connector for composite devices. S-VIDEO 9. S-Video input connector for S-Video devices. EN-20 ENGLISH FRANÇAISE ESPAÑOL Select connection quality 7.2 This section describes how you can enhance your audio visual experience by connecting your devices with the best possible connectors. HDMI - Highest quality 7.2.1. HDMI produces the best audio visual quality possible. Both audio and video signals are combined in one HDMI cable, providing an uncompressed, digital interface between your TV and HDMI devices. You must use HDMI to experience full high-definition video. Component video red, gree, blue Audio L/R red, white S-video HDMI Tip E If the device only with a DVI connector, use a DVI-HDMI adaptor to connect your device to a HDMI connector at the back of the TV. You must connect a separate audio cable from the device to the AUDIO L/R at SIDE AV. Component (Y Pb Pr) - High quality 7.2.2. Component (Y Pb Pr) video provides better picture quality than S-Video or composite video connections. Though component video supports high-definition signals, picture quality is lower than HDMI and is analogue. Also, connect a Audio L/R cable to the red and white Audio L/R input connectors at CVI 1/ CVI 2. Component video red, gree, blue Audio L/R red, white S-video Composite audio/video yellow, red, white Component video red, gree, blue Audio L/R red, white S-video Composite audio/video yellow, red, white Component video cable -Red, Green, Blue Audio L/R cable -Red, White S-Video - Good quality 7.2.3. An analogue connection, S-Video provides better picture quality than composite video. When connecting your device with S-Video, plug the S-Video cable to the S-Video connector on the side of the TV. You must connect a separate Audio L/R cable from the device to the red and white Audio L/R connectors on the side of the TV. Component video red, gree, blue Audio L/R red, white S-video Composite audio/video yellow, red, white Component video red, gree, blue Audio L/R red, white S-vid HDMI S-Video Audio L/R cable -Red, White Composite - Basic quality 7.2.4. Composite video provides basic analogue connectivity, usually combining a (yellow) video cinch cable with (red and white) Audio L/R cinch cable. Match the cable colors when connecting to the composite Video and Audio L/R input connectors on the side of the TV. omponent video ed, gree, blue Audio L/R red, white S-video Composite audio/video yellow, red, white Composite audio/video cable -Yellow, Red, White EN-21 ENGLISH FRANÇAISE ESPAÑOL Connect devices 7.3 This section describes how to connect a selection of devices with different connectors. Note that different types of connectors may be used to connect a device to your TV. The following sections describe examples only, other configurations are possible. When connecting composite or component cables, match the cable colors to the connectors on the TV. Caution C Disconnect the AC power cord before connecting devices. Note D Different types of connectors may be used to connect a device to your TV depending on availability and your needs. Connect a cable receiver box with RF In/ Outputs antenna TV Cable Receiver Box TV CABLE IN TO TV AUDIO OUT L R VIDEO OUT S-VIDEO A Pb Pr L R Y CVI 2 75 Ω L - AUDIO OUT - R Cable TV signal B OR Connect a cable receiver box with Audio/ Video output Cable TV signal Cable Receiver Box A C TV CABLE IN AUDIO OUT L R VIDEO OUT S-VIDEO B VIDEO IN S-VIDEO L - AUDIO - R SIDE AV Connect VCR, DVD player, or other devices with RCA connectors AV Player with A/V Connectors TV AUDIO OUT L R VIDEO OUT S-VIDEO B A VIDEO IN S-VIDEO L - AUDIO - R SIDE AV EN-22 ENGLISH FRANÇAISE ESPAÑOL Connect DVD player or other video devices with component video connectors HDMI 1 HDMI 2 AUDIO IN PC IN VGA CVI 1 Pb Pr L R Y Pb Pr L R Y CVI 2 75 Ω L - AUDIO OUT - R Accessory Device Equipped with Component Video Outputs TV Y Pb Pr L-AUDIO-R A B Connect DVD player with a HDMI connector HDMI 1 HDMI 2 AUDIO IN PC IN VGA CVI 1 Pb Pr L R Y Pb Pr L R Y CVI 2 75 Ω L - AUDIO OUT - R DVD Player TV A Connect PC (monitor) with a VGA connector HDMI 1 HDMI 2 AUDIO IN PC IN VGA CVI 1 Pb Pr L R Y Pb Pr L R Y CVI 2 75 Ω L - AUDIO OUT - R Computer TV A B EN-23 ENGLISH FRANÇAISE ESPAÑOL Glossary 8. Aspect Ratio The ratio between the width and height of the TV picture on the screen. In a normal TV set the aspect ratio is 4 to 3 (4:3). The new aspect ratio in HDTV is 16:9 which resembles the aspect ratio in a movie theatre (Widescreen). New TV systems support both 4:3 and 16:9 aspect ratio and can automatically switch between them. Audio Video (A/V) A term often used when discussing a channel on a TV receiver or on video equipment, which has been especially designed to accept VCR audio-video signals. This channel automatically activates special circuitry within the TV set to prevent picture distortion and skewing. It is also used for audio-video processors, which handle both types of signals. CVBS Composite Video Baseband Signal. In broadcast television this refers to the video signal, including the color information and syncs. Component Video Input (Y Pb Pr) Component Video Input is a type of connection that uses a cinch-type connector to allow cable receiver boxes or analog DVD players to connect a signal to the TV. By offering the cinch-type input (YPbPr) the primary colors, red, green and blue are connected from a cable receiver box directly into the TV allowing for the signal to display on the screen. HDTV The generally agreed upon definition of HDTV is approximately twice the vertical and horizontal picture resolution of today’s NTSC TV, which essentially makes the picture twice as sharp. HDTV also has a screen ratio of 16:9 as compared with most of today’s TV screens, which have a screen ratio of 4:3. HDTV offers reduced motion artifacts (i.e. ghosting, dot crawl), and offers 5.1 independent channels of CD-quality stereo surround sound, (also referred to as AC-3). Progressive Scan In Progressive Scanning all the horizontal scan lines are scanned on to the screen at one time. The Digital TV and HDTV Standards accept both Interlaced Scan and Progressive Scan broadcast and display methods. Resolution Resolution: A measurement of the finest (smallest) detail that is visible in a video image. TV Resolutions may be expressed as number of pixels in an image; or more commonly, As Total Number of (horizontally scanned) Lines used to create the image. Standard Digital TV Resolutions: SDTV: 576i - The picture is 704x576 pixels, 576p - The picture is 720x576 pixels. HDTV: 720p - The picture is 1280x720 pixels, 1080i - The picture is 1920x1080 pixels. 1080p - The picture is 1920 x 1080 pixles. SPDIF SPDIF (Sony and Philips Digital Interconnect Format) is highly recommended for high quality digital sound output. Note D SPDIF only supports at HDMI source. EN-24 ENGLISH FRANÇAISE ESPAÑOL 9. Troubleshooting Symptoms Possible cause What should you do No power or indicator light. The TV is not connected to the power. 1. Press POWER at the side of the TV, or press . on the remote control. 2. Ensure the AC power cord is connected tightly to the TV power connector and to the power socket outlet. 3. Remove the AC power cord from the power socket outlet, wait 60 seconds and reconnect the AC power cord. 4. Connect the TV to a different power socket outlet. Error message on the screen with HDMI connection. HDCP authentication fail. 1. Ensure that your HDMI cable is certified. 2. Press SOURCE button on the remote control to switch to another source and then switch back to the HDMI source. 3. Reset the accessory device and the TV. Turn on the TV Select the HDMI channel Turn on the accessory device 4. While the TV and the accessory device are powered on, unplug either end of the HDMI cable and then reinsert the cable. No sound is detected from the PC. Audio cable is not connected. 1. Connect an audio cable to the PC AUDIO IN port on the TV. 2. Press SOURCE button on the remote control, and select the PC source. TV does not respond to the remote control. Batteries are installed incorrectly, or low battery power. 1. Ensure the indicator light on the TV blinks when the remote control buttons are pressed. 2. Ensure that you are using the remote control supplied with the TV. 3. Ensure that the batteries of the remote control are inserted according to the illustration on the remote control and that the batteries do not need to be replaced. 4. Remove the AC power cord from the power socket outlet, wait 60 seconds and reconnect the AC power cord. The picture is distorted. It is stretched out, has short, fat, black bars on the side or top. Broadcast video format. 1. Press the FORMAT button on the remote control to select the best picture format. 2. For some accessory devices, the picture format has to be set in the accessory device. The picture is mostly red and green, or the picture is missing red when the TV is connected to an accessory device via component cables. Insecure/incorrect connection. 1. Ensure all the connections are made according to the color code. 2. Push the component cables all the way into the YPbPr sockets on the TV. No sound on the TV loudspeaker. Volume level is set to zero. 1. Increase the volume. Sound is muted. 2. Press MUTE button on the remote control. Headphones are connected. 3. Ensure the headphones are not plugged into the TV. Audio cable is not connected. 4. For AV connection, ensure that the Audio L/R cable is connected as described in Connect devices section. If you are using a component cable, ensure that you have not crossed the red audio cable with the red video cable. Accessory device audio output setting is incorrect. 5. For HDMI connections, some accessory devices have an HDMI audio output setting that must be turned on for HDMI to HDMI connections. Bad picture quality with a coaxial connection. Standard definition channels are not as clear as high definition channels. 1. Connect the devices via component or HDMI cables. No picture or sound. Incorrect channel 1. Ensure you have selected the correct channel. Incomplete channel installation. 1. If the TV receives channels via an AV connection, set the TV to the correct source input. 2. If the TV is connected directly to the wall via a coaxial connection, perform the Auto store again. EN-25 ENGLISH FRANÇAISE ESPAÑOL 9.1 Technical specifications Model no. 32PFL3403 32HFL3330 37PFL3403 37HFL3330 42PFL3403 47PFL3403 PICTURE/DISPLAY Aspect Ratio 16:9 Resolution 1366 x 768p SOUND ENHANCEMENT Sound Output (RMS Watts) 5W x 2 10W x 2 Sound Mode Mono, Stereo, Incredible surround EASE OF USE Video Formats Super zoom, 4:3, Movie expand 14:9, Movie expand 16:9, 16:9 subtitle, Widescreen Smart Mode Personal, Vivid, Standard, Movie, Game, Power saver CONNECTIONS Rear Connectors CVI 1/CVI 2: Component video input + Audio L/R (support 480i/p, 576i/p, 720p, 1080i/p) HDMI 1/HDMI 2 (Ver 1.3a HDMI, support video: 480i/p, 576i/p, 720p, 1080i/p) AUDIO L/R output PC IN: VGA, PC Audio IN Side Connectors Headphone x 1 Composite video input + Audio L/R S-Video WEIGHT & DIMENSIONS Product Weight (without stand) 11kg 14.8kg 18.1kg 24.9kg Product Weight (with stand) 14kg 19.3kg 22.6kg 31.5kg Product Weight (incl. packaging) 16.7kg 22.6kg 22.1kg 29.4kg Product Dimension (without stand) (H x W x D) 543 x 809 x 92mm 611 x 929 x 99mm 667 x 1033 x 92mm 733 x 1150 x 104mm Product Dimension (with stand) (H x W x D) 593 x 809 x 220mm 666 x 929 x 262mm 721 x 1033 x 262mm 793 x 1150 x 310mm Box Dimension (L x W x H) 1025 x 250 x 662mm 1156 x 266 x 739mm 1256 x 270 x 795mm 1378 x 280 x 866mm POWER Power Consumption 150W 180W 220W 300W Standby Power Consumption < 0.3 W Mains Power 100-240V, 60-50Hz EN-26 ENGLISH FRANÇAISE ESPAÑOL Index 10. A AC power cord 9 Antenna 8 Auto lock 17 B Batteries 8 Brightness 14 C Cable 8 Care Environment 5 Screen 5 Channel Install 13 Clock 16 Color temp 14 Contrast 14 L lock program 18 N NR 17 O Overview Connection 19 Remote control 12 TV 6 P PC mode 18 Picture format 15 PIN code 17 Position the TV 7 R Rear connectors 19 Recycling 5 Remote control 6 S Screen resolutions 18 Sharpness 14 Side connectors 19 Skin tone 17 Sleeptimer 16 Smart mode 14 Switch on the TV 9 T Technical specifications 25 Tint 14 Troubleshooting 24 V Volume 10 W Wall mount 7 Watch TV 10 ZH-1 ZH 了解这些 安全符号 此“闪电”符号表示设备中的非绝缘材 料可能会导致触电。为了您家中每个人 的安全,请勿卸下产品外盖。 此“感叹号”提醒您注意一些功能,您 应当认真阅读随付的有关这些功能的文 字资料,以防出现操作和维护问题。 警告:为了减小发生火灾和触电的风险,请勿将此 设备暴露在雨中或潮湿环境中,而且不要将盛有液 体的物品(例如花瓶)放在此设备上。 小心:为避免触电,请将插头的宽插片与宽插槽对 准,并将插头完全插入。 客户专用 请将机身背面的序列号填写在下方。 请保留此信息已备将来参考。 型号 _________________________ 序列号 _______________________ 恭喜您购买此产品, Philips“家族”向您表示欢迎! 尊敬的 PHILIPS 产品用户: 感谢您对 PHILIPS 的信任。我们将尽一切努力使 您长期对我们的产品感到满意。 CAUTION RISK OF ELECTRIC SHOCK DO NOT OPEN CAUTION: TO REDUCE THE RISK OF ELECTRIC SHOCK, DO NOT REMOVE COVER (OR BACK). NO USER-SERVICEABLE PARTS INSIDE. REFER SERVICING TO QUALIFIED SERVICE PERSONNEL. 欢迎 ZH-2 ZH 重要的安全说明 1 在操作设备前,请仔细阅读 阅读并遵守这些说明。 1. 注意所有警告。 2. 按照所有说明进行操作。 3. 请勿在通风槽中插入任何特异物品,否则可能导致电 4. 视机损坏。 请勿在有水的地方使用本设备。 5. 仅使用干布擦拭设备。 6. 请勿阻塞任何通风孔。 7. 请依照生产商的说明进行安装。 请勿安装在任何可能产生热量的热源附近,例如散热 8. 器、通风机、炉子或其他设备(包括放大器)。 应充分发挥极化插头或接地型插头的安全作用。极化 9. 插头有两个引脚,其中一个稍宽。接地型插头有两个 引脚和另一个接地端。极化插头的宽引脚或接地型插 头的接地端可为您提供安全保护。如果提供的插头 不适合您的电源插座,请向电气技师咨询以更换过 时的插座。 防止电源线被踩或受到挤压,特别是在插头、电源插 10. 座以及与设备的连接点等处。 仅使用生产商指定的附件/配件。 11. 12. 仅使用生产商指定或随设备一起出售的手推 车、支架、三角桌、托架或桌子。使用手推 车时,在推动手推车/设备时务必多加小心以 防止翻倒受伤。 在雷雨期间或长时间不使用设备时,请拔出设备插 13. 头。 仅向合格的维修人员寻求各项服务。无论设备受到何 14. 种形式的损坏都应进行维修,例如电源线或插头受 损、设备溅水或有物体掉入设备中、设备淋雨或受 潮、设备工作不正常或不慎摔落地上。 本产品可能含有铅或汞。出于环保考虑,对这些材料 15. 的处理应遵守法规限制。有关处理或回收信息, 请与当地主管部门或电子工业联盟联系,后者的网址 为:www.eiae.org。 需要进行维修的一些损坏情况 – 在以下情况下,设备 16. 需由合格的维修人员进行维修: A. 电源线或插头损坏; B. 物体掉入设备中,或设备溅水; C. 设备淋雨 D. 设备工作不正常或性能发生明显变化; E. 设备摔落地上或罩壳受损。 倾斜/稳定性 17. —所有电视机必须遵守建议的有关机柜设 计倾斜度和稳定性的国际性全球安全标准。 • 请勿违反这些设计标准,使用大力推(拉)机柜正 面或顶部,否则可能最终导致产品翻倒。 • 另外,请勿将电子设备/玩具放在机柜顶部,这可能 给您或儿童带来危险。毋庸置疑,这些物品可能从机 柜顶部坠落从而导致产品受损和/或人身伤害。 壁装或吊架安装 18. —仅可按照生产商建议的方法将设备 安装到墙壁或天花板上。 电线 19. —室外天线应远离电线。 室外天线接地 20. —如果室外天线连接到接收器,请确保 天线系统接地以提供针对电涌和累积静电的保护。 物体和液体进入 21. —应多加留意,以防止物体和液体通 过开孔掉入或溅入罩壳中。 电池使用注意事项 22. —为防止电池泄漏而导致人身伤 害、财产损失或设备损坏,请遵守以下规则: 正确安装所有电池,+ 极和 – 极与设备上的标 • 记一致。 不要混用电池(新旧电池,或碳质与碱性电池)。 • 长时间不使用设备时,应取出电池。 • 在电视机周围至少留出 4 至 6 英寸的空间以便通风。 23. 请勿将电视机放在地毯上。 请勿让设备淋雨或溅水。 24. 请勿将设备暴露在雨水或潮湿环境中,且不要将盛有 25. 液体的物品(如花瓶)放在设备上。 设备必须连接至具有保护接地连接的电源插座。 26. 连接器用作本设备的断开连接装置,断开连接装置应 27. 随时保持可用状态。 ZH-3 ZH 2008 © Koninklijke Philips Electronics N.V.。保留所有权利。 规格如有更改,恕不另行通知。 所有商标均是 Koninklijke Philips Electronics N.V. 或它们各自所有者 的财产。 Philips 保留随时更改产品的权 利,而且没有义务对较早前提供 的产品进行相应的调整。 本手册中的材料对于本系统的设 计用途来说已经足够。如果产 品或其单个模块或程序用于除 此处指定用途之外的其它目的, 则必须首先确认其有效性和适合 性。Philips 保证材料本身没有侵 犯任何美国专利。没有明示或暗 示任何其它保证。 对于本文档内容中的任何错误, 以及因本文档内容造成的任何问 题,Philips 概不负责。Philips 会尽 快地纠正用户报告的错误并将其 并公布在 Philips 支持网站上。 像素特性 此液晶面板具有很高的彩色像素 数配置。尽管其有效像素比率高 达 99.999% 或更高,但屏幕仍可 能出现持续的黑点或亮点(红 色、绿色或蓝色)。这是显示器 的结构属性(在通用行业标准之 内),不属于故障,不会影响产 品的性能。 安全符号 了解这些安全符号: CAUTION RISK OF ELECTRIC SHOCK DO NOT OPEN CAUTION: TO REDUCE THE RISK OF ELECTRIC SHOCK, DO NOT REMOVE COVER (OR BACK). NO USER-SERVICEABLE PARTS INSIDE. REFER SERVICING TO QUALIFIED SERVICE PERSONNEL. 此“闪电”符号表示设备中 的非绝缘材料可能会导致触 电。为了您家中每个人的安 全,请勿卸下产品外盖。 此“感叹号”提醒您注意 一些功能,您应当认真阅 读随付的有关这些功能的 文字资料,以防出现操作 和维护问题。 如果将电视机安装在旋转基座或旋转 臂上,请确保电视机旋转时电源线不 会绷紧。电源线绷紧会使电源连接变 松。这会产生火花并导致起火。 ZH-4 ZH ZH-5 ZH 目录 重要的安全说明 1. . . . . . . . . . . . . . . . . . . . . . 2 重要信息 2. . . . . . . . . . . . . . . . . . . . . . . . . . . . 6 产品信息 2.1 . . . . . . . . . . . . . . . . . . . . . . . . . . . . . . . 6 屏幕养护 2.2 . . . . . . . . . . . . . . . . . . . . . . . . . . . . . . . 6 环境保护 2.3 . . . . . . . . . . . . . . . . . . . . . . . . . . . . . . . 6 摆放规则公告 2.4 . . . . . . . . . . . . . . . . . . . . . . . . . . . 6 电视 3. 机 . . . . . . . . . . . . . . . . . . . . . . . . . . . . 7 电视机概述 3.1 . . . . . . . . . . . . . . . . . . . . . . . . . . . . . 7 遥控器 3.2 . . . . . . . . . . . . . . . . . . . . . . . . . . . . . . . . . 7 使用入门 4. . . . . . . . . . . . . . . . . . . . . . . . . . . . 8 摆放电视机 4.1 . . . . . . . . . . . . . . . . . . . . . . . . . . . . . 8 电视机的壁挂安装 4.2 . . . . . . . . . . . . . . . . . . . . . . . 8 安装遥控器电池 4.3 . . . . . . . . . . . . . . . . . . . . . . . . . 9 连接天线或电缆 4.4 . . . . . . . . . . . . . . . . . . . . . . . . . 9 打开电视机 4.5 . . . . . . . . . . . . . . . . . . . . . . . . . . . . 10 使用电视机 5. . . . . . . . . . . . . . . . . . . . . . . . . 11 打开/关闭电视机或将其切换为待机 5.1 . . . . . . . . 11 观看电视 5.2 . . . . . . . . . . . . . . . . . . . . . . . . . . . . . . 11 收看通过有线接收机盒接收的频道 5.3 . . . . . . . . 12 观看 DVD 5.4 . . . . . . . . . . . . . . . . . . . . . . . . . . . . . 12 充分利用电视机 6. . . . . . . . . . . . . . . . . . . . . 13 遥控器概述 6.1 . . . . . . . . . . . . . . . . . . . . . . . . . . . . 13 使用遥控器上的图文电视功能 6.2 . . . . . . . . . . . . 13 使用设定菜单 6.3 . . . . . . . . . . . . . . . . . . . . . . . . . . 14 更改画面和声音设置 6.4 . . . . . . . . . . . . . . . . . . . . 15 使用 6.5 灵智模式 . . . . . . . . . . . . . . . . . . . . . . . 15 设置时钟 6.6 . . . . . . . . . . . . . . . . . . . . . . . . . . . . . . 17 设置睡眠定时器 6.7 . . . . . . . . . . . . . . . . . . . . . . . . 17 减少降噪 6.8 . . . . . . . . . . . . . . . . . . . . . . . . . . . . . . 18 调节肤色 6.9 . . . . . . . . . . . . . . . . . . . . . . . . . . . . . . 18 使用儿童锁 6.10 . . . . . . . . . . . . . . . . . . . . . . . . . . . . 18 将电视机用作 PC 显示器 6.11 . . . . . . . . . . . . . . . . . 19 在 PC 模式下选择电视 6.12 . . . . . . . . . . . . . . . . . . . 19 连接设备 7. . . . . . . . . . . . . . . . . . . . . . . . . . . 20 连接概述 7.1 . . . . . . . . . . . . . . . . . . . . . . . . . . . . . . 20 选择连接质量 7.2 . . . . . . . . . . . . . . . . . . . . . . . . . . 21 连接设备 7.3 . . . . . . . . . . . . . . . . . . . . . . . . . . . . . . 22 术语表 8. . . . . . . . . . . . . . . . . . . . . . . . . . . . 24 故障排除 9. . . . . . . . . . . . . . . . . . . . . . . . . . . 25 技术规格 9.1 . . . . . . . . . . . . . . . . . . . . . . . . . . . . . . 26 索引 10. . . . . . . . . . . . . . . . . . . . . . . . . . . . . . 27 ZH-6 ZH 重要信息 2 产品信息 2.1 型号和序列号位于电视机的背面和电视机包装上。 此电视机在待机模式下仅消耗最低限度的电量, 可最大限度地降低对环境的影响。电视机背面的 型号牌上提供了有源功耗信息。 屏幕养护 2.2 在清洁屏幕之前,请关闭电视机并拔下交流 • 电源线。 用柔软的干布擦拭屏幕。不要使用家用清洁剂 • 等材料,它们可能会损坏屏幕。 为了避免屏幕变形或褪色,应尽快擦去上面 • 的水滴。 不要使用坚硬的物体碰触、推压、摩擦或敲打 • 屏幕,因为这会对屏幕造成永久性损害。 尽量避免屏幕长时间显示静止图像。如果必须 • 使用静止图像,请降低屏幕对比度和亮度, 以 防止损坏屏幕。 环境保护 2.3 报废法令 - 回收 Philips 一向致力于生产环保产品。这款新 的电视机包含了多种可回收再利用的材料。报废 时,专业公司可以拆解并回收此装置。这将最大 限度地减少需要进行废弃处理的材料量。请确保 根据国家及当地的所有法规来处理此装置。 回收包装 本产品的包装可回收利用。有关如何回收利用此 包装的信息,请与当地机构联系。 处理废电池 提供的电池不含汞或镉。应根据当地法规妥善处 理提供的电池和其它废电池。 功耗 此电视机在待机模式下仅消耗最低限度的电量, 可最大限度地降低对环境的影响。有源功耗信息 显示在电视机背面。 摆放规则公告 2.4 警告 B 为了减少发生火灾或触电的风险,请勿将此设 备暴露在雨中或潮湿环境中。不要将盛有液体 的物品(例如花瓶)放在此设备上。 ZH-7 ZH 电视 3 机 本节概述电视机常用的控件和功能。 电视机概述 3.1 侧面控件和指示灯 POWER CHANNEL MENU VOLUME 1 2 4 3 POWER CHANNEL MENU VOLUME 5 POWER POWER(电源) 1. CHANNEL +/- (频道 +/- ) 2. MENU(菜单) 3. VOLUME +/-(音量 +/-) 4. 遥控传感器/电源指示灯 5. 侧面插口 HDMI 2 HDMI 1 CVI 1 CVI 2 AUDIO IN VGA PC IN 75 Ω L-AUDIO OUT-R 使用电视机侧面插口可连接各种移动设备,如相 机或游戏机。您还可以连接耳机。 背面插口 HDMI 2 HDMI 1 CVI 1 CVI 2 AUDIO IN VGA PC IN 75 Ω L-AUDIO OUT-R Cable 使用电视机背面的插口可连接天线和永久性设 备,如高清影碟播放机或 DVD 播放机。 注意 D 有关连接的更多信息,请参见第 7 节 “连接设备”。 3.2 遥控器 1 2 3 4 5 6 7 8 9 待机/开启 1. 信号源 2. 选择 色彩按钮 3. 画面格式 4. 按钮 箭头按钮 5. 频道选择 6. 音量选择 7. 菜单按钮 8. 确认按钮 9. 有关遥控器的更多信息,请参见遥控器概述 一 节。 ZH-8 ZH 使用入门 4 本节介绍如何放置和连接电视机,以及如何进行 首次安装。 4.1 摆放电视机 警告 B 在完成所有连接之前,请勿将电源插头插入 • 墙壁插座。 大屏幕电视机很沉,需由两个人搬运。 • 无论决定将电视机放在何处,都要确保可以方便 地接触到交流电源线或插头,以便于将电视机与 电源断开。 如果将电视机安装在旋转基座或旋转臂上,请确 保电视机旋转时交流电源线不会绷紧。交流电源 线绷紧会使电源连接变松。这会产生火花并导致 起火。 为达到理想的观看条件,请将电视机放在光线不 会直射到屏幕的位置。 观看电视机的最佳距离为屏幕尺寸的 3 倍。 Kensington 安全插槽 电视机背面配备有 Kensington 安全插槽。 如果连接了 Kensington 防盗锁(未附带提供), 请将电视机放在可与锁连接的固定物品的附近。 4.2 电视机的壁挂安装 警告 B 电视机的壁挂安装应仅由合格的安装人员执 行。Koninklijke Philips Electronics N.V. 对由于 安装不当而造成的事故或人身伤害不负任何 责任。 第 1 步 购买一个符合 VESA 标准的壁挂托架 根据电视机屏幕尺寸,购买以下任一壁挂托 架: 电视机屏幕 尺寸(英寸) 符合 VESA 标准的 壁挂托架类型 (毫米) 螺丝类型 32 英寸 200 x 200 毫米 公制 6 x 10 毫米 37 英寸 200 x 200 毫米 公制 6 x 10 毫米 42 英寸 400 x 200 毫米 公制 6 x 10 毫米 47 英寸 400 x 200 毫米 公制 6 x 10 毫米 第 2 步 卸下电视机座 注意 D 这些说明仅适用于安装了机座的电视机型号。 如果您的电视机没有安装机座,请跳至 第 3 步“连接电缆”。 小心地将电视机正面朝下放在铺有软布的平坦 1. 稳固的表面上。软布应足够厚,以保护电视 机屏幕。 使用十字螺丝刀(未附带提供)拧下固定电视 2. 机座的 4 个螺钉。 ZH-9 ZH 安装遥控器 4.3 电池 A A A A A A 打开遥控器背面的电池盖。 1. 插入 2 节附带提供的电池。确保电池的 + 极 2. 和 - 极方向正确(电池盒内有标记)。 盖上电池盖。 3. 连接天线或电缆 4.4 连接天线 HDMI 2 HDMI 1 CVI 1 CVI 2 AUDIO IN VGA PC IN 75 Ω L-AUDIO OUT-R 在电视机背面找到 TV ANTENNA(电视天 1. 线)插口。 将天线(未附带提供)的一端插入 TV 2. ANTENNA(电视天线)插口。如果天线不 匹 配,请使用适配器。 将天线的另一端插入天线插座,确保天线两端 3. 都已插紧。 用力将机座从电视机底部拔下。将机座和螺钉 3. 放到安全的地方以备以后重装。 第 3 步 连接电缆 按照下面几节和第 7 节“连接设备”。 第 4 步 将符合 VESA 标准的壁挂托架固定到电视 机上。 警告 B 将符合 VESA 标准的壁挂托架固定到电视机上 时,只能使用指定的螺钉(M6 x 10 毫米)。 指定的螺钉是根据此电视机的重量而设计的。 注意 D 根据符合 VESA 标准的壁挂托架的不同,您可 能需要从壁挂托架上卸下安装板以便于安装。 有关说明,请参阅符合 VESA 标准的壁挂托架 的文档。 ZH-10 ZH 连接有线接收机盒 HDMI 2 HDMI 1 CVI 1 CVI 2 AUDIO IN VGA PC IN 75 Ω L-AUDIO OUT-R HDMI 2 HDMI 1 CVI 1 CVI 2 AUDIO IN VGA PC IN 75 Ω L-AUDIO OUT-R Cable Receiver Box ANTENNA Cable Receiver Box ANTENNA HDMI 1 HDMI 2 AUDIO IN PC IN VGA CVI 1 Pb Pr L R Y Pb Pr L R Y CVI 2 75 Ω L - AUDIO OUT - R 有线接收机盒可通过以下连接方式连接到电视机: 天线 (75 • Ω) A/V(复合视频和音频) • S-Video 和 Audio • YPbPr(分量视频输入) • HDMI • 通过分量视频输入或 HDMI 连接有线接收机盒 HDMI 2 HDMI 1 CVI 1 CVI 2 AUDIO IN VGA PC IN 75 Ω L-AUDIO OUT-R HDMI 2 HDMI 1 CVI 1 CVI 2 AUDIO IN VGA PC IN 75 Ω L-AUDIO OUT-R Cable Receiver Box ANTENNA Cable Receiver Box ANTENNA HDMI 1 HDMI 2 AUDIO IN PC IN VGA CVI 1 Pb Pr L R Y Pb Pr L R Y CVI 2 75 Ω L - AUDIO OUT - R 连接交流电源线 警告 B 检查电压是否与电视机背面标注的电压相符。 如果不符,请勿插入交流电源线。 连接交流电源线 AC IN AC IN HDMI 1 HDMI 2 在电视机背面找到电源插口。 1. 电源插口的位置因电视机的型号而异。 将交流电源线完全插入电视机电源插口。 2. 将交流电源线插头连接到电源插座上。 3. 确保电 源线两端固定牢固。 4.5 打开电视机 打开电视机之前,请检查电源线是否已正确连 接。按电视机侧面的 POWER 按钮或按遥控器 上的电源按钮。电视机启动通常需要 10-15 秒的时 间,首次打开电视机时会显示下面的屏幕。 POWER CHANNEL MENU VOLUME 1 2 4 3 POWER CHANNEL MENU VOLUME 5 POWER ZH-11 ZH 使用电视机 5 本节将帮助您进行基本的电视机操作。 打开/关闭电视机或将其切换为待机 5.1 打开电视机 如果待机指示灯熄灭,请按电视机侧面的 • . POWER(电源)。 如果待机指示灯亮起,请按遥控器上的 • .。 POWER CHANNEL MENU VOLUME 1 2 POWER CHANNEL 5 POWER 切换为待机模式 按遥控器上的 • . 。 不使用遥控器,从待机状态切换为开启状态。 按电视机侧面的 • . POWER(电源)可关闭 电视机。 再次按 • . POWER(电源)可打开电视机。 关闭电视机 按电视机侧面的 • . POWER(电源)。 5.2 观看电视 切换频道 按遥控器上的数字(1 至 9)或 • 频道 +/-。 按 • 频道切换 可返回观看的上一个电视频道。 注意 D 您也可以通过按电视机侧面的 CHANNEL +/- (频道 +/-)来切换频道。 调节音量 按遥控器上的 • 音量+/-。 按遥控器上的 静音 可静音。再次按 静音 • 或 按 音量 +/- 可恢复声音。 注意 D 您也可以通过按电视机侧面的 VOLUME +/- (音量 +/-)来调节音量。 ZH-12 ZH 收看通过有线接收机盒接收的频道 5.3 开启有线接收机盒。 1. 通过有线接收机盒接收的画面将自动显示在 屏幕上。 使用有线接收机盒的遥控器选择频道。 2. 如果未显示画面 反复按 1. 信号源 以选择连接的有线接收机盒, 然后等待几秒钟,使画面显示。 按 2. 确认 键。 使用有线接收机盒的遥控器选择频道。 3. 观看 DVD 5.4 在播放机中插入一张 DVD 光盘。 1. 按播放机遥控器上的 2. Play >。 通过有线接收机盒接收的画面将自动显示在 屏幕上。 如果未显示画面 反复按 1. 信号源 以选择正确的信号源,然后等 待几秒钟,使画面显示。 按 2. 确认 键。 ZH-13 ZH 充分利用电视机 6 本节介绍电视机的高级功能。 遥控器 6.1 概述 1 16 15 14 13 12 11 10 2 3 4 5 6 7 8 9 . 1. 电源 将电视机从待机状态切换到开启状态或从开启 状态切换回待机状态。 信号源 2. 选择已连接的设备。 立体声I-II 3. 选择单声、立体声、双语 I、双语 II、丽音单 声、丽音立体声、丽音双语 I、丽音双语 II。 注意 D 声音模式的选择取决于电视节目以及当地的广 播电视频道。 画面格式 4. 选择画面格式。请参见更改画面格式 一节。 箭头按钮 5. Î ï Í Æ 用于浏览菜单。 灵智模式 6. 选择画面设置。 频道 +/- 7. 切换到下一个或上一个频道。 数字按钮 8. 选择频道、页面或设置。 频道切换 9. 返回之前观看的频道。 屏显/退出 10. 显示节目信息(如果有)。 音量 +/- 11. 增大或减小音量。 静音 12. 静音或恢复声音。 菜单 13. 打开或关闭菜单。 确认 14. 按该按钮可启动某项设置。 环绕立体声 15. 增大电视机声音的深度和维度。 睡眠时钟 16. 将电视机设置为在特定的一段时间内自动 关 闭。 使用遥控器上的图文电视功能 6.2 1. 打开/关闭图文电视 2. 图文电视保持 冻结图文电视页面。 3. 显示/隐藏图文电视 在显示和隐藏模式间切换。 4. 放大图文电视 将上下文放大到以前的两 倍。 5. 使用这四个彩色按钮,可以访问图文电视中以 相应颜色指示的项目或页面。 注意 D 图文电视仅在一些亚太电视制式中可用。 ZH-14 ZH 使用设定菜单 6.3 本节介绍如何设置语言和储存电视频道。 按遥控器上的 1. 菜单 以显示主菜单。 按 2. Î 或 ï 以选择设定,然后按 Æ 进入。 按 3. Î 或 ï 以突出显示要调整的项目,然后 按 Æ 以确认更改。 按 4. 菜单 退出。 主控 设定 自动搜寻 人工搜寻 频道设置 复原设定 声音 功能 图像 语言 设定 设定设置摘要 语言 • — 选择一种界面语言。 自动搜寻 • — 自动设置电视机可在您所在地区 接收到的广播或有线频道。 注意 D 打开新电视机的包装并插上电源后,请立即运 行自动搜寻功能,以便设置电视机可在您所 在地区接收到的广播或有线频道。如果不运行 自动搜寻功能设置频道,电视机可能无法正 常工作。 运行自动搜寻后,请检查搜寻结果。按遥控器 上的 频道 +/- 查看您可以选择哪些频道。请记 住,必须首先将天线或有线电视信号线连接到 电视机上。 人工搜寻 • — 自动搜寻: • 启动自动搜寻频道频率,或按 数字键以显示所需的频道频率。 节目号码: • 使用 Î 或 ï 可在人工搜寻菜 单中调整频道编号。 微调: • 接收质量较差时对模拟频道进行手 动微调。 储存: • 储存或设置人工搜寻菜单的设置。 频道设置 • — 频道编辑: • 设置您自己的包含喜爱的电视 频道的收藏列表。 频道互换: • 交换频道。在 自、到 和 交换 之间切换。 名称编辑: • 为没有名称的频道分配一个名 称或更改频道的名称。 按 1. Î 或 ï 编辑名称,然后按 Æ 移至下 一个字符。 按 2. Í 确认第一个字符,然后按 Æ 确认最 后一个字符。 按 3. Æ 确认名称。 频道排序: • 为频道排序或分组。 复原设定 • — 允许您将大部分画面和声音设置 重新设置为默认出厂设置。选择否或是。 注意 D 如果将电视机重新设置为出厂设置,画面、 声 音方面的当前设置和其它功能设置都将被 删 除,并将替换为生产时的默认设置。但是, 自动锁定密码不会被删除。 ZH-15 ZH 更改画面和声音设置 6.4 更改画面设置 本节介绍如何调整画面设置。 按遥控器上的 1. 菜单。 按 2. ï 或 Æ 选择 图像 菜单。 按 3. Î 或 ï 选择其中一个画面设置,然后按 Æ 进入该设置。 按 4. Î 或 ï 调整设置,然后按 确认 键确认 更 改。 按 5. 菜单 退出。 主控 图像 声音 功能 设定 亮度 色彩 清晰度 色调 色温 屏幕格式 对比度 图像 灵智模式 画面设置摘要 可对下列画面设置进行配置。根据画面信号源 格 式的不同,一些画面设置可能不可用。 灵智模式 • — 显示预定义画面和声音设置的 列 表。 对比度 • — 设置画面中的白色级别。 • 亮度 — 设置画面的亮度。 色彩 • — 设置饱和度级别。 清晰度 • — 设置细部的清晰度。 色调 • — 调整红色和绿色间的色彩平衡。 色温 • — 将色温设置为普通、暖色调或 冷 色 调。 屏幕格式 • — 更改画面的格式。 使用 6.5 灵智模式 按遥控器上的 1. 灵智模式 可将电视机设置为预 定义的画面和声音设置。 按 2. Î 或 ï 可选择以下某种设置: 个人设定 • — 使用 图像 菜单定义的自定义设 置。 鲜艳 • — 适合高度动感画面的鲜艳画面设置和 清晰的声音。 标准 • — 用于以普通方式看电视。 电影 • — 可以实现电影体验的精彩画面设置。 游戏 • — 针对 PC、游戏机和游戏站优化的 设 置。 节能 • — 用于减少耗电量的环保设置。 ZH-16 ZH 更改画面格式 按遥控器上的 1. 画面格式 进入 屏幕格式 菜单。 按 2. Î 或 ï 选择画面格式。 超放大银幕 • 删除 4:3 广播屏幕周围的黑边,并最大限度地 减小失真。 4:3 • 显示传统的 4:3 格式。 14:9 放大 • 将传统的 4:3 格式放大为 14:9。 16:9 放大 • 将典型的 4:3 格式放大为 16:9。 字幕16:9模式 • 全屏显示 4:3 画面,并且显示字幕。 阔银幕 • 将传统的 4:3 格式拉伸为 16:9。 注意 D 对亮度、色彩、对比度或清晰度的所作的 • 任 何调整都将保存在灵智模式部分 的个人设 定中。 对于 720p/1080i/1080p,HD 和 HDMI 模式下 • 的默认画面格式将是阔银幕。并且,画面格式 功能将不可访问。 对于 PC 模式,默认的画面格式将是全屏, • 且画面格式功能可以是可访问的 4:3 和全屏 格式。 ZH-17 ZH 调整声音设置 本节介绍如何调整声音设置。 按遥控器上的 1. 菜单,然后按 ï 选择声音。 主控 声音 超宽环绕立体声 自动音量调衡 功能 设定 图像 均衡器 声音 按 2. Æ 进入列表。 按 3. Î 或 ï 选择以下设置之一: 声音设置摘要 均衡器 • — 根据您本人的喜好,用不同的中心 频率更改声音频率,创建全新的、截然不同的 声音效果。 超宽环绕立体声 • — 允许您选择模式,以获得 依赖于广播信号或依赖于来自所接收外部输入 的信号的更强空间声或环境声再现效果。选择 开启或关闭。 自动音量调衡 • — 减小突然性的音 量变化,比 如插播广告期间或更换频道时。选择开启或 关闭。 设置时钟 6.6 本节介绍如何设置时间。 按遥控器上的 1. 菜单,然后选择功能 > 时 钟。 时钟 主控 I 功能 定时器 开启时间 终止时间 睡眠定时 时钟 : AM -- -- 按 2. Æ 进入列表。 按 3. Î 或 ï 设置时间。 (小时/分钟/AM 或 PM) 按 4. 确认 键确认。 设置 6.7 睡眠定时器 睡眠定时器会在定义的一段时间后将电视机切换 为待机状态。 按遥控器上的 1. 菜单,然后选择功能 > 睡眠定 时。 睡眠定时 主控 I 功能 定时器 开启时间 终止时间 时钟 睡眠定时 按 2. Æ 进入 睡眠定时 条。 按 3. Î 或 ï 在零到 180 分钟范围内设置睡眠时 间。如果设为零分钟,则睡眠定时器关闭。 按 4. 确认 键启动睡眠定时器或按遥控器上的睡 眠定时按钮。 ZH-18 ZH 减少降噪 6.8 本节介绍在接收较弱的视频信号时,如何过滤和 减少图像杂信号,从而提高图像质量。 按遥控器上的 1. 菜单,然后选择功能 > 降噪。 主控 功能 定时器 信号源列表 开启 关闭 儿童锁 肤色 降噪 降噪 按 2. Æ 进入列表。 按 3. Î 或 ï 选择“开启”或“关闭”。 按 4. 菜单 退出。 调节肤色 6.9 本节介绍如何调节肤色。 按遥控器上的 1. 菜单,然后选择功能 > 肤色。 主控 功能 定时器 降噪 信号源列表 明亮 普通 鲜艳 儿童锁 肤色 肤色 按 2. Æ 进入列表。 按 3. Î 或 ï 以选择“明亮”、“普通”或 “ 鲜艳”。 按 4. 菜单 退出。 使用儿童锁 6.10 锁定电视频道,以防止孩子观看不适宜的节目 内 容。 设置或更改 PIN 按遥控器上的 1. 菜单,然后选择功能 > 儿童 锁。 儿童锁 更换密码 全部清除 主控 功能 定时器 降噪 信号源列表 上锁程序 儿童锁 主控 功能 定时器 降噪 信号源列表 密码 儿童锁 肤色 肤色 按 2. Æ 进入。 按遥控器上的数字按钮,输入 4 位数的 PIN。 3. 如果您已有 PIN,请输入您当前的 PIN。 • 如果您没有 PIN,请输入默认密码 • 0000。 如果您丢失了 PIN,请输入主密码 • 0711。 按 4. 菜单 退出。 ZH-19 ZH 锁定程序 在设置完个人设定密码后,您就为选择您要阻止 或检查的频道做好了准备。 按遥控器上的 1. 菜单,然后选择功能 > 儿童锁 > 上锁程序。 儿童锁 更换密码 全部清除 主控 功能 定时器 降噪 信号源列表 上锁程序 儿童锁 功能 定时器 降噪 信号源列表 密码 儿童锁 肤色 肤色 按 2. Æ 进入。 使用数字按钮输入要阻止的频道或按 3. Î 或 ï 阻止当前频道。 按 4. 菜单 退出。 注意 D 使用数字按钮可跳转到另一频道,这样就可以 1. 阻止其它频道。 请记住,0000 是默认的自动锁定码。如果别 2. 人(例如孩子)更改了您的密码或者是您忘 记了自己的密码,则总是可以通过输入默认 码进入。 将电视机用作 PC 显示器 6.11 使用 VGA 电缆将一台 PC 与您的电视连接起来, 将电视用作 PC 显示器。 小心 B 连接 PC 之前,请将 PC 显示器的刷新频率设 置为 60Hz。 支持的 6.11.1. 屏幕分辨率 PC 模式支持以下屏幕分辨率: 分辨率 刷新率 640 x 480 800 x 600 1024 x 768 1280 x 720 1280 x 768 1360 x 768 1280 x 1024 60Hz 60Hz 60Hz 60Hz 60Hz 60Hz 60Hz 提示 E 1360 x 768 是建议的分辨率。 在 PC 模式下选择电视 6.12 按遥控器上的 1. 菜单,然后选择功能 > 信号源列表。 选择 2. PC,然后按 确认 键确认选择。 如有必要,按照 3. 更改画面设置 一节中的描述 调整画面设置。 按 4. 菜单 退出。 提示 E 在 PC 模式下,将画面格式设置为“全屏” 或“4:3”。 ZH-20 ZH 连接设备 7 7.1 连接概述 HDMI 1 HDMI 2 AUDIO IN PC IN VGA AV 1 Y Pr L R Pb AV 2 Y Pr L R Pb 75 Ω L - AUDIO OUT - R VIDEO IN S-VIDEO L - AUDIO - R HDMI 1 HDMI 2 AUDIO IN PC IN VGA CVI 1 Pb Pr L R Y Pb Pr L R Y CVI 2 75 Ω L - AUDIO OUT - R VIDEO IN S-VIDEO L - AUDIO - R SIDE AV 1 2 3 4 6 7 8 9 5 背面插口 HDMI 1/HDMI 2 1. 用于 DVD 播放机、数字接收器、游戏机和其 它高清设备的 HDMI 输入插口。 PC IN(PC 输入) 2. 用于 PC 的 VGA 和音频插口。 CVI 1/CVI 2 3. 用于 DVD 播放机、数码接收器或游戏机等的 分量视频输入 (Y Pb Pr) 和音频左/右插口。 AUDIO OUT L/R(音频输出左/右) 4. 用于家庭影院或其它音频系统的声音输出 Cinch 插口。 天线输入/75 5. Ω 侧面插口 耳机 6. 立体声迷你插孔。 AUDIO L/R(音频左/右) 7. 用于复合设备和 S-Video 设备的音频左/右输 入插口。 VIDEO IN(视频输入) 8. 用于复合设备的视频输入 Cinch 插口。 S-VIDEO 9. 用于 S-Video 设备的 S-Video 输入插口。 ZH-21 ZH 选择连接质量 7.2 本节介绍如何通过将设备连接到最佳插口来增强 音频和视频体验。 HDMI 7.2.1. — 最高品质 HDMI 可以提供尽可能最高的音频和视频品质。 音 频和视频信号被整合在一条 HDMI 电缆中, 在电视机和 HDMI 设备之间提供未压缩的数字接 口。您必须使用 HDMI 才可以体验全高清视频 效 果。 Component video red, gree, blue Audio L/R red, white S-video HDMI 提示 E 如果您的设备上仅有 DVI 插口,请使用 DVI-HDMI 适配器将设备连接到电视机背面 的 HDMI 插口。必须另用一条音频电缆来连 接设备与位于 SIDE AV(侧面音频视频)处的 AUDIO L/R(音频左/右)插口。 分量 (Y Pb Pr) 7.2.2. — 较高品质 与 S-Video 或复合视频连接相比,分量 (Y Pb Pr) 视频可以提供更高品质的画面。虽然分量视频支 持高清信号,但是画面质量要低于 HDMI 且属于 模拟画面。另外,请将一条音频左/右电缆连接到 CVI 1/CVI 2 处的红色和白色音频左/右输入插口。 Component video red, gree, blue Audio L/R red, white S-video Composite audio/video yellow, red, white Component video red, gree, blue Audio L/R red, white S-video Composite audio/video yellow, red, white 分量视频电缆 — 红色、绿色、蓝色 音频左/右电缆 — 红色、白色 S-Video 7.2.3. — 优良品质 采用模拟连接的 S-Video 可以提供比复合视频更好 的画面品质。将设备与 S-Video 相连接时,请将 S-Video 电缆插入电视机侧面的 S-Video 插口。您 必须使用一条单独的音频左/右电缆将设备与电视 机侧面的红色和白色音频左/右插口连接起来。 Component video red, gree, blue Audio L/R red, white S-video Composite audio/video yellow, red, white Component video red, gree, blue Audio L/R red, white S-vi HDMI S-Video 音频左/右电缆 — 红 色、白色 复合 7.2.4. — 基本品质 复合视频可以提供基本的模拟连接,通常是将 (黄色)视频 Cinch 电缆与(红色和白色)音频 左/右 Cinch 电缆组合在一起使用。连接到电视机 侧面的复合视频和音频左/右输入插口时,注意匹 配电缆的颜色。 omponent video ed, gree, blue Audio L/R red, white S-video Composite audio/video yellow, red, white 复合音频/视频电缆 — 黄色、红色和白色 ZH-22 ZH 连接设备 7.3 本节介绍如何将一系列设备连接到不同的插口 上。注意,可使用不同类型的插口将一个设备连 接到电视机。下面几节仅举出了一些示例;还可 采用其它配置。 连接复合或分量电缆时,电缆颜色应与电视机上 的插口相匹配。 小心 C 连接设备前请断开交流电源线。 注意 D 将设备连接到电视机时,可根据您可以获得的 插口类型和您的需要使用不同类型的插口。 将有线接收机盒连接到射频输入/输出天线电视 Cable Receiver Box TV CABLE IN TO TV AUDIO OUT L R VIDEO OUT S-VIDEO A Pb Pr L R Y CVI 2 75 Ω L - AUDIO OUT - R Cable TV signal B OR 将有线接收机盒连接到音频/视频输出 Cable TV signal Cable Receiver Box A C TV CABLE IN AUDIO OUT L R VIDEO OUT S-VIDEO B VIDEO IN S-VIDEO L - AUDIO - R SIDE AV 将 VCR、DVD 播放机或其它设备连接到 RCA 插 口 AV Player with A/V Connectors TV AUDIO OUT L R VIDEO OUT S-VIDEO B A VIDEO IN S-VIDEO L - AUDIO - R SIDE AV ZH-23 ZH 将 DVD 播放机或其它视频设备连接到分量视频插口 HDMI 1 HDMI 2 AUDIO IN PC IN VGA CVI 1 Pb Pr L R Y Pb Pr L R Y CVI 2 75 Ω L - AUDIO OUT - R Accessory Device Equipped with Component Video Outputs TV Y Pb Pr L-AUDIO-R A B 将 DVD 播放机连接到 HDMI 插口 HDMI 1 HDMI 2 AUDIO IN PC IN VGA CVI 1 Pb Pr L R Y Pb Pr L R Y CVI 2 75 Ω L - AUDIO OUT - R DVD Player TV A 将 PC(显示器)连接到 VGA 插口 HDMI 1 HDMI 2 AUDIO IN PC IN VGA CVI 1 Pb Pr L R Y Pb Pr L R Y CVI 2 75 Ω L - AUDIO OUT - R Computer TV A B ZH-24 ZH 术语表 8 宽高比 电视机画面在屏幕上的宽度和高度的比例。一般情况下电视机的宽高比为 4 比 3 (4:3)。高清晰度电视应用了新的宽高比 16:9,这类似于影院的宽高比(阔银幕)。 新的电视制式支持 4:3 和 16:9 两种宽高比,并可以在两者之间自动切换。 音频视频 (A/V) 这是描述电视接收机或视频设备(专用于接收 VCR 音频视频信号)上的一个频道 时常用的一个术语。该频道会自动启动电视机中的专用电路,以防画面失真和出 现相位差。此术语还用于描述可处理音频和视频两种信号的音频视频处理器。 CVBS 复合视频基带信号。在广播电视中,此术语是指视频信号,包括色彩信息和 同 步。 分量视频输入 (Y Pb Pr) 分量视频输入是一种使用 Cinch 型插口的连接类型,允许有线接收机盒或模拟 DVD 播放机将信号连接至电视机。通过提供 Cinch 型输入 (YPbPr),三基色(红、 绿、蓝)可以直接从有线接收机盒连接到电视机,使信号显示在屏幕上。 高清晰度电视机 一般认为,高清晰度电视机的清晰度大约是目前 NTSC 电视机垂直和水平画面 分 辨率的两倍,实际上就是画面清晰了两倍。高清晰度电视机的屏幕比例也是 16:9,而如今大多数的电视机屏幕比例则为 4:3。高清晰度电视机减少了运动伪影 (即,重像、点蠕动),并提供了 CD 品质环绕立体声的 5.1 独立频道(又称 AC-3)。 逐行扫描 在逐行扫描中,可以同时对屏幕上所有水平扫描线进行扫描。数字电视和高清晰 度电视标准对隔行扫描与逐行扫描广播和显示方式都接受。 分辨率 分辨率:对视频图像中可见的最微小细部的度量。电视机分辨率可以用图像中的 像素数来表示;更为常见的表示法是,用生成图像的总(水平扫描)行数来表 示。标准数字电视机分辨率: 标准清晰度数字电视机:576i — 画面为 704x576 像素;576p — 画面为 720x576 像素。 高清晰度电视机:720p — 画面为 1280x720 像素;1080i — 画面为 1920x1080 像 素。1080p — 画面为 1920 x 1080 像素。 SPDIF 对于高品质数字声音输出,极力推荐使用 SPDIF(Sony 和 Philips 数码互连 格式)。 注意 D 仅在使用 HDMI 信号源时支持 SPDIF。 ZH-25 ZH 9 故障排除 症状 可能的原因 您应该 未通电或指示灯不亮。 电视机未连接至 电 源。 1. 按电视机侧面的 POWER(电源),或者按摇控器上的 .。 2. 确保交流电源线紧紧地连接在电视机电源插口和电源插座上。 3. 从电源插座上拔下交流电源线,60 秒后重新插上交流电源线。 4. 将电视机连接到其它电源插座上。 屏幕上出现 HDMI 连接错 误消息。 HDCP 身份验证 失 败。 1. 确保 HDMI 电缆经过认证。 2. 按摇控上的 信号源 按钮,切换到其它信号源,然后再切回至 HDMI 信 号 源。 3. 重新设置附属设备和电视机。 打开电视机 选择 HDMI 频道 打开配套设备 4. 打开电视机和配套设备后,拔下 HDMI 电缆的其中一端,然后重新插入 电 缆。 PC 上未检测到声音。 未连接音频电缆。 1. 将音频电缆连接至电视机上的 PC AUDIO IN(音频输入)端口。 2. 按摇控器上的 信号源 按钮,然后选择 PC 信号源。 操作遥控器,电视机没有 反应。 电池安装错误,或者 电池电量低。 1. 按摇控器按钮时,确保电视机上的指示灯闪烁。 2. 确保您使用的是电视机附带提供的摇控器。 3. 确保按照摇控器上的插图装入电池,且电池不需要更换。 4. 从电源插座上拔下交流电源线,60 秒后重新插上交流电源线。 画面扭曲。画面被拉伸, 侧边或顶部出现短而宽的 黑边。 广播视频格式。 1. 按摇控器上的 画面格式 按钮,选择最佳画面格式。 2. 对于某些配套设备,画面格式须在配套设备中进行设置。 画面大部分是红色和绿色, 或者当电视机通过分量电缆 连接至配套设备时画面不显 示红色。 连接不安全/不正确。 1. 确保所有的连接都是根据颜色代码进行的。 2. 将分量电缆插入电视机上的 YPbPr 插座中。 电视机音箱没有声音。 音量级设置为了零。 1. 提高音量。 声音设置为静音。 2. 按摇控器上的 静音 按钮。 连接了耳机。 3. 确保未将耳机插入电视机。 未连接音频电缆。 4. 对于 AV 连接,确保音频左/右电缆是按照连接设备如果您使用的是分量电缆, 确保未将红色音频电缆与红色视频电缆交叉连接。 配套设备音频输出不 正确。 5. 对于 HDMI 连接,有些附属设备具有 HDMI 音频输出设置,必须为 HDMI 到 HDMI 连接开启此设置。 进行同轴连接时画面品 质差。 标准清晰度频道不如 高清晰度频道清晰。 1. 通过分量电缆或 HDMI 电缆连接设备。 没有画面或没有声音。 频道不正确 。 1. 确保选择了正确的频道。 频道设定不完整。 1. 如果电视机通过 AV 连接接收频道,请将电视机设置到正确的信号源输入。 2. 如果电视机通过同轴连接直接连接至墙壁,再进行一次自动搜寻。 ZH-26 ZH 9.1 技术规格 型号 32PFL3403 32HFL3330 37PFL3403 37HFL3330 42PFL3403 47PFL3403 画面/显示 宽高比 16:9 分辨率 1366 x 768p 声音增强 声音输出(RMS 瓦特) 5W x 2 10W x 2 声音模式 单声、立体声、超宽环绕立体声 易用性 视频格式 超放大银幕、4:3、14:9 放大、16:9 放大、字幕16:9模式、阔银幕 灵智模式 个人设定、鲜艳、标准、电影、游戏、节能 连接 背面插口 CVI 1/CVI 2:分量视频输入 + 音频左/右(支持 480i/p、576i/p、720p、 1080i/p) HDMI 1/HDMI 2(1.3a 版 HDMI,支持视频:480i/p、576i/p、720p、 1080i/p) AUDIO L/R(音频左/右)输出 PC IN(PC 输入):VGA、PC 音频输入 侧面插口 1 个耳机 复合视频输入 + 音频左/右 S-Video 重量和尺寸 产品重量(不含机座) 11 kg 14.8 kg 18.1 kg 24.9 kg 产品重量(含机座) 14 kg 19.3 kg 22.6 kg 31.5 kg 产品重量(含包装盒) 16.7 kg 22.6 kg 22.1 kg 29.4 kg 产品尺寸 (不含机座) (高 x 宽 x 深) 543 x 809 x 92mm 611 x 929 x 99mm 667 x 1033 x 92mm 733 x 1150 x 104mm 产品尺寸 (含机座) (高 x 宽 x 深) 593 x 809 x 220mm 666 x 929 x 262mm 721 x 1033 x 262mm 793 x 1150 x 310mm 箱尺寸(长 x 宽 x 高) 1025 x 250 x 662mm 1156 x 266 x 739mm 1256 x 270 x 795mm 1378 x 280 x 866mm 电源 功耗 150 W 180 W 220 W 300 W 待机功耗 < 0.3 W 电源 100-240V,60-50Hz ZH-27 ZH 索引 10 A 儿童锁 18 B 摆放电视机 8 背面插口 20 C 侧面插口 20 D 打开电视机 10 电池 9 电缆 9 对比度 15 F 肤色 18 G 概述 电视 7 连接 20 遥控器 13 故障排除 25 壁挂安装 8 观看电视 11 H 画面格式 16 回收 6 J 技术规格 26 交流电源线 10 L 亮度 15 N 降噪 18 P PC 模式 19 PIN 码 18 频道 设定 14 屏幕分辨率 19 Q 清晰度 15 S 灵智模式 15 色温 15 色调 15 时钟 15 睡眠定时器 17 锁定节目 19 T 天线 9 Y 养护 屏幕 6 环境 6 遥控器 7 音量 11 © 2008 Koninklijke Philips Electronics N.V. All rights reserved. P41TN017813 1C
版权声明
1. 本站所有素材,仅限学习交流,仅展示部分内容,如需查看完整内容,请下载原文件。
2. 会员在本站下载的所有素材,只拥有使用权,著作权归原作者所有。
3. 所有素材,未经合法授权,请勿用于商业用途,会员不得以任何形式发布、传播、复制、转售该素材,否则一律封号处理。
4. 如果素材损害你的权益请联系客服QQ:77594475 处理。