PHILIPS 3104 315 2050.1电视说明书
 "PHILIPS 3104 315 2050.1电视说明书-0")
 "PHILIPS 3104 315 2050.1电视说明书-1")
 "PHILIPS 3104 315 2050.1电视说明书-2")
 "PHILIPS 3104 315 2050.1电视说明书-3")
 "PHILIPS 3104 315 2050.1电视说明书-4")
 "PHILIPS 3104 315 2050.1电视说明书-5")
 "PHILIPS 3104 315 2050.1电视说明书-6")
 "PHILIPS 3104 315 2050.1电视说明书-7")
 "PHILIPS 3104 315 2050.1电视说明书-8")
 "PHILIPS 3104 315 2050.1电视说明书-9")
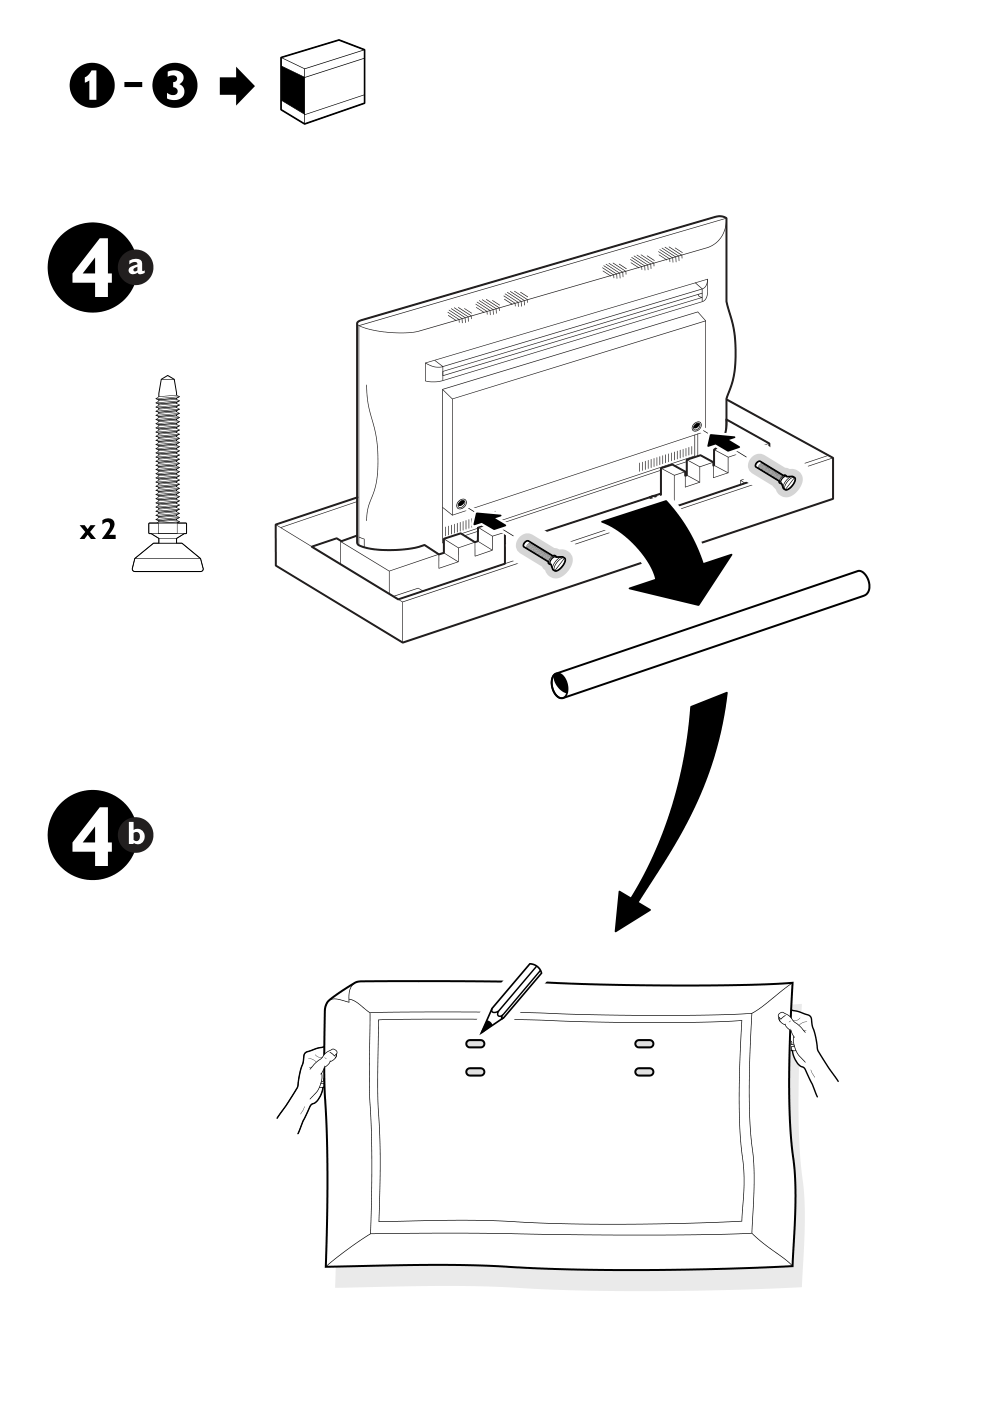
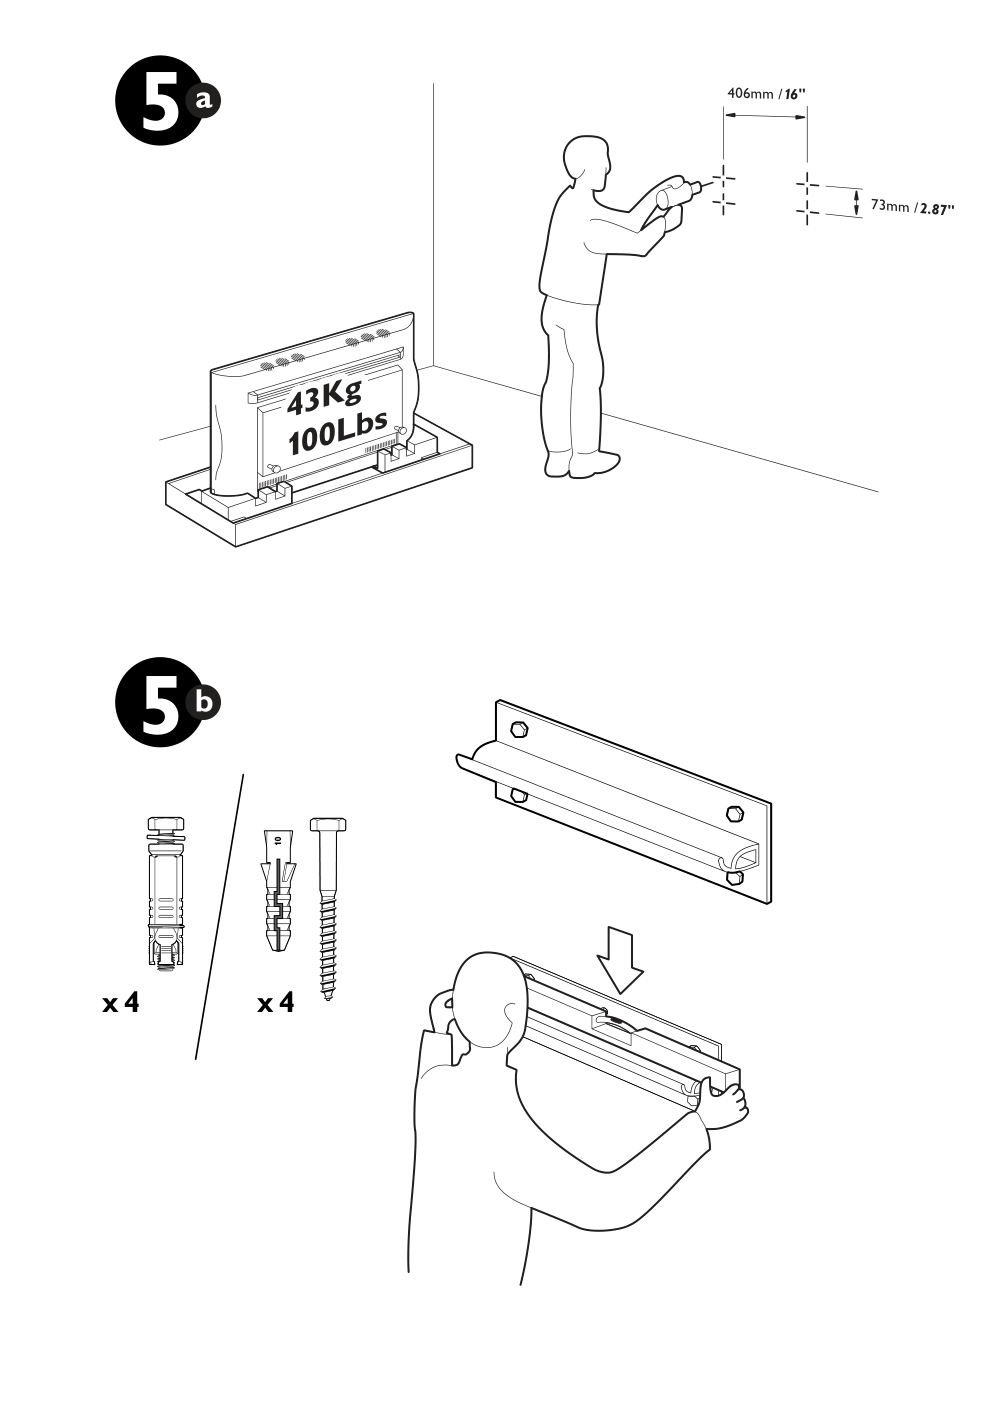
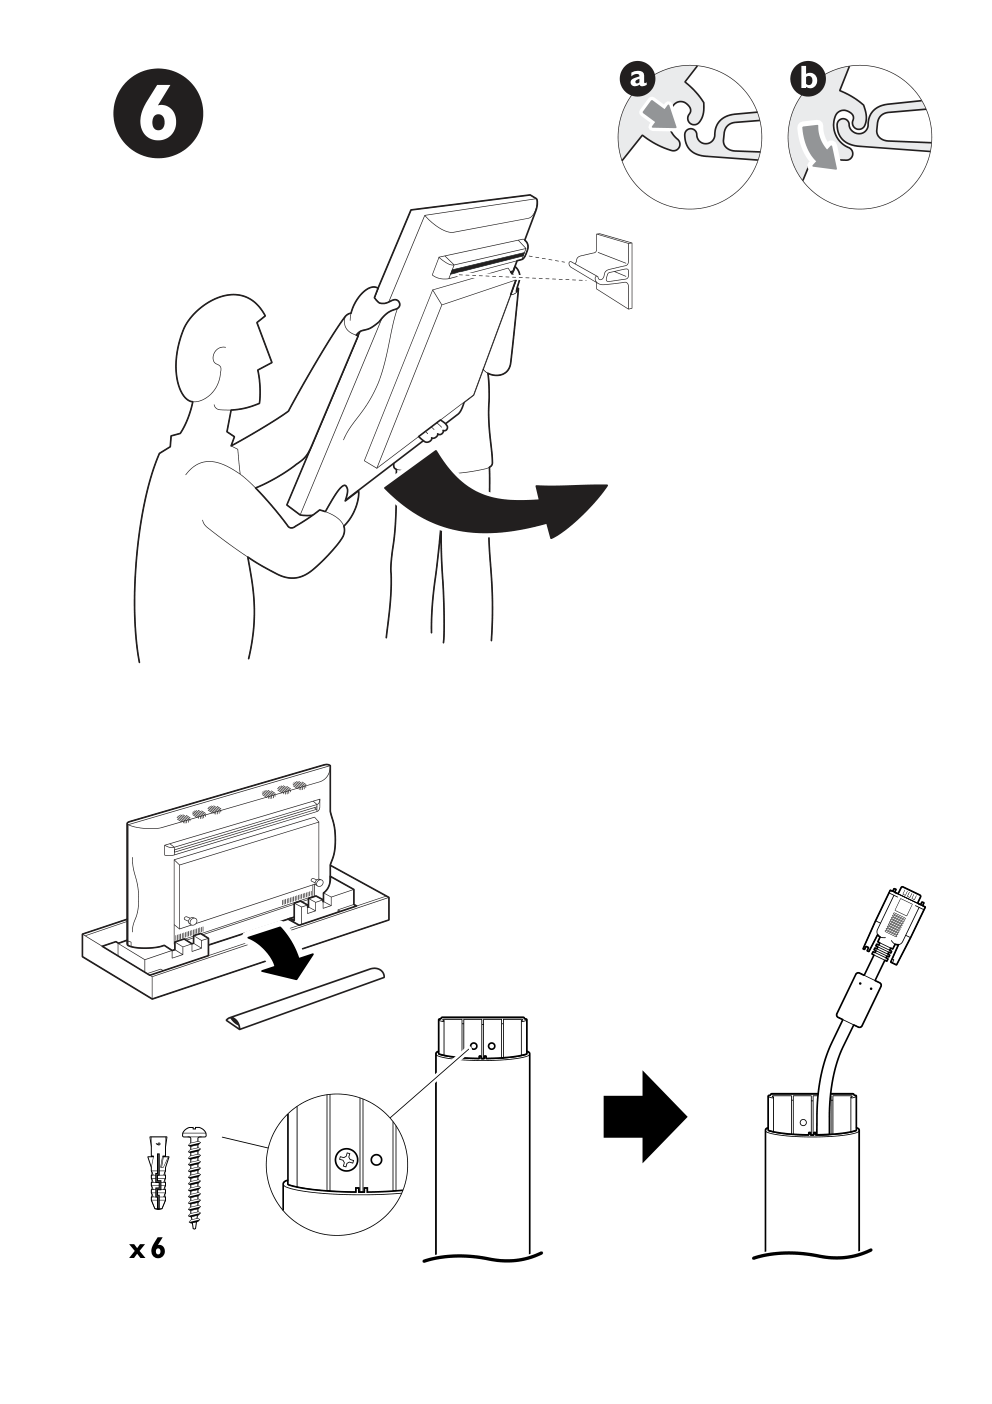
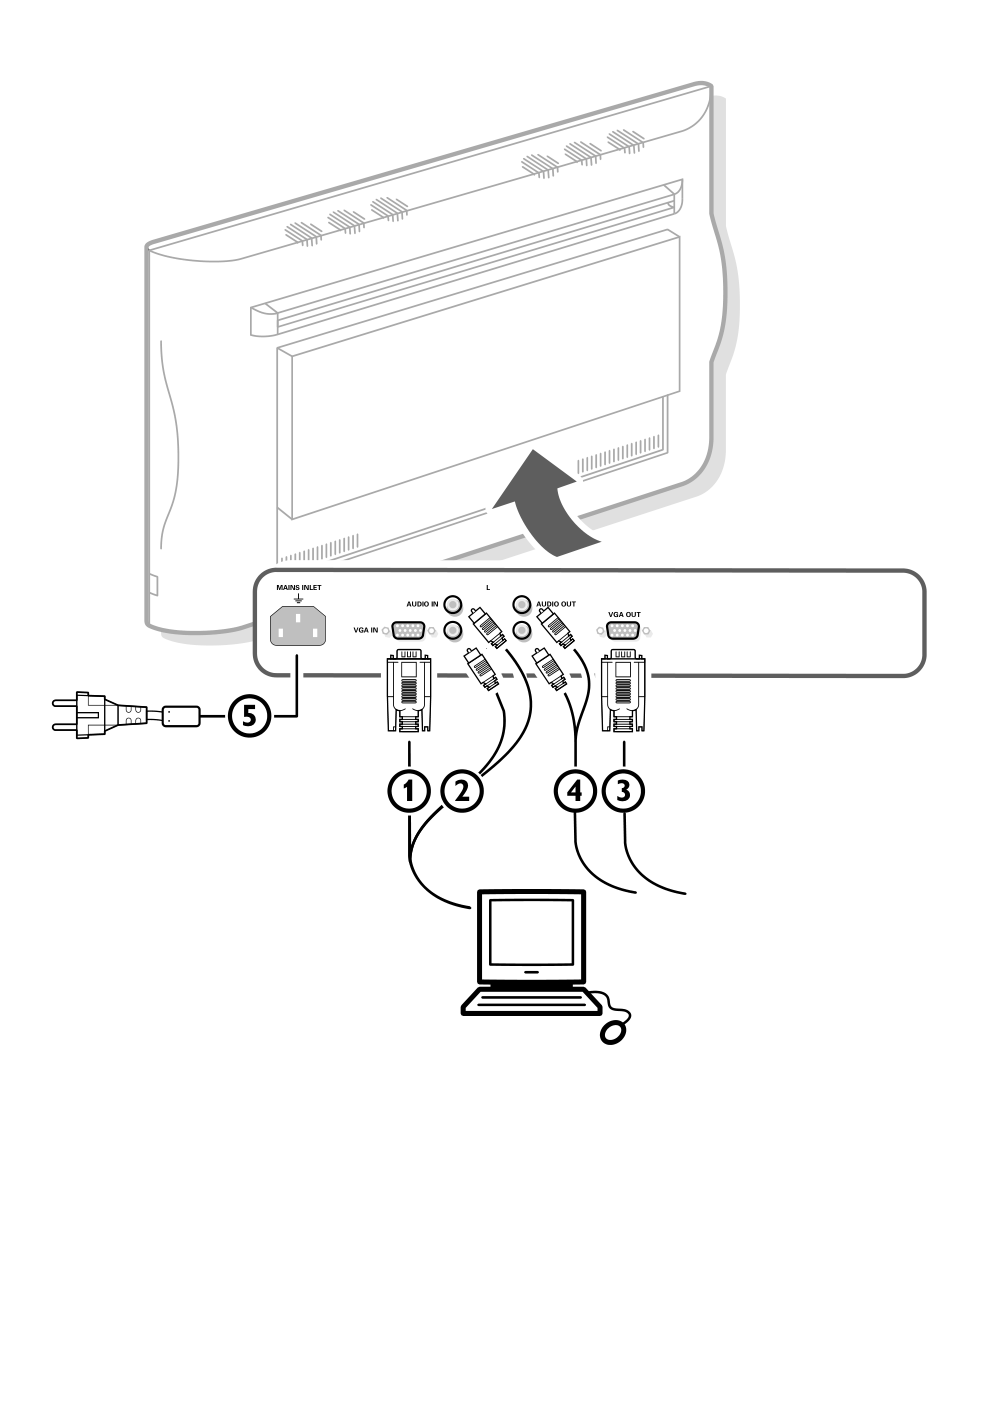
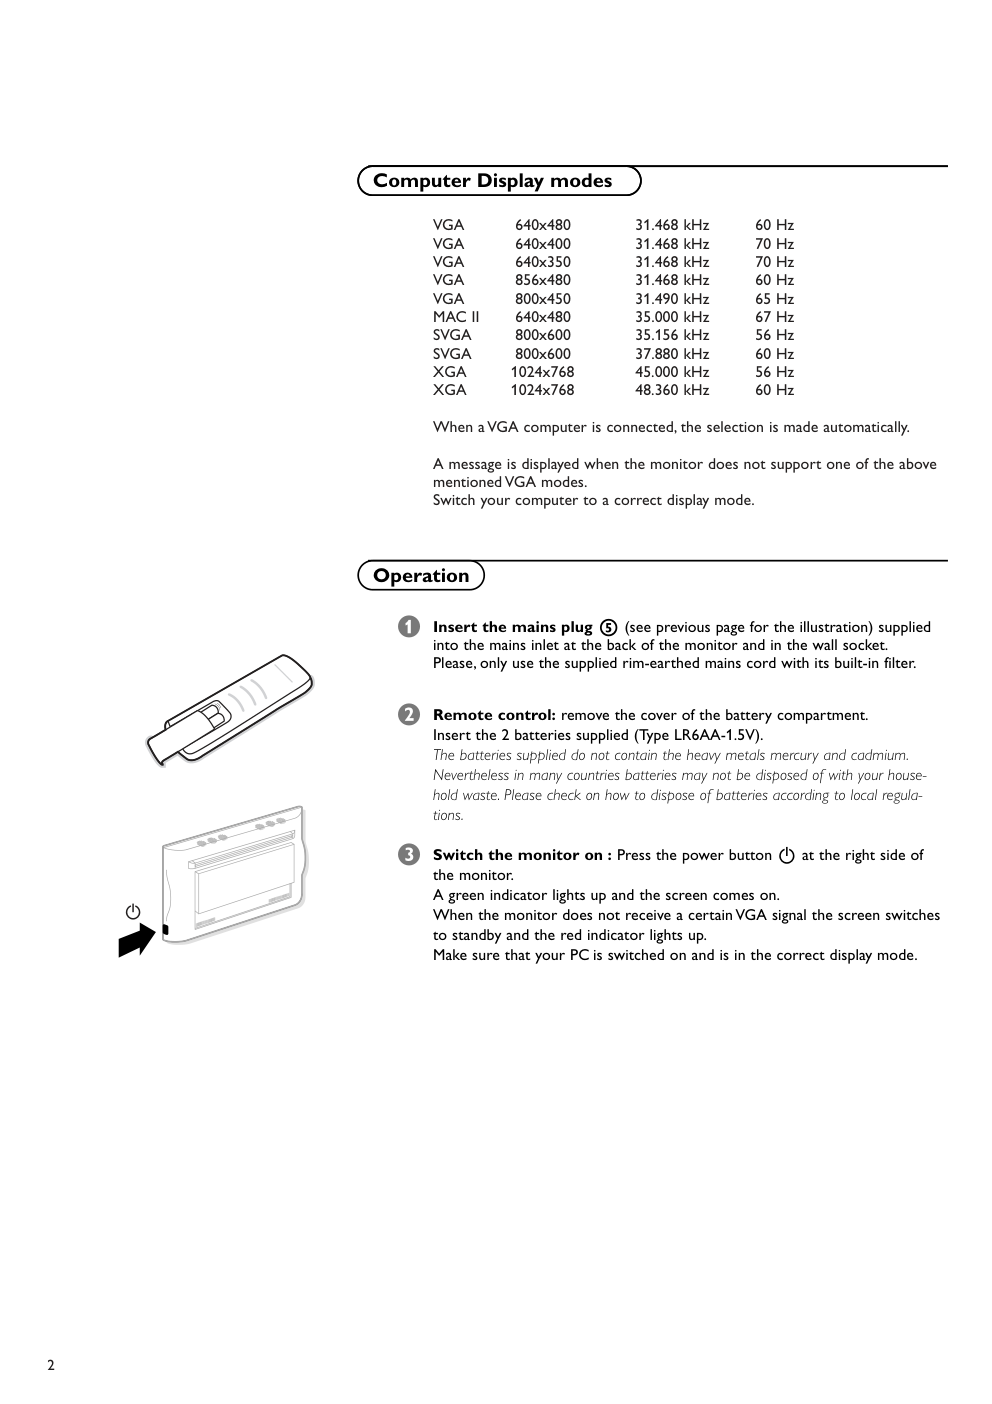
Printed on recycled paper Printed in Belgium 3104 315 2050.1 Printed on recycled paper 4 4 x 2 a b 406mm /16" 73mm /2.87" 5 5 10 x 4 x 4 a b 6 x 6 MAINS INLET VGA IN AUDIO IN L R VGA OUT 5 1 3 2 4 2 AUDIO OUT 1 English Unpacking and wall mounting instructions For the unpacking instructions follow the illustrated steps printed on the packaging (outside and inside). For the wall mounting instructions follow the illustrated steps ‘ to § printed on the first pages of this instruction booklet. Make sure that the wall mount is being fixed securely enough so that it meets safety standards.The weight of the monitor (excl. packaging) is about 43 kg. Connect your computer & Connect one end of the VGA cable 1 supplied to the video card of the computer and the other end to the VGA IN connector at the rear side of the monitor. Fix the connectors firmly with the screws on the plug. é In case of a Multimedia computer, connect the audio cable 2 to the audio outputs of your Multimedia computer and to the AUDIO IN R (right) and L (left) inputs of the monitor. Daisy chaining The Active Loop Through facility makes it possible to make a daisy chain with a second VGA monitor. “ Connect one end of another VGA cable 3 to the VGA OUT connector at the rear side of the monitor and the other end to the VGA IN connector of a second VGA monitor. ‘ In case of a Multimedia computer, also connect the audio cables 4 to the AUDIO L and R outputs of the monitor and to the AUDIO IN L and R inputs of the second VGA monitor. Note: only use the VGA cables supplied or use cables that are specially delivered with the monitor. Connect your Apple Macintosh* computer Attention: Macintosh computers with separate H and V synchronisation signals can be used together with a switchable adaptor. Macintosh computers with Composite Sync and Sync on Green signals may need another special adaptor or cable. Contact your dealer. Connect the switchable adaptor for Apple video connectors to one end of a VGA cable. Put the DIP switches on the adaptor in the following positions : 1 2 3 4 off off on on Connect the end of the VGA cable with the adaptor to the video card of the computer and the other end to the VGA IN connector on the back of the monitor. Screw the connectors down firmly. * Apple Macintosh is a registered trademark of Apple Computer, Inc. 15-pin D sub (2-row) 15-pin mini D sub (3-row) a 2 VGA 640x480 31.468 kHz 60 Hz VGA 640x400 31.468 kHz 70 Hz VGA 640x350 31.468 kHz 70 Hz VGA 856x480 31.468 kHz 60 Hz VGA 800x450 31.490 kHz 65 Hz MAC II 640x480 35.000 kHz 67 Hz SVGA 800x600 35.156 kHz 56 Hz SVGA 800x600 37.880 kHz 60 Hz XGA 1024x768 45.000 kHz 56 Hz XGA 1024x768 48.360 kHz 60 Hz When a VGA computer is connected, the selection is made automatically. A message is displayed when the monitor does not support one of the above mentioned VGA modes. Switch your computer to a correct display mode. & Insert the mains plug 5 (see previous page for the illustration) supplied into the mains inlet at the back of the monitor and in the wall socket. Please, only use the supplied rim-earthed mains cord with its built-in filter. é Remote control: remove the cover of the battery compartment. Insert the 2 batteries supplied (Type LR6AA-1.5V). The batteries supplied do not contain the heavy metals mercury and cadmium. Nevertheless in many countries batteries may not be disposed of with your house- hold waste. Please check on how to dispose of batteries according to local regula- tions. “ Switch the monitor on : Press the power button B at the right side of the monitor. A green indicator lights up and the screen comes on. When the monitor does not receive a certain VGA signal the screen switches to standby and the red indicator lights up. Make sure that your PC is switched on and is in the correct display mode. B Use of the remote control Computer Display modes Operation 3 Use of the remote control VGA OK FRONT o AV1 p MENU π AV2 œ AV3 ¬ AV4 SMART CONTROLS PICTURE SOUND - CH/P + - V + B VGA to select your computer connected to the VGA IN connector FRONT, AV1, AV2, AV3,AV4 no function - CH/P + no function V press - or + to adjust the volume B to switch to standby or on again OK to activate your choice MENU to switch the menu on/off cursor keys to select your choice and to alter a selected adjustment pπ Picture format In VGA mode, press the p or π keys to switch between a 4:3 or a 16:9 picture format. Note: In VGA display mode 850x480 you can select Wide VGA. In VGA display mode 800x450 Wide VGA is fixed. ¬ Mute key temporarily mute the sound or restore it SMART CONTROLS PICTURE/SOUND no function Use of the remote control Menu & Press the MENU key to switch the menu on. é Select one of the PC symbols with the o and œ keys: H for contrast G for brightness, for colour temperature for horizontal picture position for vertical picture position V for volume “ Press the p and π keys to alter the selected adjustment. ‘ Press the MENU key again to switch the menu off. 4 Ambient temperature Do not hang up the monitor above a cen- tral heating or other heating sources. Active Loop Through The Active Loop Through facility makes it possible to make a daisy chain for VGA. Maximum 2 sets. Care of the screen Clean the anti-reflex coated flat glass screen with a slightly damp soft cloth. Do not use abrasives solvents as it can dam- age the glass surface of the screen. Plasma Display characteristics When switching over to another picture after having displayed the same still picture for a long time (many hours), it may hap- pen that some parts from the previous picture will remain on screen due to a kind of memory effect.This ghost picture will disappear after some time.To avoid this effect change the pictures regularly or for PC use you can turn on a screen saver in your computer. Philips has built in an automatic shift of the picture every 5 minutes to avoid this effect and to prolong the life of the screen. Very incidentally and after a longer period of unuse (approx. 1 year) the screen may display some strange colour deficiencies. This is quite normal for plasma displays and these effects will disappear after the set has been turned on for some time. A plasma display consists of more than 1,2 Million colour pixels. It is within industry standards that very few pixels (< 0.001%) may be defective, even for a new set. There is however no reason to doubt about the quality of the set. The plasma display technology operates with rare gases which are being influenced by air pressure. Up to an altitude of 2000 m above sea-level, the display is function- ing fine. Operating the set at a higher alti- tude, the picture becomes unstable and the picture performance is deteriorating. Bringing the set below 2000 m it works fine again.Transportation has no influence. Control of peripheral equipment The infrared signals of the screen may influence the reception sensitivity of other peripherals. Solution: replace the batteries of the remote control or change position of other equipment. E.g. keep away a wire- less headphone from within a radius of 1.5 m. No stable or not synchronised VGA picture Check if you have selected the correct VGA mode in your PC (640x480, 640x400, 640x350, 856x480, 800x450, MAC II, SVGA, XGA). No picture or no sound Are the supplied cables connected proper- ly? (The power cable to the display, the VGA cables, the audio cables,...) Is your PC switched on? Do you see a black screen and the indica- tor in front of the monitor lights up green, this means that the display mode is not supported. Switch your VGA source to a correct mode. Remote control If your monitor no longer responds to the remote control, the batteries may be exhausted. If your problem is not solved: Switch your monitor off and then on again. Never attempt to repair a defective monitor yourself. Check with your dealer or call a TV techni- cian. Transport Keep the original packaging to transport the monitor if needed. End of life directives Philips is paying a lot of attention to pro- duce environmentally-friendly in green focal areas.Your new monitor contains materials which can be recycled and reused. At the end of its life specialised companies can dismantle the discarded monitor to concentrate the reusable materials and to minimise the amount of materials to be disposed of. Please ensure you dispose of your old monitor according to local regulations. How to dispose of batteries ? The batteries supplied do not contain the heavy metals mercury and cadmium. Nevertheless in many countries batteries may not be disposed of with your house- hold waste. Please ensure you dispose of batteries according to local regulations. Miscellaneous . Ambient temperature: + 5~ + 45°C . Maximum operating altitude: 2000 m . Mains:AC 100-240V . Power consumption: around 350W . Standby consumption: 1 W . Weight (excl. packaging) Display: 42.5 kg . Dimensions (wxhxd): Display: 122.2 x 68.1 x 14.6 cm . Wall mounting bracket included Tips 6 MAINS INLET VGA IN AUDIO IN L R VGA OUT 5 1 3 2 4 2 AUDIO OUT 1 Instructions de déballage et de montage Pour les instructions de déballage, suivez les illustrations indiquées sur l’em- ballage (extérieur et intérieur). Pour les instructions de fixation au mur, suivez les illustrations ‘ à § sur les premières pages de ce manuel d’instructions. Assurez-vous que le support de fixation murale est fixé correctement afin de satisfaire aux normes de sécurité. Le poids du moniteur (sans l’emballage) est d’environ 43 kg. Brancher votre ordinateur & Raccordez une extrémité du câble VGA 1 fourni à la carte vidéo de votre ordinateur et l’autre extrémité au connecteur VGA IN à l’arrière du moni- teur. Fixez les connecteurs à l’aide des vis prévues à cet effet sur les prises elles-mêmes. é Si vous utilisez un ordinateur multi-médias, raccordez le câble audio 2 aux sorties audio de votre ordinateur multi-médias et aux entrées AUDIO IN R (à droite) et L (à gauche) de votre moniteur. Chaîne bouclée La possibilité de bouclage actif permet de réaliser une connexion en guirlande avec un second moniteur VGA. “ Connectez l’extrémité d’un autre câble 3 VGA au connecteur VGA OUT sur le côté arrière du moniteur et l’autre extrémité au connecteur VGA IN d’un second moniteur VGA. ‘ Si vous utilisez un ordinateur multi-médias, vous devez également raccorder les câbles audio 4 sur les sorties AUDIO L et R outputs du moniteur et sur les entrées AUDIO IN L et R du second moniteur VGA. Remarque : n’utilisez que les câbles VGA fournis ou les câbles spécialement fournis avec le moniteur. Brancher votre ordinateur Apple Macintosh * Attention: les ordinateurs Macintosh avec des signaux de synchronisation H et V séparés peuvent être utilisés avec un adaptateur commutable. Il est possible qu’un autre adaptateur ou câble spécial soit requis pour des ordinateurs Macintosh avec des signaux Composite Sync et Sync on Green. Consultez votre revendeur. Raccordez l’adaptateur commutable pour connecteurs de vidéo Apple à une extrémité d’un câble VGA. Mettez les interrupteurs DIP de l’adaptateur dans les position suivantes : 1 2 3 4 off off on on Raccordez une extrémité du câble VGA avec l’adaptateur à la carte vidéo de l’ordinateur et l’autre extrémité au connecteur VGA IN à l’arrière du moni- teur. Fixez solidement les connecteurs au moyen des vis. * Apple Macintosh est une marque registrée de Apple Computer, Inc. 15-pin D sub (2-ligne) 15-pin mini D sub (3-ligne) a Français 2 VGA 640x480 31.468 kHz 60 Hz VGA 640x400 31.468 kHz 70 Hz VGA 640x350 31.468 kHz 70 Hz VGA 856x480 31.468 kHz 60 Hz VGA 800x450 31.490 kHz 65 Hz MAC II 640x480 35.000 kHz 67 Hz SVGA 800x600 35.156 kHz 56 Hz SVGA 800x600 37.880 kHz 60 Hz XGA 1024x768 45.000 kHz 56 Hz XGA 1024x768 48.360 kHz 60 Hz Lorsqu’un ordinateur VGA est branché, la sélection est faite automatique- ment. Un message s’affiche si le moniteur ne supporte pas l’un des modes VGA mentionnés ci-dessus. Sélectionnez un mode d’affichage correct dans votre ordinateur. & Insérez la fiche secteur 5 (voir page précédente pour l’illustration), four- nie avec l’appareil, dans la prise secteur à l’arrière du moniteur et dans la prise murale. N’utilisez que le câble secteur de mise à la terre fourni avec son filtre intégré. é Télécommande: Enlevez le couvercle du compartiment à piles. Mettez les deux piles fournies (Type LR6AA-1.5V). Même si les piles livrées avec la télécommande ne contiennent pas de métaux lourds tels que le mercure ou le cadmium, la législation de certains pays peut cepen- dant interdire la dépose de piles usagées dans les déchets ménagers. Informez-vous pour connaître les dispositions en vigueur dans votre pays. “ Mise en service du moniteur : Appuyez sur le bouton B situé sur le côté droit du moniteur. Un voyant vert s’allume et l’écran s’éclaire. Lorsque le moniteur ne reçoit pas un signal VGA précis, l’écran se met en position de veille et l’indicateur rouge s’allume. Assurez-vous que votre PC est allumé et qu’il est réglé sur le mode d’afficha- ge correct. B Use of the remote control Modes d’affichage d’ordinateur Utilisation 3 Use of the remote control B pour mettre le moniteur en posi- tion de veille ou de l’allumer à nouveau OK pour valider votre choix MENU activer/désactiver le menu touches pour sélectionner votre choix et pour valider le réglage pπ Format d’image En mode VGA, appuyez sur les touches p ou π pour passer d’un format d’ima- ge 4 :3 à un format d’image 16 :9. Note: En mode d’affichage VGA 850x480 vous pouvez sélectionner Wide VGA. En mode d’affichage VGA 800x450 Wide VGA est fixé. ¬ Suppression du son supprimer momentanément ou rétablir le son SMART CONTROLS PICTURE/SOUND sans fonction Utilisation de la télécommande VGA OK FRONT o AV1 p MENU π AV2 œ AV3 ¬ AV4 SMART CONTROLS PICTURE SOUND - CH/P + - V + B - CH/P + sans fonction V appuyez sur + ou - pour régler le volume VGA pour sélectionner votre ordinateur branché au connecteur VGA IN FRONT, AV1, AV2, AV3,AV4 sans fonction Menu & Appuyez sur la touche MENU pour ouvrir celui-ci. é Sélectionnez un des symboles en appuyant sur les touches o et œ: H pour le contraste, G pour la luminosité, pour la température des couleurs pour la position horizontale de l’image, pour la position verticale de l’image, V pour le volume “ Appuyez sur les touches p et π afin de modifier le réglage sélectionné. ‘ Appuyez de nouveau sur la touche MENU pour désactiver le menu. 4 Température ambiante Ne suspendez pas le moniteur au-dessus d’une source de chauffage central ou d’un autre type de chauffage. Active Loop Through La possibilité de bouclage actif permet de réaliser une connexion en guirlande pour le VGA. Nombre maximum d’appareils : 2. Entretien de l’écran Nettoyez l’écran plat en verre antireflet au moyen d’un chiffon doux légèrement humide. N’utilisez pas de solvants abrasifs, car ceux-ci peuvent abîmer la surface en verre de l’écran. Caractéristiques de Plasma Display Lorsque vous passez à une autre image après avoir affiché la même image immobi- le pendant une longue durée (plusieurs heures), il se peut que des parties de l’image précédente restent à l’écran en raison d’un certain effet de mémoire. Cette image fantôme disparaîtra après quelques instants. Pour éviter cet effet, il est conseillé de changer régulièrement le programme de télévision ou s’il s’agit d’un ordinateur personnel, vous pouvez utiliser un protec- teur d’écran sur l’ordinateur. Pour éviter cet effet et afin de prolonger la durée de fonctionnement de votre écran, Philips a incorporé un léger décala- ge automatique qui est activé toutes les 15 minutes.Très rarement et après une période prolongée d’inactivité (environ 1 an), il se peut que l’écran présente quelques défauts au niveau des couleurs. Cela est relativement normal pour des écrans à plasma et ces effets disparaîtront après que l’installation aura fonctionné pendant quelques instants. Un écran à plasma consiste en plus de 1,2 millions de pixels de couleur. Selon les standards industriels, un nombre très limi- té de pixels peut être défectueux (0,001%), même quand il s’agit d’un nouvel appareil. Il n’y a toutefois aucune raison de douter de la qualité de l’appareil. La technologie de l’écran a plasma fonc- tionne avec des gaz nobles qui sont sous l’influence de la pression barométrique. Jusqu’à une hauteur de 2000 m au-dessus du niveau de la mer, l’écran fonctionne bien. Si l’on se sert de l’appareil à une plus grande hauteur, l’image sera instable et la qualité diminuera. En redescendant au-des- sous d’une hauteur de 2000 mètres, l’ap- pareil fonctionnera de nouveau parfaite- ment. Le transport n’a aucune influence négative sur le fonctionnement de l’appa- reil. Contrôle des périphériques Les signaux infrarouges de l’écran peuvent perturber la sensibilité de réception d’autres périphériques. Que faire ? Remplacez les piles de la télécommande ou changez la position de vos autres appa- reils. Par ex. éloignez tout casque audio dans un rayon de 1,5 m. Image VGA pas stable ou pas syn- chronisée Vérifiez si vous avez sélectionné le mode VGA correct dans votre ordinateur (640x480, 640x400, 640x350, 856x480, 800x450, MAC II, SVGA, XGA). Absence d’image ou de son Les câbles fournis avec l’appareil sont-ils bien raccordés? (Le câble du courant au moniteur, les câbles VGA, les câbles audio,...) Avez-vous allumé votre ordinateur ? Vous voyez un écran noir et un indicateur vert sur la face avant de votre moniteur ? Cela veut dire que le moniteur ne suppor- te pas le mode d’affichage sélectionné. Réglez votre source VGA sur un mode correct. Télécommande Si votre moniteur ne réagit plus aux com- mendes, il est possible que les piles soient usées. Toujours pas de résultat: Mettez votre moniteur hors service. Remettez-le en service. N’essayes jamais de réparer vous- même une panne de moniteur. Consultez votre revendeur ou un technicien. Transport Conservez l’emballage original du moniteur au cas où vous devriez le transporter. Que faire lorsque votre téléviseur est usagé ? Votre nouveau téléviseur contient des par- ties et matériaux recyclables et réutili- sables. Des entreprises spécialisées démontent les téléviseurs arrivés en fin de cycle de vie pour récupérer les parties et matériaux réutilisables de manière à rédui- re au minimum les déchets. Informez-vous sur les dispositions de votre pays concer- nant les vieux téléviseurs. Que faire avec les piles usagées Même si les piles livrées avec la télécom- mande ne contiennent pas de métaux lourds tels que le mercure ou le cadmium, la législation de certains pays peut cepen- dant interdire la dépose de piles usagées dans les déchets ménagers. Informez-vous pour connaître les disposi- tions en vigueur dans votre pays. Divers . Température ambiante: + 5~ + 45°C . Altitude maximale d’utilisation de l’appareil: 2000 m . Alimentation:AC 100-240V . Consommation: environ 350W . Consommation en position de veille: 1W . Poids (sans l’emballage) Ecran: 42.5 kg . Dimensions (lxhxp): Ecran: 122.2 x 68.1 x 14.6 cm . Support de fixation murale inclus Conseils MAINS INLET VGA IN AUDIO IN L R VGA OUT 5 1 3 2 4 2 AUDIO OUT 1 �� �� !"#$%!&'() �� !�� !�� !"#$%& �� !"#$%&'()*+( ‘ � § �� �� !"#$% &'()�� !"#�� ! "#$%� �� 43 �� �� !"# &�� VGA �� 1 �� !"#$�%&'()�� !"# �� !" VGA IN �� !�� !"#$%&'(()*+ é�� !"#$�� !" 2 �� !"#$%&!'()*+ �� !"#$ AUDIO IN R�� !"� L�� !"# �� !" �� !"#$%&'()*+ VGA �� !"#$%&'() “� VGA �� 3 �� !"#$%&'� VGA OUT �� �� �� !" VGA �� ! VGA IN �� ! ‘�� !"#$�� !"#$ 4 �� !"# AUDIO L � R �� !"# VGA �� ! AUDIO IN L � R �� ���� !"#$%& VGA �� !"#$%&'()��* �� ! Apple Macintosh* �� �� �� !" H � V �� !" Macintosh �� !"#$ �� !"#$%&�� !"#$%&'("#$%) Macintosh�� !"#$%&'(�� !"�� !"#$� �� !"#$% �� Apple �� !"#$%&'()*+ , VGA �� ! �� �� !"# DIP �� !"#$ 1 2 3 4 offE�F offE�F onE�F onE�F �� !"#$VGA �� !"�#$%&'()*�� !" �� !" VGA IN �� �! �� !"#$% 15J � D �� 15 �� D �� �2 �� �3 �� * Apple Macintosh � Apple Computer,Inc. �� !"# a 2 VGA 640 ×480 31.468 �� 60 �� VGA 640 × 400 31.468 �� 70 �� VGA 640 × 350 31.468 �� 70 �� VGA 865 × 480 31.468 �� 60 �� VGA 800 × 450 31.490 �� 65 �� MAC II 640 × 480 35.000 �� 67 �� SVGA 800 × 600 35.156 �� 56 �� SVGA 800 × 600 37.880 �� 60 �� XGA 1024 × 768 45.000 �� 56 �� XGA 1024 × 768 48.360 �� 60 �� �� VGA �� !�� !"#$% �� !"#$% VGA �� !"#$%&'( �� !"#$%&'()*+ &�� !"#$% 5�� !"#$�� !"#$%&'() �� !"#$%&�� !"#$%&'()*+,-./01 �� é�� !�� !"#$�� !"2�� �� LR6AA-1.5�� �� !"#$%&'()*+�� !"#$%�� !"#$ �� !"#$%&'()*+!,�� !"#$%&'()* �� !"# “�� !"#�� !"#$%& 2� �� !"#$%�� !" �� !"#$%&' VGA �� !�� !"#$%&'�� �� !"#$%&' �� !"#$%&'(�)*+,-. �� !"# �� 3 �� !"# VGA OK FRONT o AV1 p MENU π� AV2 œ� AV3 ¬� AV4 SMART CONTROLS PICTURE SOUND - CH/P + - V + B VGA �� !"# VGA IN �� �� �!" �� FRONT AV1�AV2�AV3�AV4 - CH/P + �� ! A�� - �� + �� !" 2 �� !"#$% !"#&'( �� OK �� !"# MENU �� !" VGA �� !"#$ �� !"#$% ÑÉ �� ! VGA �� !� Ñ � É �� 4:3 � 16:9 �� !"#$% �� � VGA 850X480 �� !"#�� �� ! VGA� � VGA 800x450 �� !"#�� VGA �� !" H�MUTE KEY �� !"#$%!& SMART CONTROLS PICTURE/SOUND �� ! �� ! �� &� MENU �� !"# é�� V � W �� !"#$%&' H �� G �� �� Œ �� !"# œ �� !"# A �� “� Ñ � É �� !"#$%&' ‘�� MENU �� !"# 4 �� �� ! �� !"#$%&'()*+,-. �� !" �� !"# �� !"#$%&'()* VGA � �� !"#$%�� !"#$%& �� !" �� !"#$%&'()*+,-. �� !"#$%&'�� !"#$ �� !"#$ �� !"#$% �� !�� !"#�� !"#$ �� !"#$%&'��()*+, �� ! "#$%&'()*+,- �� !"#$�� !"#$%&' �� !"�� !"#$%&'() �� !"#$%�� !"#$%& �� !"# �� �� !"#$%&5�� ! �� !"#$%&'()*+,-. �� !" �� !"#$%�� 1 ���� ���� !"#$�� !"#$% �� !"#$�� !"#$%&' �� !"#�� !"#$%&' ���� !"#$%&'()* 120 �� �� !"#$%&'()*+ ��<0.001%��� !"�� !" �� !"�� !"#$%&'() �� !"#$%&'()*+!, ���� !"#$%&'(�� ! 2000�� �� !"#$�� !" �� !"#$�� !"#$�� ���� !"2000�� !"#$% �� �� !" �� !"#$%&'()*+", �� !"#�� !"�� !"# �� !"#$%&'()*�� � �� !"#$%&'( 1.5 �� ! �� �� !�"#$ VGA �� �� !"�� !"#$%&'() � VGA ���640×480�640×400� 640×350�856×480�800×450� MAC II�SVGA�XGA�� �� !"#��$% �� !"#$%&'(�� !"# �� VGA �� �� !"" KKK� �� !"#$ �� !"#$%&'()*+&,! �� �� !"#�$%& � VGA �� !"#$%&' �� �� !"#$%&'�� !"#$ �� �� !"#$%& �� !"#$%& �� !"#$%&'()* �� !"#$%&'()*+,- �� �� !"#$�� !"#$%& �� �� !"#$%&' �� !"#$%&'()*+,-. �� !�� !"#$%&'()* �� !"#$%& �� !"#$%&'(�� !"# �� !"#$%&'(�� !"# �� !"�� !"#$%&'( �� !"#$%&'()*+,- �� !"#$ �� !"#$%&'()*+�� �� !"�� !"#$%&' ( �� !"#$%&'(�� !"# �� !"#$%&'()* �� !" J �� !"+5 ~ +45°C J �� !�"#2000 � J �� !�� 100-240 � J �� !�� 350 � J �� !"1 � J ���� ! "# �� !42.5 �� J ���� × �� × �� ! �� !122.2 × 68.1 × 14.6 �� J �� !"#$
版权声明
1. 本站所有素材,仅限学习交流,仅展示部分内容,如需查看完整内容,请下载原文件。
2. 会员在本站下载的所有素材,只拥有使用权,著作权归原作者所有。
3. 所有素材,未经合法授权,请勿用于商业用途,会员不得以任何形式发布、传播、复制、转售该素材,否则一律封号处理。
4. 如果素材损害你的权益请联系客服QQ:77594475 处理。